Continue to Site

Welcome to EDAboard.com

Welcome to our site! EDAboard.com is an international Electronics Discussion Forum focused on EDA software, circuits, schematics, books, theory, papers, asic, pld, 8051, DSP, Network, RF, Analog Design, PCB, Service Manuals... and a whole lot more! To participate you need to register. Registration is free. Click here to register now.

Seeking advice regarding structure of a DC-DC/PWM reg. for personal vaporizer.

Status
Not open for further replies.
But I thought that 80W is 80W no matter if it is produced with 1V*80A or 10V*8A?

Sounds like a problem in impedance matching, although even if it is not, indirectly it can lead to progress. Therefore say we want 80W going through a load of 0.2 ohm. It calculates as a 4V battery pushing 20A. (W = V^2 / R )
As a matter of fact we can expect there to be greater resistance than just the load. I suggest we add a 'guesstimate' of 0.2, for a total of 0.4 ohm. Now it calculates as a 5.6V battery pushing 20A. (W = V^2 / R).

This suggests you ought to use 2 batteries in series. Do they occupy the same space as 1 battery plus a boost converter? Probably.

Suppose you do some tests, by sending ordinary PWM through 2 batteries? This should be easy to control. Heat up the coil quickly with 100 percent duty cycle for a few seconds. Then reduce the duty cycle. See what temperature the coil is at. Such experiments will tell you a lot about the feasibility of your plan.
 
  • Like
Reactions: David_

    David_

    Points: 2
    Helpful Answer Positive Rating
Ok, I am trying to set up a test circuit but I am having some difficulties in selecting a MOSFET driver.

Unless I am making a mistake then MOSFETs for this sort of application(very low RDSON and very low gate-source threshold voltage) is plentiful, I have quickly looked up one which I think is a good match and it isn't too expensive, this one.

But as for the driver, as I was hoping to use two n-channel MOSFETs I need some form of a high-side driver. But I can't find one that will operate with a 3V supply(I think it is necessary to count on the minimum voltage being 3V), perhaps it would make things easier if I chose to go for a p-channel/n-channel MOSFET solution instead then maybe I could solve the driver circuit by using BJTs.

Does anyone have a gate driver suggestion, ether a IC or a circuit?

Hi,

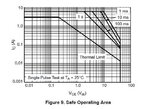
Just an option to consider: Low Vce BJTs. I'm finding them a real help when I don't have suitable MOSFETs, best logic level I have are VGSth 1 - 3V, whereas the low Vce BJTs are the predictable ~0.7V/~-0.7V Vbe. I only know OnSemi's NSS40301 (NPN) and NSS40300 (PNP), respectively equivalent RDSon of 44 and 80 milliohms. OnSemi have a tutorial/promo video explaining how they can be used instead of MOSFET devices, and sometimes even save power. Attached are snippets from the NPN datasheet in case you're interested

NSS40301 datasheet snippet 2 SOA.JPGNSS40301 datasheet snippet.JPG

I heard today that a report has been released about e-cigarettes saying bla, bla, bla and that butterscotch and menthol flavours are pretty bad for your health due to the chemical make-up, I smoke tobacco so I'm not criticising your habit, by the way, just thought I'd mention it.
 
  • Like
Reactions: David_

    David_

    Points: 2
    Helpful Answer Positive Rating
Does anyone have a gate driver suggestion, ether a IC or a circuit?

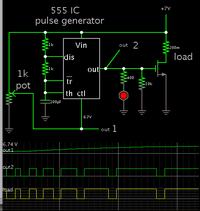
Here is a simple method to change duty cycle to the load. A 555 timer IC shortens or lengthens its off time as determined by voltage applied to pin 5.
I've done this with real 555 IC's and it works reasonably well. Duty cycle and frequency are both affected.


The led provides a visual cue that the circuit is working.

If your mosfet does not turn on sufficiently, then try a transistor, or two in parallel, or maybe darlington type.
 
  • Like
Reactions: David_

    David_

    Points: 2
    Helpful Answer Positive Rating
Hi,

If Brad's solution with the 555 is viable for you, the CMOS LMC555 works from 1.5V to max. 15V, and can source/sink 50mA/-10mA (but says 100mA in max. ratings).
 

I don't know if I missed the point of the answer(s) or if I asked the question in a way not intended.

But to be sure everyone is on the same page:

I am planning two revisions of this device, one minimalist revision in which the heating element is tailored to <0,12Ω, and a buck style converter built with the minimum components possible to save space and complexity. The MOSFET is in both this and the next revision controlled by a microcontroller which is responsible for generating the switching signal as well as the user interface(a small OLED or LCD or some kind of display with some buttons to control the device and one dedicated "fire" button to activate the atomizer.

Then the second revision(which is the one I am working on because I can't construct a heating coil build to reach <0,12Ω, not until I receive SS316L wire that is thicker than anything I can find in Sweden, so it will be a couple of weeks minimum until I get the wire and can find out if I can make such a coil build that I like) is built with two batteries as opposed to the first revision which only has a single 3,7V(3-32V(fully discharged) to 4,2V(fully charged)) but more importantly I will create a more elaborate circuit. I have a two-switch Buck-Boost converter in mind, here is a picture of a LTspice simulation which I am currently building and I will use models for the MOSFETs that I will buy and I will(I have already done it once but will certainly do it more times) calculate the value for the inductor and output capacitor(s) so that the LTspice simulation is as close to the real circuit as possible:

buck-boost.png

I have hidden some component names because the bother me, but this isn't working as thought, the output voltage doesn't change no matter how I adjusts the duty cycle of ether MOSFET.

What I tried to ask before was how to design the circuit going between the mcu I/O pin and the MOSFET gates if I would have a converter like the picture above, I thought that the MOSFETs gate charge(Qg) parameter was what determined how much current a gate drive circuit needs t be able to source/sink, Qg as well as knowledge about over what kind of time span it needs to be charged/discharged but while looking for MOSFETs with gate-source threshold voltage(Vgs-th) <= 3V and RDSON below 10mΩ and as low a Qg as I can find, it started to look weird that the gate charge would determine the driver current requirement(I thought it is weird due to the varying values of Qg between different MOSFETs) but I don't know.

- - - Updated - - -
(The rest of this post does not concern electronics but rather the possibly harmful substances in e-cigarettes and ordinary tobacco cigarettes)

About that thing about harmful substances in so called e-liquids or e-juices, it isn't any good case made for that.
The harmful stuff is more specifically diketones,the first such substance being used was diacetyl.
But then there where an occurrence of factory workers in Mexico that worked at a factory producing popcorn and after having inhaled vast amounts of diacetyl they developed lung disease of some kind. That is the only evidence that I know of, but that have been enough for producers of e-liquids to work to eliminate diacetyl from there products(diketones are often used within food manufacturing to give buttery or creamy flavors and those substances is not harmful to digest, ordinary butter contains lots of them) but inhaling them is another matter and although the levels of those substances in e-liquids are nothing compared to the amounts those Mexican workers inhaled it has still caused all manufacturers of e-liquids to substitute diacetyl for other rather similar substances like acetoin and acetyl propionyl, which can in some situations change form into small amounts of diatecyl but are apart from that not as possibly dangerous as diacetyl.

A side note, cigarettes made out of tobacco contains huge amounts of these same substances(compared to e-liquids), so the bad news for vapers is still worse news to smokers I'm afraid.

I have talked online to some people whom have high degrees in chemistry and have an understanding about these things that I completely lack, but they have told me that it isn't the fact that one is inhaling these things one needs to worry about but the concentration of these substances, low enough concentration is nothing to worry about apparently.

But in general I don't bother to think about this stuff, I did but came to the conclusion that it isn't worth thinking about, even though it doesn't govern my choices of flavor additives I am aware of which of my flavors concentrates contains any of this stuff and which does not, many many flavors doesn't contain these harmful substances at all while others contain anything from 0,01% up to a few %. I personally like flavor concentrates from Flavour Art since they don't use these substances at all.
I mix all my liquids at home so I have a pretty good idea of how much of these substances I have in my liquids and it isn't at such levels as to cause me any concern.

Thanks for writing about it though:)
 
  • Like
Reactions: d123

    d123

    Points: 2
    Helpful Answer Positive Rating
Hi David,

I couldn't troubleshoot your Qg problem, as from what you say I understand about as much, I can post a couple of pfds that explain how to calculate it if you want, but it sounds like you have that part clear.

I noticed in your schematic that you too have discovered the joys of trying to get a ramp generator to work :). It took me over a week of reading, trying different circuits, including the one with two op amps, and in the end I put this together (the attached image) and I can guarantee you that it works in the real world for a 0 - ~3V sawtooth at ~90kHz, and is reasonably adjustable, the 14K, 228R and 530pF in principle are what should be adjusted, but after a lot of playing around and trying to do some calculations I felt that the MOSFET capacitances were also influencing the frequency (that's a point for the experts to possibly and rightly dismiss my amateur ignorance with knowledgeable facts); also, attached are a couple of pdfs of different sawtooth generators that also work, these don't swing down to ground which I believe is not a requirement for SMPS anyway.

sawtooth schematic.JPG

Once I realised several of the ramp generators I was seeing used a current source charging a capacitor I was able to find a way to make my own (my own shoddy version). As you can see, the ramp generator is the classic three inverters, a complementary pair buffer, and a current source charging the ramp capacitor in a linear manner with the output BJT which drains the capacitor immediately.

In the pdf Triangle-Sawtooth generators there's a pretty good one that let's you change the direction of the slope, without wishing to dismiss a few other good ones that are easy to get functional.

I have found that not all things like ramp generators work in simulations but do work on a board/circuit, some things are worth breadboarding when there are doubts as you can dismiss a functional circuit based on the occasional times when you get erroneous simulation results.

Thanks for explaining about the additives, very interesting.
 

Attachments

  • Application Note - Kenneth Young.pdf
    916.3 KB · Views: 139
  • Simple sawtooth generator operates at high frequency.pdf
    211.2 KB · Views: 156
  • Triangle-Sawtooth Generators.pdf
    2.5 MB · Views: 196
Last edited:
  • Like
Reactions: David_

    David_

    Points: 2
    Helpful Answer Positive Rating
I will take a look at those ramp generators, though I would very much like to see the pdfs about calculating the current required by the gate charge.
It would save me a lengthy google session:)

- - - Updated - - -

I would appear as the lack of low-voltage gate drivers was simply a matter of search terms, I did a search this time for low-voltage mosfet driver circuit and now I find that LT does sell at least a few 1,8V - 6V MOSFET gate driver ICs. Couldn't find any at all after a couple of hours search yesterday.
 

Hi,

Have you seen SunnySkyGuy's link to "let me Google that for you?" in a thread from a couple of month's ago, it auto-completes the OPs question in the Google page search field :-D

Here you are, my pleasure, hope they are of some use. Specifically, "DRIVING THE MOSFET QG and IG Microchip 00786a," "Low Saturation Transistor for Gate Drive Application AND9285-D," and "Bipolar transistors for MOSFET gate driving applications dn80" cover gate charge calculations. "Design And Application Guide For High Speed MOSFET Gate Drive Circuits 1463434250304" and "05 Gate and Base Drive Circuits and Protection" are a good read, 'though the others are equally informative and useful too.

"I would appear as the lack of low-voltage gate drivers was simply a matter of search terms, I did a search this time for low-voltage mosfet driver circuit and now I find that LT does sell at least a few 1,8V - 6V MOSFET gate driver ICs. Couldn't find any at all after a couple of hours search yesterday."

- I'm glad you've found some suitable gate drivers!
 

Attachments

  • Gate drive.rar
    9.9 MB · Views: 114
  • Like
Reactions: David_

    David_

    Points: 2
    Helpful Answer Positive Rating
Thank you, I haven't read more than 2 or 3 so far but they have been great.

I have decided to go for a two 18650 battery design first and then design a single battery version after that if I feel that I want it.
That decision if much due to the fact that it feels simpler to do it that way(the actual implementation is perhaps not simpler but in my thoughts it feels simpler and I feel more confident about it).

I wrote a peace of text talking about voltages of two series batteries but I deleted that and wrote this instead because I realized(I hope it's true anyways) that two batteries would serve me better in parallel, as I am using heating elements <0,5Ω and when I use 0,5Ω I never use more than 26W so I wouldn't need to boost any voltage and can go for a more simple buck converter.

I have some questions regarding the feedback-loop(s) and choices of current-/voltage-mode but first I want to ask about the lowest voltage a converter can produce.

Because when you look at integrated DC-DC converters there output ranges rarely if ever goes down to the voltages I would like to be able to output, and if I would go for the parallel 3,7V(I think they are 2100mAh but I know that they are rated for 25A) batteries I would want to be able to at least be capable of utilizing the full output current, which i think for safety I would put below 50A.
I find my self a little confused after having played around with a lot of numbers and I am not sure if I would ever need a output voltage below 1V, but I really want to know in ether case whether or not it is possible and if so how would I go about designing a buck-regulator that can regulate a voltage between 4,2V(D=1 or 100%) and 0,5V(D=0,095 or 9,5% I think)?

Is the only problem the generation of the duty cycle or is there a problem with the reference voltage as well...

That brings me into what I wanted begin to ask about the control loop, whether I choose current- or voltage-mode(if I have understood correctly I would probably go for current-mode even if voltage mode seems simpler and suitable as I already need to measure the input voltage), who much or how little of the loop can I keep analog while generating the switching signal with a microcontroller?

On one hand I think it would be possible to read the voltage of the output voltage divider directly with the mcu's ADC and process that information while on the other hand I think that the more analog control loop functions I can implement the better. Since from what I think I have learned from you people here at edaboard it doesn't matter how high a frequency I would use to drive the main clock of the mcu or how efficient I would design the software, it will never ever be able to act and react in the same time period as an analog circuit would, right?

- - - Updated - - -

Oh and the frequency would be no higher than 100kHz(probably between 20 and 30kHz in this case but lets say 100kHz because I want to know if it would be possible, and would love to find out how one finds that out), which I sort of already know I guess, since from what I have read here at edaboard in other peoples threads and discussions(I am assuming some stuff that weren't explicitly written) it comes down to if the time frame of 9,5% duty cycle is realistic which depends upon what switching frequency is used. Assuming that the voltage reference isn't going to be a problem.

So then it is simply a question of what is the fastest realistic switching speed I can produce with the mcu running at 32mHz.
 

Hi,

Klaus and Schmitt Trigger are good with SMPS, along with several other members, such FVM as well.

"Is the only problem the generation of the duty cycle or is there a problem with the reference voltage as well..." - You can put a resistor voltage divider on the output of a voltage reference to get the required Vref (assuming your control circuitry works on well over 1V), or use an op amp to divide down the bandgap reference, depending on how hot the enclosure will get may want to look at low ppm/ºC resistors.

"So then it is simply a question of what is the fastest realistic switching speed I can produce with the mcu running at 32mHz." - how fast are your transistors and op amps? How long do the transistors take to turn off?

r.e. such a wide duty cycle, might be good to read about CCM and DCM, in case you haven't already, as I think the compensation required changes enormously between both modes of conduction, and I seem to remember it's a good idea to set a minimum load, like a voltage regulator in a way.
 
  • Like
Reactions: David_

    David_

    Points: 2
    Helpful Answer Positive Rating
Hmm... I feel very confused right now, I fear that I am making mistakes due to thinking about this from a theoretical point of view while at the same time trying to look at the start of a real design.

If I may ask from those whom has followed this thread, what should I be doing next?

To set up a test circuit seems like the next step but in doing so should I simply test out a version of a simplistic buck converter or should I test the hole thing implementing a current measurement system and voltage measurements system as those that I in the end want, the alternative would to set up simpler I and V measurements simply to get the buck converter going.

It may be the multitude of subjects that I have been and are reading about but if someone could tell me what they think I should be doing I would really appreciate it because I don't know at this point and it would be great if i could avoid spending a lot of time doing things I shouldn't be doing at this point.

Because today I have been thinking about how to accomplish to implement a measurements system measuring I and V with true 14-bit resolution, I am reasoning that if I aim for true 14-bit resolution then maybe it wouldn't matter that much I fail and not reaching 14-bit, but seeing as I am valuing the temperature control so much 14-bit sounds as a good idea, or do you think I am wrong?
That last question was regarding a system where the voltage varies between 1V and 4,2V and the current being as high as 40A(theoretically it also goes down to close to 0A but on one hand I don't think that the current used by my coil builds will ever be below something like 10A but on the other hand if I want to implement a good temperature control system then maybe the current would need to be controlled at lower levels than that), please note that if this last peace of text is regarding stuff that I shouldn't be concerned about right now then you can disregard this question.

Also I will be reading more about CCM and DCM because although I know very well what it is I have no real understanding of the consequence of the different modes.
And regarding how to get a low reference voltage, it sounds as I should use one of those integrated resistor IC that are closely matched and are available at different ratios alternatively implement a switched capacitor instrumentation block(LTC1043) as a divide by 2, 3 or 4. Or perhaps it isn't necessary to do anything more than a voltage divider with 0,1% resistors. I guess I feared that there may be some other problem apart from simply deriving the voltage.
 

If I may ask from those whom has followed this thread, what should I be doing next?

To make progress in a practical manner, I would tap wires together repeatedly to send power through your coil. Two seconds on, one second off. This imitates the electronic action in your project. (I'm recommending this because I don't recall that you said you've tried it already.) Find out the effect of various duty cycles. Hold the coil between your fingers to find out what duty cycle makes it too hot to hold. Find out what battery configuration you need to make the coil hot enough. Etc.

As you do this, watch how many Amperes the coil admits. Do you have an ammeter that reads tens of Amps? (My inexpensive DMM's cannot read more than 10A.) If not then you need to make one. Maybe a dashboard instrument, or compass needle deflection, or heavy duty shunt, etc.

You hope to be able to detect coil resistance, because if the coil gets hot enough then its resistance can rise, which inhibits Ampere level. This should give you clues about how to measure temperature.

To measure the coil's temperature is a challenge. It probably will not work to mount a sensor 1/8 inch away. Perhaps a thermocouple in direct contact? Perhaps if you spot-weld one leg of a diode (led) to the coil leads. (I say spot-weld because solder is liable to melt eventually.) A diode's V/I response changes with temperature. You must contrive a circuit which detects this small change.

I find that such experiments are fascinating in themselves. You gain knowledge at the basic level about the components, and the electrical forces, that you're working with. Hours go by quickly. Every so often I think about the famous pioneers of electricity who almost certainly performed similar experiments, and learned so much, with mere unsophisticated technology.
 
  • Like
Reactions: David_

    David_

    Points: 2
    Helpful Answer Positive Rating
Hi David,

I'd say, once you have something clear, put a sample version together, personal experience is that sometimes too much theory can turn a circuit into a labyrinth where you forget what on earth you had originally planned to make, or make a complex circuit so decorated with "that would be a nice feature" add-ons that it can be hard to find where to start or look so overwhelming that one has doubts as to whether to proceed or not. Multimeter and oscilloscope can shed a lot of light on where planning may need to be re-thought or bring pleasant surprises.

Maybe the wrong approach (that'll be why my circuits are so bad :) ) -

· First could be a block diagram of the whole design and how you need/want the building blocks to fit together.
· Design each block separately as a basic schematic, bearing in mind inputs and outputs from blocks and their eventual relation to each other, 'though.
· Do the calculations or estimated calculations to check the parts are suitable and the whole circuit adds up/looks like it should work.
· Simulate the blocks you can, and/or breadboard them - except SMPS as I have been told here - and then make test version(s). Annoying case is not being able to simulate or test with intended components so having to prototype a similar version and extrapolating hoped for results from there, comparing calculations to what surrogate version produces.

I'd ask myself: Which part is the core of this circuit? Can I make that first, or do I need to make another/other building block(s) to implement the core circuit? Is there any protection circuitry that it's vital it be in place before the core circuit is functional?

I personally do not recommend putting the whole thing together first attempt, as if there are any issues it's much harder to find the cause(s) of the problem(s), whereas building blocks you are already familiar with and have prodded and perfected, when joined together will be much easier to troubleshoot as you know what they should be doing.

Brad offers good advice. Maybe if you can't measure 50A with what you have, measuring the voltage across a shunt would suffice (although 0R01 * 50A = 0.5V = 25W across the shunt... maybe not practical unless the shunt is divided into 2 0R005, and even then..., and not the worth so much effort unless you really need to find out).

I'd get the circuit parts working, and try to be familiar with what's happening, and when, in those circuits, then get them working correctly together, then worry about measurement systems, ...unless you can get the measurement system going first and use it. If the temperature part is vital, then that would be one place to start. You can glue/thermally bond an IC sensor to the critical part of the PCB, or use a diode-connected transistor and a resistor or two + op amp to sense the change in Vbe as that is predictable, linear, but seems hard to implement in reality...


An afterthought... Not if I were you, rather If you were me... I would have some serious reservations about making any device that passes 40A, worse putting it anywhere near my mouth, especially if I'd never made that type of device before, and could I afford the time and cost, I would first make a much, much lower current version, or copy a reference design for a much lower current version to get to understand what to expect from such a circuit. I would want to have everything about how such a circuit worked truly clear in my mind and fully understood, and know what things to look out for at first power-up. To blow a 100mA fuse on a breadboard is in no way like a 40A device.
 
Last edited:
  • Like
Reactions: David_

    David_

    Points: 2
    Helpful Answer Positive Rating
Thank you, it will take a few hours before I have absorbed what i just read and I will probably read it a couple of times more.

But just off the top of my head.
I know that I have at least two bought but never used moving-coil panel meters(actually one volt-meter and one amp-meter) as well as a few scavenged ones. So at least one of them aught to be suitable to be re-fitted with appropriate components to result in an amp-meter that can measure 40A.

And as to the safety concerns, those are valid but I might add that passing 40A is the planned extreme scenario of what the device should be able to pass(though it have started to look like that value will have to come down somewhat in order to discharge the batteries under whats considered safe conditions), but initially I would be using it the same way I am using the device I have today which cannot pass more than 25A and when it is activated it does output about 15A with my current heating elements.

So to begin with I thought that I would simply choose components that I know can handle 40A and design the DC-DC converter to be able to function with such a high current but it would be a while, and after assured correct functioning that I would ever approach 40A while actually using the device, though I would draw such high currents in the testing phase to ensure it's safe.
I am not even 100% sure I would ever want to go that high but it depends on how my vaping habits evolve and what kind of coils I develop, the point of the high current capabilities is to be able to build with lower resistance coils. Because it comes to a point where I can't build certain coils because my device can't use them due to a 25A limit.

But then it is also relevant that I would never use my designed device before it has been thoroughly tested and I feel that I have a good grasp of what is happening and that I have included all the safety circuits and functions needed. One tricky aspect of it all pertaining to the in system measurements is that the temperature will vary quite a bit, I haven't measured my currently used device and i can't really estimate the temperature but when I star using it after it has stood unused a while it is of course at room temperature but after a while the batteries + the MOSFET(s) have raised the temperature inside the device so much that I can feel it in my hand without a doubt.

I want to ask about what Brad wrote about measuring the coils temperature, I have planned to implement a thermocouple probe system that should be used to calibrate the otherwise used measurement system, but all the commercial devices that I am using as references are all estimating the coils temperature by measuring it's resistance.
Such devices can't be used with Kanthal coils(while operating in temperature control mode hence forth TC) for example since kanthal does not change enough in regards to it's resistance to be able to be used to implement a TC system, to use TC one must use Nickel, Titanium or SS316/SS316L(at least those are the ones that my device that I use today can control in TC). Out of which I only want to use SS316/SS316L in my design, so unless I can implement a system to measure the coils resistance remotely... I will after posting this post take some pictures because although I have made plans for a thermocouple probe system used for calibration of the TC algorithm the mechanical structure of this sort of device(s)(since the atomizer and the personal vaporizer is two separate devices) doesn't allow for anything other than the resistance based estimation of temperature while it is in use as it is normally used.
Inserting a thermocouple probe once to perform a few minutes worth of calibration measurements isn't a problem but while using the device it is not possible, not without altering the atomizer so much as to degrade it's performance.
 

I have begun to seriously question a vital part of my system, my laptop is going through a increadably long update so I can't link to it but I read an article on powerguru.org called something like "digital SMPS introduction for analog engineers" and it was written by someone from Microchip.

In it he described in a very easily read way what is needed for the digital control loop of a DC-DC converter and at the same time promoting microchips dsPIC family, and if what that article says was telling the truth then the Atmel XMEGA MCU that I was planning to use is quite unuitable for controlling a DC-DC converter. It had to do with things like the ability to update the PWM duty cycle in a very short time and not having to wait until the next period before it is changed and it had to do with PWM resolution which is in the best dsPICs 1nS. And it had to do with the ability to make the ADC sample at very crusial points in the inductors current waveform.
There where other things as well and I didn't like it because it sort of convinced me that I have to under take to get a new programmer, set it all up and then learn programming PICS...
Although now that I have learned to program XMEGA it shouldn't be such a big task to learn to program a second mcu.

But I have only that article to judge this with because I don't know, of course it must be possible to use a XMEGA but that article pointed out a lot that makes the dsPIC so very much more suitable.

I will post a link to it as soon as my laptop is up running if anyone wants to read it.

But does anyone have any insight into this sort of thing?
 

Hi,

Is it the attached pdf - "Introduction to SMPS Control Techniques" Microchip (en527885)? Discussion of delay around the loop and subsequent controller requirements pages 18 - 26.

I really don't know the answer, David, but would add: "Between you and me, our ice-cream is far creamier and tastier than our competitors', so buy ours."
 

Attachments

  • Introduction to SMPS Control Techniques Microchip en527885.pdf
    107.9 KB · Views: 136

The coil resistance, the total wire length and the winding style will determine the amount of energy (power) input needed to attain a given temperature. Plus you will need to decide how much of the solvent you want to evaporate for every sec.

1. You need to be rather accurate with the resistance of the coil; that means both the diameter and the length must be accurately known. The wire ends must be welded so that not much heat is removed by conduction from the weld points.

2. The coiling and the spacing of the turns decide the effective surface area for radiation. Most of the heat will be lost by radiation and some by conduction. The coil will attain some specific temperature.

3. The spray of solvent rapidly takes away heat from the hot coil and it gets cooled. The spray duration must be short and the amount of spray must not be excessive.

4. The processes are hard to simulate but rough estimates are possible.

I want a free ice-cream!!
 

I have begun to seriously question a vital part of my system, my laptop is going through a increadably long update so I can't link to it but I read an article on powerguru.org called something like "digital SMPS introduction for analog engineers" and it was written by someone from Microchip.
For high speed DC/DC converter control, precise control over sampling and duty cycle with low latency are all good. But for a heating applications speed isn't really an issue, since you're looking at response times on the order of many milliseconds, not microseconds. An xmega should be able to do what you want just fine.
 

commercial devices that I am using as references are all estimating the coils temperature by measuring it's resistance.

V divided by A. The curve may be similar to an incandescent bulb (at an area before the filament gets red). A few measurements should tell you how easy it is to determine coil resistance and coil temperature, using this method.
 
  • Like
Reactions: David_

    David_

    Points: 2
    Helpful Answer Positive Rating
Status
Not open for further replies.

Similar threads

Part and Inventory Search

Welcome to EDABoard.com

Sponsor

Back
Top