Continue to Site

Welcome to EDAboard.com

Welcome to our site! EDAboard.com is an international Electronics Discussion Forum focused on EDA software, circuits, schematics, books, theory, papers, asic, pld, 8051, DSP, Network, RF, Analog Design, PCB, Service Manuals... and a whole lot more! To participate you need to register. Registration is free. Click here to register now.

PIC16f870 Help please

Status
Not open for further replies.

dj_holmzy

Junior Member level 2
Joined
Jun 22, 2021
Messages
21
Helped
0
Reputation
0
Reaction score
0
Trophy points
1
Visit site
Activity points
177
Hi,

I have a faulty chip that I cannot read and am trying to programme a new one for replacement. The chip is pic16f870 and it came from an amplifier. I have gone through great difficulty just to get the device to read the chip in MPLAB IDE.

I have attached the schematic of the circuit with the chip I need to programme. Any help would be greatly apprectaited as currently the amplifier does nothing as the chip is dead. Believe to be electrostatically shocked in circuit. Thank you
 

Attachments

  • S21-MI-CONTROL-CCT_.pdf
    133.5 KB · Views: 230

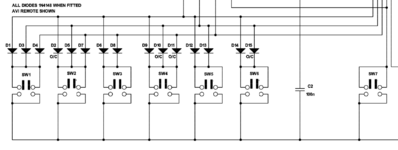
One reason why I've asked about state of the switches is because of the state of 3 input pins on PIC.
If switches (push buttons) are normaly closed type, no mater which one you press (SW1..SW6) you will have constant logical 0 on RA0..3 pins of PIC.
On the other side, if push buttons are normaly open, Pressing SW1, SW2 or SW4 will produce same "code" on the PIC input pins, and similary pressing SW5 and SW6 will produce same "code".
To conclude, something is wrong with schematic :D
 

Attachments

  • Should be buttons.png
    Should be buttons.png
    89.5 KB · Views: 145

To conclude, something is wrong with schematic :D
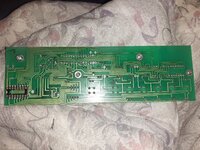
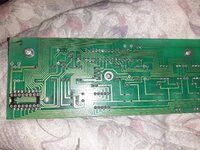
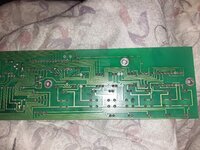
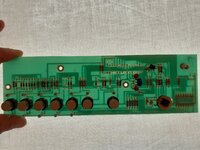
To make some sense of this schematic is helpful to look at the photo of the front panel circuit board.

Diodes at reference designators D2, D10, D11, D15 are not assembled on the PCB.

The schematic notes O/C at each of these parts.

There is still an issue in that SW4 and SW6 each have only one diode and that diode is on the same signal line for each switch.

This is why this schematic cannot represent the actual PCB as built.

If the PCB was built as the schematic shows then the PIC16F870 will not be able to detect which (SW4 or SW6) switch is pressed as both will present the same code to the PIC inputs.
 

are you sure the problem is with the PIC ?
The Original Poster is trying to repair the front panel and found the PIC16F870 does not seem to work.

At present the OP is only interested in getting the relays in the other section of the amplifier to switch in to a state where sound will come out.

If we can get the OP up to the point of getting a programmed controller running in the hardware it will be a clean solution of turning on the correct relays.

I would like to help the OP to get a fully functional controller working with the IR remote control functional as well.

I expect this part to be tricky as the volume control uses a motor to physically turn the knob. There is not enough information on how to control this motor from the PIC. Based on the motor drive circuit I expect it to be simple but some experimentation will be needed to determine a useful implementation.
 
Last edited:

Hi, I see the files but not sure what to even download! I have taken some shots of the PCB front and back. I can zoom into certain areas on request.

I did receive a reply from Phil, he has no code and no service manual. He has stated he fixes these from just experience.

Please note the Chip is removed and I have the original and a new replacement. If I am able to I can hook up my USB PSU to the board and power it up. However last time I tried that the MUTE LED did not light , this is without the chip fitted and ribbon cable from amplifier.

If poss I can hook it back up to the PSU with the new chip to take measurements perhaps?
 

Attachments

  • 20210625_191240.jpg
    20210625_191240.jpg
    1.8 MB · Views: 141
  • 20210625_191247.jpg
    20210625_191247.jpg
    1.7 MB · Views: 135
  • 20210625_191251.jpg
    20210625_191251.jpg
    1.7 MB · Views: 140
  • 20210625_191344.jpg
    20210625_191344.jpg
    1.3 MB · Views: 137

OK, so this is the way the push buttons are connected to PIC:
SW1 - RA0 + RA1 + RA2
SW2 - RA1 + RA2
SW3 - RA0 + RA2
SW4 - RA2
SW5 - RA0 + RA1
SW6 - RA1

Further more, On silk screen SW7 is marked as REC, so Mute is controlled by uC, and I guess only from remote controll, as well as Vol +/-, ...
 

Attachments

  • 20210625_191240.jpg
    20210625_191240.jpg
    1.6 MB · Views: 135

Hi, I see the files but not sure what to even download! I have taken some shots of the PCB front and back. I can zoom into certain areas on request.

I did receive a reply from Phil, he has no code and no service manual. He has stated he fixes these from just experience.

Please note the Chip is removed and I have the original and a new replacement. If I am able to I can hook up my USB PSU to the board and power it up. However last time I tried that the MUTE LED did not light , this is without the chip fitted and ribbon cable from amplifier.
The direct link to the only (so far) source code file is:

You can clone the repository (git speak for download) using this link:

You can do one of two things:
  1. I just got only the main.c file, so what can I do?

    You will need to create an MPLABX stand alone project for the PIC16F870 the move the main.c in to the correct place in the project folder.

    Next tell the MPLABX IDE to add an existing file (main.c) to the project.

  2. OK, Mr. Smartypants I got the main.zip file, now what?

    Inside the ZIP archive is a folder (16F870_AVI_S21_MI.X), copy this folder to a convenient folder on drive where you installed the MPLABX tools.

    Start the MPLABX IDE, use menu :File:Open Project...: (or press Ctrl+Shift+O) then enter the path to where you put the (16F870_AVI_S21_MI.X) folder from the ZIP archive.

    I used: C:\Public\GIT\Projects\PIC\16F\16F870_AVI_S21_MI\16F870_AVI_S21_MI.X

    Your path will likely be different.

I have redrawn the area of the schematic and added a note on how we think SW1 to SW6 are encoded. I will create the code based on this until we can test it in the real hardware.

See the updated schematic here:

That the (mute) light is not on does not mean there is a fault on your board.

When the Front Panel Board(FPB) is powered up and not connected to the amplifier all of the lights will be out until the PIC16F870 has been programmed.

We can make better progress when you have a PIC16F870 in your PCB and the Microchip In-Circuit-Serial-Programming(ICSP) tool connect correctly.

Please post a reply and mention which Microchip programming/debugging tool you have.

Also describe the physical methods you used to read the original PIC16F870.

The reason I ask is that the way the FPB is designed it is possible to update the code in the PIC16F870 without removing it from the PCB.
 

Thank you all for all the information. I will attempt to follow this tomorrow and report back. Good night!
I suspect that you may be having too many issues setting up the Microchip tools to build the code I created.

Here is a HEX file for the PIC16F870 that may be functional enough to get your amplifier doing what you want:
Code:
:020000040000FA
:020000000A28CC
:10000800FE00030EF0000A08F10016290B288301F0
:100018000D28FA01F701F901032180308316031333
:10002800860060308700C820F5007508F800780859
:100038007A06031927287808F5007508FA0014309D
:10004800F5007508F9007908031931280130F9021B
:100058007908031D3128F701F70A7708031D892855
:10006800C02883120313061C3D288030F50075084C
:1000780087064130F500750886050614A528831201
:100088000313861C4B288030F5007508870642301C
:10009800F500750886058614A52883120313061D26
:1000A80059288030F500750887064430F500750832
:1000B80086050615A52883120313861D6728803038
:1000C800F500750887064830F50075088605861519
:1000D800A52883120313061E75288030F5007508BD
:1000E80087065030F500750886050616A528831280
:1000F8000313861E83288030F50075088706603054
:10010800F500750886058616A5287A08F500F60113
:100118007608003A03199128A5287508013A0319A9
:100128003528033A03194328013A03195128073A95
:1001380003195F28013A03196D28033A03197B282C
:10014800A52807307A06031DBF284030F50075083A
:10015800831203138606061FBB28E030F5007508D6
:1001680087050608E039F50075088704BF28E030E0
:10017800F50075088705F701C730F500C328F50BAA
:10018800C228C628C7281728F401DA28F401F40A77
:10019800F9280230D6280330D6280430D62805306E
:1001A800D6280630F2007208F400F92883120313E7
:1001B80005080739F200F3017308003A0319E52826
:1001C800F9287208003A0319CA28013A0319CD28F8
:1001D800033A0319CF28013A0319D128073A03191A
:1001E800D328013A0319D528F92874080319851961
:1001F80001290730F2007208F400740808008B0126
:10020800831603138C018D01FF308500FF308600B3
:10021800FF30870006309F00831203138501860193
:100228008701080071088A00700E8300FE0E7E0E9A
:020238000900BB
:02400E00393F38
:00000001FF
Once you have confirmed that this code does what you want I will update the source code in my git hub repository.

There is plenty of Program space and Data space to implement a Philips RC5 IR decoder.

If you want this functionality you will need to select some kind of 36KHz IR transmitter and code set to use.
 
Last edited:

Just a thought - the front panel has 13 LEDs, that is enough to display a decoded RC5 address and data. Maybe a generic RC5 decoder driving the LEDs then noting the patterns as each remote button is pressed would be useful. When the codes are known they should be easy to incorporate into the program.

Brian.
 

It would be better to see the picture of the remote. RC5 codes are quite standardized.

If you can obtail Proton Basic compiller, you can try this code, to check functioning of IR receriver.
The code will display Device and Command code on IN1..6 plus REC LEDS, 3 seconds each. (should, I don't have an 870 at hand)

Code:
Device 16F870
Xtal = 4
All_Digital = true

Reminders false
Config DEBUG_OFF, LVP_OFF, PWRTE_OFF, WDT_OFF, HS_OSC
Reminders true

Declare RC5In_Pin = PORTA.4

Input PORTA
Output PORTB
Output PORTC

Symbol IN1_LED = PORTB.0
Symbol IN2_LED = PORTB.1
Symbol IN3_LED = PORTB.2
Symbol IN4_LED = PORTB.3
Symbol IN5_LED = PORTB.4
Symbol IN6_LED = PORTB.5

Symbol REC_LED = PORTB.6
Symbol REC1_LED = PORTC.0
Symbol REC2_LED = PORTC.1
Symbol REC3_LED = PORTC.2
Symbol REC4_LED = PORTC.3
Symbol REC5_LED = PORTC.4

Symbol REC_btn = PORTA.3
 
Dim RC5_rcv As Word
Dim RC5_device As RC5_rcv.HighByte
Dim RC5_command As RC5_rcv.LowByte

Dim Keys As Byte
Dim Key_mask As %00000111
 

' Main program loop
While 1 = 1
    Repeat
        RC5_rcv = RC5In
    Until RC5_command <> 255
    PORTB = RC5_device
    DelayMS 3000
    PORTB = RC5_command
    DelayMS 3000
Wend
 

I did...something! OK I downloaded the project and opened it the IDX. Then I flashed it!? It seemed to go through...

I definitely loaded the right project... Is it done? In regards to the remote it could be either original remote control or reprogrammed from factory to use a universal remote!!

What have I actually done to the new chip? LOL

Connecting to MPLAB PICkit 3...

Currently loaded firmware on PICkit 3
Firmware Suite Version.....01.56.09
Firmware type..............Midrange

Programmer to target power is enabled - VDD = 4.750000 volts.
Target device PIC16F870 found.
Device Revision ID = 1

Device Erased...

Programming...

The following memory area(s) will be programmed:
program memory: start address = 0x0, end address = 0x86
configuration memory
Programming/Verify complete


Hi, Sorry I have no idea what that is! I had to watch a couple of videos just to get the PIC 3 to communicate with the software!

What do I do with the compiler? I also still have the chip plugged into the reader, do I just disconnect that? Thanks
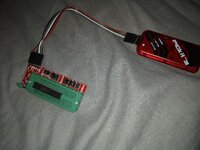
Please post a photo of what you have setup to program your PIC16F870. It would help me understand what you are doing.

When it comes to implementing the decoder for the Infrared(IR) remote control transmitter I have a problem.

I have several IR transmitter that I could use but I would need to know the specific one you want to use.

After you have select the IR remote you will need to specify which physical button on the IR remote maps to which button on the S21MI amplifier.

Remember: I DO NOT HAVE THE AVI LAB IR REMOTE MADE FOR THE S21MI AMPLIFIER.

So you do not get to tell just do what AVI did because I cannot.
 
Last edited:

Time seems to always get the better of me. I will follow this very closely tomorrow. I can send more pictures etc then. Thanks!
 

Attachments

  • IMG_20210627_230355602.jpg
    IMG_20210627_230355602.jpg
    2 MB · Views: 133

Thanks for the photo, now I have a better idea how you are programming the PIC16F870.

This is the main application of the source code in my git repository:
Code:
/*
 * Main application
 */
void main(void) 
{
    /*
     * Initialize main application
     */
    PIC_Init();
    
    /* Set GPIO directions for S21 */
    TRISB = 0b10000000;
    TRISC = 0b01100000;
    /*
     * Application process loop
     */
    while(1)
    {
        PollSwitches();
        /*
         * Initial debug code to check that we have 
         * the project and tools working together.
         * 
         * The expected behavior is the (mute) light should be on.
         * The (record) light should flash 2 times per second.
         * 
         * This code will be used later to indicate a critical fault in the application .
         */
        LED_REC(LED_REC_ON);
        __delay_ms(250);
        LED_REC(LED_REC_OFF);
        __delay_ms(250);
    }
}

From what I can deduce from your post#32 you appear to be using the MPLABX IDE to program the PIC16F870 with a PICkit3 connected to a ZIF programming socket.

This is a fine setup.

What you should be able to get working is to program the code from my git repository in a PIC16F870.

Put that device in your front panel board and see the (mute) light on and the (record) light flashing two time per second.

When you have confirmed that this works I will update the source code in my git repository with code that should be more functional.

I want to know for certain that my test code builds correctly for you, your process for programming the controller then fitting it in the front panel board all works.

This may seem to be a very small steps but because you are so new to this I want to limit the number if things that can go wrong.

If Murphy's law holds any sway some kind of confusion will occur.
 

Thanks for the photo, now I have a better idea how you are programming the PIC16F870.

This is the main application of the source code in my git repository:
Code:
/*
* Main application
*/
void main(void)
{
    /*
     * Initialize main application
     */
    PIC_Init();

    /* Set GPIO directions for S21 */
    TRISB = 0b10000000;
    TRISC = 0b01100000;
    /*
     * Application process loop
     */
    while(1)
    {
        PollSwitches();
        /*
         * Initial debug code to check that we have
         * the project and tools working together.
         *
         * The expected behavior is the (mute) light should be on.
         * The (record) light should flash 2 times per second.
         *
         * This code will be used later to indicate a critical fault in the application .
         */
        LED_REC(LED_REC_ON);
        __delay_ms(250);
        LED_REC(LED_REC_OFF);
        __delay_ms(250);
    }
}

From what I can deduce from your post#32 you appear to be using the MPLABX IDE to program the PIC16F870 with a PICkit3 connected to a ZIF programming socket.

This is a fine setup.

What you should be able to get working is to program the code from my git repository in a PIC16F870.

Put that device in your front panel board and see the (mute) light on and the (record) light flashing two time per second.

When you have confirmed that this works I will update the source code in my git repository with code that should be more functional.

I want to know for certain that my test code builds correctly for you, your process for programming the controller then fitting it in the front panel board all works.

This may seem to be a very small steps but because you are so new to this I want to limit the number if things that can go wrong.

If Murphy's law holds any sway some kind of confusion will occur.
Here you can find codes for RC5 IR protocol: https://en.wikipedia.org/wiki/RC-5
and more description on timings: https://clearwater.com.au/code/rc5

From the (wrong) schematic, it seems that many functions of the amp are controlled only with remote.
Would be nice ti find s picture of original remote :)

The following code might make your amp to work

Code:
Device 16F870
Xtal = 4
All_Digital = true

Reminders false
Config DEBUG_OFF, LVP_OFF, PWRTE_OFF, WDT_OFF, HS_OSC
Reminders true

Declare RC5In_Pin = PORTA.4

Input PORTA
Output PORTB
Output PORTC

Symbol IN1_LED = PORTB.0
Symbol IN2_LED = PORTB.1
Symbol IN3_LED = PORTB.2
Symbol IN4_LED = PORTB.3
Symbol IN5_LED = PORTB.4
Symbol IN6_LED = PORTB.5

Symbol REC_LED = PORTB.6
Symbol REC1_LED = PORTC.0
Symbol REC2_LED = PORTC.1
Symbol REC3_LED = PORTC.2
Symbol REC4_LED = PORTC.3
Symbol REC5_LED = PORTC.4

Symbol REC_btn = PORTA.3

Dim RC5_rcv As Word
Dim RC5_device As RC5_rcv.HighByte
Dim RC5_command As RC5_rcv.LowByte

Dim Keys As Byte
Dim Key_mask As %00000111
Dim InButtons As Byte
Dim RecButton As Bit


' setting initial states of output pins on power up
PORTB = 1  ' CH1 initially selected
PORTC = 0

' Main program loop
While 1 = 1

    GoSub CheckButtons
   
Wend
End

'****************************************************************
' * SUBs                                                        *
'****************************************************************
CheckButtons:
    InButtons = PORTA
    InButtons = ~(InButtons & Key_mask)
    Select InButtons
    Case 0
        PORTB = %00000001
       
    Case 1
      PORTB = %00000010
       
    Case 2
      PORTB = %00000100
     
    Case 3
      PORTB = %00001000
     
    Case 4
      PORTB = %00010000
     
    Case 5
      PORTB = %00100000
     
    End Select
   
    RecButton = REC_btn
    If RecButton = 1 Then
        Toggle REC_LED
    End If
   
Return
and the produced hex is attached, just rename file extension from txt to hex
 

Attachments

  • Amp.txt
    480 bytes · Views: 98
Last edited:

Would be nice ti find s picture of original remote :)
1624868776400.png


It was buried deep in the internet. The issue is that there is no description of which (if any) standard IR remote control protocol is used.

Later version of the user guide say that an All for One universal remote control transmitter works for the most recently produced amplifiers.

The user guide does not document the model number of the recommended All for One transmitter or which specific keys are associated with which function of the amplifier.

I have written the code to deal with the NEC protocol. The RC5 protocol is not as complex, There are several Microchip application notes for make transmitters and decoders. (AN_1473, AN_2534 and AN1064)

At some point the Original Poster(OP) will need to stand up and describe, in detail, what kind of solution is needed.

I would like the OP to communicate more completely and offer comprehensive descriptions of what has been tried, what has failed to meet expectation and what would be useful without needing to asked specifically for each and every detail.

I have been unable to locate a working version of any of these AVI Lab products anywhere near me.

The U.K. is famous (and infamous) for bespoke high end audio equipment that gets a lot of coverage in the HiFi press but nobody outside of Britain ever seems to actually have one.

After looking at the schematics and PCB photos ports by the OP I am not impressed by the choices made by the designers with regard to capacitor voltage selection and PCB layout technique.

For anyone that has one of these amplifiers I would recommend replacing ALL of the electrolytic capacitors with ones with higher rated working voltages before ever turning it on again.
 
Last edited:

Thanks Dan for picture :)
It looks that from whole remote, onlu three buttons are used :) Vol+/- and Mute

So System could be
16 (Preamp 1)
or
19 (Preamp 2)
and Commands
16 (Vol +)
17 (Vol -)
and
13 (Mute)

A little bit of further thinkerig led me to conclusion that After pressing a REC button, another button needs to be pressed (SW1..SW6) for selection of recording (input, or maybe output).
 

Status
Not open for further replies.

Similar threads

Part and Inventory Search

Welcome to EDABoard.com

Sponsor

Back
Top