Continue to Site

Welcome to EDAboard.com

Welcome to our site! EDAboard.com is an international Electronics Discussion Forum focused on EDA software, circuits, schematics, books, theory, papers, asic, pld, 8051, DSP, Network, RF, Analog Design, PCB, Service Manuals... and a whole lot more! To participate you need to register. Registration is free. Click here to register now.

[SOLVED] PIC complete discussion for all

Status
Not open for further replies.
this is a very good thread to learn PIC.. Nice thread started by romel... thanks man.... i am also learning from this thread after looking into other forums without understanding anything...

here it is expalined nicely... will catch up with you soon and post my doubts also here...

thanks to all who are helping us here...
 
welcome to my thread!!!! let's discuss here..!!!!

---------- Post added at 13:43 ---------- Previous post was at 13:42 ----------

This is my classroom man.. hehe

---------- Post added at 14:58 ---------- Previous post was at 13:43 ----------

I cant understan PWM.. In some example codes there are very few involve but in the datasheet there are many of them.. still not clear to me.. more research needed.. :(


for my own Idea I just declare function prototypes at the beginning because I don't what to see anything as much as possible like functions above main.... I just like that way.. :) hihi

Actually Romel, your way is the prefer method and taught in most college classes, at least over here. It also has the advantage of simplifying the process of separating related routines into their own header/code, object or library files for future use in other projects. Why reinvent the wheel?

You simply cut and past the prototypes into a .h file, cut and paste the subroutines into a .c file, which can be included into a new project by #include <newheader.h>. Also the subroutine code and be compiled into an object module or into a separate library .lib file.

.. Im not a good programmer but I know I can teach some basics of C++ like displaying something in the CLI..

.. Im a very bad programmer...

I've seen worse. A LOT WORSE! I think you're being a little hard on yourself and you should have not problem being a tutor. And you're right, it will only help/force you to improve your C programming skills. If you need to brush up on certain areas, let me know, I can refer you to several online references and textbooks. I personally have a library of over 4000 technical books, one wall is dedicated to only programming languages, many are C and C++ texts.

Good Luck with your tutorship.
 
Actually Romel, your way is the prefer method and taught in most college classes, at least over here. It also has the advantage of simplifying the process of separating related routines into their own header/code, object or library files for future use in other projects. Why reinvent the wheel?

You simply cut and past the prototypes into a .h file, cut and paste the subroutines into a .c file, which can be included into a new project by #include <newheader.h>. Also the subroutine code and be compiled into an object module or into a separate library .lib file.

ah I see... I just copied this style of some programmers.....


I've seen worse. A LOT WORSE! I think you're being a little hard on yourself and you should have not problem being a tutor. And you're right, it will only help/force you to improve your C programming skills. If you need to brush up on certain areas, let me know, I can refer you to several online references and textbooks. I personally have a library of over 4000 technical books, one wall is dedicated to only programming languages, many are C and C++ texts.

Good Luck with your tutorship.

Im enjoying it.. Honestly she told me Im better than her teacher because I explained line by line of the code and its functions... lol... I read that all in google and some of them are based on my little experience in programming... hehe

by the way PIC programming, configuration of registers and reading the datasheet is harder compared to my tutorship... hehe

This is the source code of our first lesson and also her school assignment..

PHP:
#include <iostream> 	//include this to use cout function
#include<conio.h>  	//include to use getchar(); funtion


using namespace std;  	//include this to use cout function


float calculate_quiz();  	//Funtion prototypes.
float calculate_exam();  	//You need to declare it here
float calculate_attendance();  	//if you have funtions below the 
float final_grade(float grade); 	 //main funtion 

/* main Funtion */
main()
{
  float raw_grade, grade; //declaration 
  int choice;            //of variables

  here:		//jump label
  system("cls");	//clear screen funtion
  cout<<"            This System is a Student Grade Calculator\n\n";
  cout<<"              Pls. ENTER The Following Needed Data\n" ;

  raw_grade = calculate_quiz() + calculate_exam() + calculate_attendance();  	//sum of all computations

  grade = final_grade(raw_grade); 	//calculating the final grade	
  cout<<"\nGrade: "<<grade; 	//Display final grade

 // cout<<"\nraw grade: "<<raw_grade;


  cout<<"\n\n\nCalculate Another Student Grade?\n(press 1 if YES and 0 if NO)";
  cin>>choice;
  if(choice == 1)
  goto here;		//jump label to repear first step
  else
  exit;		//Exit command

}


float calculate_quiz()		//funtion for calculating quiz
{
    float quiz;		//declare quiz as foat variable
    cout<<"\nENTER QUIZ: ";
    cin>>quiz;		//store user input to quiz variable
    quiz = quiz*0.50;	//compute the percentage of quiz


    return quiz; 	//return the value of quiz to be calculated in later application

}

float calculate_exam()  	////funtion for calculating exam
{
    float exam;
    cout<<"\nENTER EXAM: ";
    cin>>exam;
    exam = exam*0.30;

    return exam;

}

float calculate_attendance()  	//funtion for calculating attendance
{
    float attendance;
    cout<<"\nENTER ATTENDANCE: ";
    cin>>attendance;
    attendance = attendance*0.20;


    return attendance;

}


float final_grade(float grade)	 //function for selecting final grade range
{
    float final_grade;

    if(grade<75)
    final_grade = 5.0;
	
     /* conditional statements */
    if(grade >= 75 && grade <= 77)
    final_grade = 3.0;

    if(grade >= 78 && grade <= 80)
    final_grade = 2.75;

    if(grade >= 81 && grade <= 83)
    final_grade = 2.5;

    if(grade >= 84 && grade <= 86)
    final_grade = 2.25;

    if(grade >= 87 && grade <= 89)
    final_grade = 2.0;

    if(grade >= 90 && grade <= 92)
    final_grade = 1.75;

    if(grade >= 93 && grade <= 95)
    final_grade = 1.5;

    if(grade >= 96 && grade <= 98)
    final_grade = 1.25;

    if(grade >= 99 && grade <= 100)
    final_grade = 1.0;


    return final_grade;

}

This afternoon I will continue my PWM lesson... :)
 

This afternoon I will continue my PWM lesson... :)


Are you still have problems with certain areas of PWM? If so, let me know. Good online PIC specific tutorials covering PWM in C language seem to be lacking. I have several textbooks which cover PIC generation of PWM fairly well, I may have some appnotes as well.
 
Are you still have problems with certain areas of PWM? If so, let me know. Good online PIC specific tutorials covering PWM in C language seem to be lacking. I have several textbooks which cover PIC generation of PWM fairly well, I may have some appnotes as well.

yesterday I have problems about what exactly the specific register to configure to use the Pwm.. but after I found online calculator with basic code of PWM I have now idea what to do.. but if you can share that textbooks then it would be nice... :) hehe thanks...
 

I have two books with covering PIC PWM in C fairly well:

SD Card Projects Using the PIC Microcontroller

Contains a decent section covering PWM as well as, of course, SD Card interfacing, uses the PIC18 and Microchip's C18 Compiler.

Programming 16-Bit PIC Microcontrollers in C: Learning to Fly the PIC24

Has an entire chapter titled, "Volare," which covers PWM generation starting with the basic theory and applying to an audio project similar to your goal project. The book is based on the PIC24 using Microchip's C30 Compiler, but you should be able to apply it to either the PIC16 or PIC18. The text happens to be one of my personal favorite PIC C programming books, it covers the matter throughly and professionally. The author also has a similar book in print covering the PIC32, another one of my favorites.

I do not know if the books come in PDF form. Maybe you could borrow a copy or find a copy in PDF?

Most of the appnotes I have concerning PWM are in assembler, but I'll keep looking.

If you can find a copy of either of Lucio Di Jasio "Learning to Fly" books, they are fantastic. I strongly recommend either of them.
 
thanks. I have already the ibrahin SD card interfacing(the first link).. it uses the C18 library... there are a lot of instructions there for interfacing..
but before I will continue to that goal I will learn first the basic... thumbs up for that book..

he has very nice ebooks.. I have 3 different copies of it about PIC from that author..

---------- Post added at 05:55 ---------- Previous post was at 05:51 ----------

i will check the book this afternoon.. hehe the last time I opened that book I did not read anything I just jump into sdcard interfacing... hehe
 

Well remember, you can also check out the source files for the PWM libraries in Hi-Tech C PICC18 and Microchip's C18, like you started to do for SPI interface. They may also have some example programs concerning PWM, using their libraries, as well.

Have you coded any interrupts yet?

If not, that topic should most likely be your next to tackle. Once you learn how to code Interrupt Service Routines (ISR) and understand their power, you'll see how to tie all these other peripherals together into a meaningful program.
 
yes.. but only timer interrupt of PIc16f628 :)

in 8051 device I tried all the interrupt routines .. Im am also amaze din PIC because I always faced rocky road in register configuration... hehe difficult compared to old 8051 devices
 

yes 8051 is the simplest as they have very less registers and PIC, ARM are always tidious and difficult as they have so many registers to configure... But once you learn them it will be easy if you plan to learn higher end controllersin PIC or ARM... otherwise its very difficult to learn just by reading data sheet....
 
Have you looked at the attached PWM/ADC example?

Written for Hi-Tech PICC18, looks like a good example for Proteus Simulation or Physical Implementation, requires PIC18, two pots, LED and current limiting resistor.

Uses no libraries, just register configurations.
 

Attachments

  • pwm.zip
    1.5 KB · Views: 125
Im back again.. I will start now..

ok thanks.. that's very nice..

I will be back here with working PWM code..
 

Hi, I am partially done with PWM :lol: but I have some doubts. what is the relation of Postscale Select bits in timer2 when talking about PWM? does it need to set also or I can set it at any value when using timer 2 in PWM mode? does it affect the PWM output?

---------- Post added at 13:21 ---------- Previous post was at 13:12 ----------

I dont understand this sentence also.. hehe

The pulse width modulation (PWM) mode produces a PWM output at 10-bit resolution.
A PWM output is basically a square waveform with a specified period and duty cycle.

yes I knew it's 10 bit resolution but where I can get that 10bit resolution if I am using only one output for PWM e.g. CCP1 ? (I doubt that my question is wrong... hehe )
 

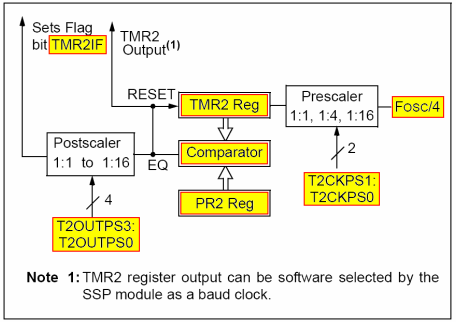
TIMER2_block_diagram1.jpg


as I understand based on that image above the POSTSCALER controls the time occurrence of timer2 flag?

Prescaler - divides the frequency clock source BEFORE the counting take place at the register TMR2, thus the counting inside the TMR2 register is performed based on the divided frequency clock source by the Prescaler .

Postscaler divides the frequency that comes out of the Comparator again for the last time.

my pwm is functionin well without setting the POstscaler thing.... on some example code of pwm they also dont mind the postscaler stuff.. hehe
 

if you use timer2 to generate the pwm then you have to play with the registers.. but if you are deriving pwm directly from the pwm channel then it is not required...

this is my partial code for PWM.. I just tested if I can enable PWM mode..I will improve this code if I understand everything..


as I read some books if I understand it correctly timer2 is required to run pwm because PR2 is a component of pwm time period.
**broken link removed**


PHP:
#include<htc.h>

void init_pwm();
void pwm(unsigned char period, unsigned char duty);

void main()
{
	init_pwm();
	while(1)
	{
		pwm(50,20);
	
	}

}


void init_pwm()
{
	TRISC = 0; //set PORTC as output
	CCP1CON |= 0b1100;  //enable PWM mode
	T2CONbits.TMR2ON = 1;
	T2CONbits.T2CKPS0 = 1; //prescaler 4


}

void pwm(unsigned char period, unsigned char duty)
{
	
	PR2 = period;
	CCPR1L = duty;

}
 
Last edited:

Status
Not open for further replies.

Similar threads

Part and Inventory Search

Welcome to EDABoard.com

Sponsor

Back
Top