Continue to Site

Welcome to EDAboard.com

Welcome to our site! EDAboard.com is an international Electronics Discussion Forum focused on EDA software, circuits, schematics, books, theory, papers, asic, pld, 8051, DSP, Network, RF, Analog Design, PCB, Service Manuals... and a whole lot more! To participate you need to register. Registration is free. Click here to register now.

Help with 24 led light powered by 12 Volt car battery

Status
Not open for further replies.
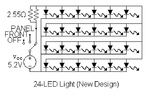
Ok, I replaced the two resistors in parallel 5.1Ohm 1/2Watt 5% on the circuit board of the light itself.
Connected to External Power supply at 5.2 Volts.
Light & circuit board heated up big time.
I then added the same value resistors, 2 of them in series to the power going to the light, and this dropped the voltage slightly & less overheating.
I ran this light for 16 Hours non-stop with a temperature probe inserted into the light.
The temperature maxes out at 102 degrees Fahrenheit after running non-stop.
 

How much current is the light assembly drawing with the 2.55Ω (2 X 5.1Ω in parallel) resistance.

Are you saying that for your long test you had 10.2Ω?

The new circuit should look like this:
 

Attachments

  • 24-LED Light (New Design).gif
    24-LED Light (New Design).gif
    9 KB · Views: 112
Last edited:

I will check & let you know.
Been working my butt off :(
Thanks for the reply
 

Ok, Just for kicks , i bought 8 of these lights with intentions of modding them.
I was noticing that that the temperature of one I modified was producing a little heat.
I thought I did something wrong.
So, I took a brand new light, opened it up and took the temperature of the blue resistor for the hell of it.
With 3 AAA batteries driving it, the resistor is at 125 degrees and rising !!
Must be a poor design.
When measuring the voltage for each LED I was getting 3.2 Volts, which may be right.
I looked at alot of led specifications, and alot of them run at 3 to 3.2 volt maximum
Now I Have to figure out why the overheating of the resistor is happening.
I did this with 3 lights, by just opening them up and measuring the temperature.
Got a feeling that it is the wrong resistor :(
When I use almost almost depleted batteries the resistor didn't heat up.
This tells me voltage must be too high which in turn, means the resistor must be wrong.
Am I correct in assuming this ?
Just to refresh, there are 24 leds in this light with a supply voltage from 3 AAA batteries.
I will take a better close up picture tomorrow..
Now I don't know what to do :(
I tried using the led resistance calculator found here.
For pictures of the resistor, see post # 6
 
Last edited:

If you know the resistor values, you can quickly calculate their power dissipation by P = (V^2) / R, just measure the voltage drop across the resistors when its powered up. If you're not sure about the values of the resistors, disconnect the power source and use an ohmmeter across the resistors to verify their net value.

P.S. LEDs are current-controlled devices. The voltage across them changes quickly as the current changes a small amount. Set up your system to run the LEDs below their Vmax, then you'll avoid the potential problem of burning up some of the LEDs that are biased harder than the others, due to variations in their V-I curves.
 

The voltage across them changes quickly as the current changes a small amount.

It seems by mistake you exchanged the words 'voltage' and 'current'.

I think you liked to say:
The LED current changes quickly as the voltage across it changes a small amount.
 

All of the calculations I did previously were based on a Vf for the LEDs of 3.8V which was derived from the nominal supply voltage of 4.5V and your measured total current of 480mA. It seems that the Vf is somewhat lower. We need to nail that figure down better to proceed. You mentioned 3.2V but didn't specify the total current that was flowing when that voltage was measured. Do you have an adjustable power supply available? I have to go now but I'll get back to this later tonight.
 
I don't have an adjustable power supply, next project for me, lol
I use a computer power supply connected to breadboard.
Separate outputs for 3.3 Volts / 5 Volts / 12 Volts output.
Measured resistor with batteries taken out-1.6 Ohms ( the Blue resistor that heats up with no modifications at all to light )
Measured Voltage with batteries in device NOT powered on- 3 Volts both sides of resistor
Measured Voltage with batteries powered on 1 side of resistor 1.9 Volts other side is 2.6 Volts

And it does draw 480mA

This is driving me nuts,lol
Apparently they designed these lights to not last too long due to the overheating of the resistor.
You leave the light on long enough & you can start to smell the components overheating.
Like I said, I powered off the unit when my temperature probe from the multimeter hit 125 degrees Fahrenheit.
Thanks for the replies
It is greatly appreciated..
 
Last edited:

Must be a poor design.
This tells me voltage must be too high which in turn, means the resistor must be wrong.
Am I correct in assuming this ?
Of course it's a bad design. There are two main reasons for this. First, the voltage of typical alkaline cells goes from 1.5 when fresh to 0.8 when considered dead. This means that your supply will go from 4.5V to 2.4V as the batteries go through their discharge curve. LEDs need to be actively current regulated when powered by a variable and unregulated supply. A fixed resistance, no matter the value can only be correct for a moment as the supply voltage passes through the one correct value (like a clock that doesn't run being right twice a day). When the voltage is high for the given resistance, the current is excessive, shortening the life of or destroying the LEDs and when low, the LEDs become dim or even fail to light. Second, LEDs are current driven devices so connecting multiple LEDs in series is the normal approach to keeping the current equal and correct in each LED. When they're connected in parallel, the supply current can be divided unequally due to manufacturing variations resulting in excess current flow in some LEDs while depriving others of adequate current to fully illuminate. As you might expect, this leads to the premature failure of the excess current LEDs.

The resistor is wrong, at least sometimes, depending on the supply voltage at the moment. If these LEDs turn out to have a Vf of 3.2V, it would seem the resistance as designed was optimized for a 3.9V supply.

I need to know the voltage across the LEDs while the current is 480mA, if possible. 2.6V is too low for white LEDs at full current. It should be at least 3.1V.

Another test you can do that may even solve your problem is to connect the constructed 2.55Ω resistor pair in series with the existing 1.5Ω resistor for a total of 4.05Ω and power it with the 5.2V DC-DC converter. Measure the total current and the voltage across the LEDs. Test circuit shown below.

24-LED Light (Test Circuit).gif

By the way, don't worry about the minor setbacks. I have a pleasant design surprise waiting to spring on you when we get the real Vf at 20mA@ worked out. :grin:
 
Last edited:
You are exactly correct..
I measured the voltage across led's and they are 3.1 Volts.
I can test using 2.55Ω resistors but will have to buy them..
I do however have 5.1Ω resistors that I purchased for this project,lol
Dumb question? Couldn't I just use the 5.1Ω resistors I purchased recently for this project?
Or do you want me to purchase the 2.55Ω resistors?
As soon as I order & receive the 2.55Ω resistors & install them, I will reply here...
You people are awesome!!
Thanks again for the replies :)
 
Last edited:

I need to know the voltage across the LEDs while the current is 480mA, if possible. 2.6V is too low for white LEDs at full current. It should be at least 3.1V.

Another test you can do that may even solve your problem is to connect the constructed 2.55Ω resistor pair in series with the existing 1.5Ω resistor for a total of 4.05Ω and power it with the 5.2V DC-DC converter. Measure the total current and the voltage across the LEDs. Test circuit shown below.

View attachment 57184

By the way, don't worry about the minor setbacks. I have a pleasant design surprise waiting to spring on you when we get the real Vf at 20mA@ worked out. :grin:

Ok,

Ran 12 volts from power supply to breadboard then to 5.2V DC-DC converter.
Connected the 5.1Ω resistor & measured the amperage & got 241mA
Measured the led voltage and got 3 volts
Measured voltage on both sides of the 1.5Ω resistor - got 3.5 volts on one side and 3 volts on other side with temperature at 113 degrees Fahrenheit after 10 minutes.
Measured voltage on both sides of the 5.1Ω resistor - got 5.1 volts on one side and 3.5 volts on other side with temperature at 150 degrees Fahrenheit after 10 minutes.
I held this light with a light running on AAA Batteries & they were the same as far as brightness even though the Amperage draw was cut in half .

Hope this helps
 
Last edited:

You don't need to buy resistors, just use two of the 5.1Ω in parallel. That makes 2.55Ω. That's what I've been talking (writing) about all along. That 3.1V measurement isn't complete without knowing what current was flowing at the time it was made.

All the extra measurements aren't helping since you didn't construct the circuit as shown in the schematic. It needs to be the constructed 2.55Ω mentioned above in series with the 1.5Ω, then just the voltage across the LEDs and the total circuit current.
 
Last edited:

I was wondering what chip those regulators use now, so thanks for the pics!....so still MC34063A but surface mount now....

The spec of the chip is max 0.5Amp, so advertising anything more would be
incorrect,
:roll: or if the circuit current limit resistors made for 1Amp, it will most certainly
fail in due course.

should expect ~85% efficiency,maybe better from that thing I think, which is better than the LM317 linear method you attempted earlier

If you *did* get an older type, not surface mount I would suggest modding the regulator itself to give you the 4.5 volts directly, just one resistor change....
 
Last edited:

Last edited:

Ok,

First I want to apologize for not paying attention to detail like I was supposed to !!
I connected to two 5.1Ω resistors in parallel and connected in series with the 1.5Ω resistor.
I won't post the temps, sorry about that..
Voltage across the LEDs was 3.09 volts
327.6 mA draw
Does that help ??
Thanks again for the replies.. :)
 

Yes, I used the DC-DC converter
Lights are still bright as anything..
Let me guess, I have to spend more money to make this more efficient due to their bad design? lol

Well, now you've blown my surprise. I was going to suggest a modification to the converter after we got the Vf well defined. The SMD resistor change may be a problem for Campus. She's said she has limited soldering skills. My datasheet says 1.5A but I think the thermal design of the board will be the limiting factor.
https://www.st.com/internet/com/TECHNICAL_RESOURCES/TECHNICAL_LITERATURE/DATASHEET/CD00001232.pdf

I'm willing to attempt soldering if needed, I'm using a weller TC020 Solering station.
**broken link removed**

I wouldn't even attempt to use a plain old soldering iron,lol
I'm willing to try playing around with it.
Just don't ask me to de-solder that 8 pin monster,lol
pins are so close to each other, it's not funny.
What I really need to do, is get some helping hands for soldering. ( think thats what they are called,lol )
You know, the two clips that have alligator clips on them ? or the small vices with rubber on them.
Thanks for reply
 

You should try measuring the current and voltage as before, but with the 1.5Ω resistor bypassed so just the 2.55Ω is in circuit as shown in post #22. Set up to measure current first and just turn on briefly to get the current measurement, then if it's less than 500mA, measure the LED voltage as well.
 
You should try measuring the current and voltage as before, but with the 1.5Ω resistor bypassed so just the 2.55Ω is in circuit as shown in post #22. Set up to measure current first and just turn on briefly to get the current measurement, then if it's less than 500mA, measure the LED voltage as well.

Heating up the soldering iron, will post back results.. :)

Ok, with 1.5 Ohm resistor bypassed, draws 403mA @ 3.2 across LEDs
Does that help ?
BTW the two 5.1 Ohm resistors connected in parallel are heating up, 170 degrees Fahrenheit.
 
Last edited:

That's good information. Apparently the Vf is a little higher than 3.2V even but something isn't right. With this setup running, what's the supply voltage from the converter?
 
Last edited:

Status
Not open for further replies.

Part and Inventory Search

Welcome to EDABoard.com

Sponsor

Back
Top