Continue to Site

Welcome to EDAboard.com

Welcome to our site! EDAboard.com is an international Electronics Discussion Forum focused on EDA software, circuits, schematics, books, theory, papers, asic, pld, 8051, DSP, Network, RF, Analog Design, PCB, Service Manuals... and a whole lot more! To participate you need to register. Registration is free. Click here to register now.

Building the impedance measurement circuit

Kamran786

Newbie level 6
Newbie level 6
Joined
Jul 11, 2024
Messages
12
Helped
0
Reputation
0
Reaction score
0
Trophy points
1
Activity points
207
Dear Members,

I hope you are all doing well.

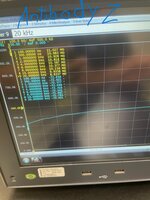
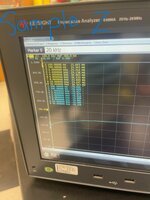
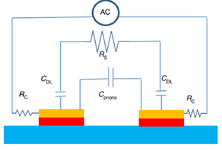
I am a PhD student and completely new to circuit design. I need a compact-sized circuit and prefer not to use an impedance analyzer due to its bulkiness. I am looking to build a circuit capable of automatically measuring the impedance of a sensor in the range of 1MΩ to 30MΩ. However, I am unsure how to approach this task, especially with the various methods available for impedance measurement. I’m not certain which method would be most suitable for automatic measurement in my case. There are different impedance measurement modules, but none seem to have the capability to measure impedance automatically within this range. My sensor’s equivalent circuit is a resistor in parallel with a capacitor.

Could someone guide me through the procedure to build the circuit design? Specifically, I would like to know which components I should purchase to begin building the circuit. If there are any tutorials or resources that you could recommend, that would be very helpful as well.

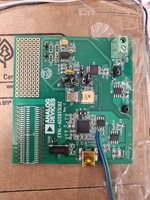
So far, I have only completed the integration of a DDS (Direct Digital Synthesis) with an Arduino to generate a signal with a frequency of 1 kHz and an amplitude of 500mV, which meets my signal requirements. However, I am uncertain about how to proceed with the remaining circuit design.

Your help in this matter would be greatly appreciated.
 
Previously discussed measurement method https://www.edaboard.com/threads/fr...ith-ad-5933-for-impedance-measurement.411660/ is useful if you want to measure frequency dependant complex impedance, similar to function of LCR meter. The impedance characteristic of your sensor wasn't yet mentioned. Is it resistive, capacitive or complex? How is it frequency dependant? Is applicable voltage level restricted, e.g. minimal level due to sensor noise? There may be simpler or better solutions depending on sensor properties.
 
Hi,

* a capacitor in parallel with a resistor.
* 1MOhms ... 30MOhms
* 1kHz, 500mV

What
* accuracy
* precision
* resolution
do you expect? (In numbers please)

I guess my approach would be to use a "dual, simultaneous sampling ADC" to measure V and I.
Maybe with let´s say 32x oversampling. This means you need a sampling frequency of 32 x 1kHz.
Best if it is synchronous to your 1kHz. Not only frequency synchronous, but also phase synchronous. Maybe you could use a PLL to generate the 32x sampling clock from the 1kHz clock. Often the DDS outputs a digital signal that can help you with this.

A microcontroler needs to read the digital signal and mathematically perform the quadrature encoding.
So you get amplitude and phase angle of both signals ...

Indeed, since 1kHz is a rather low frequency ...
.. instead of using a DDS I´d rather use an STM32 microcontroller that is able to feed a DAC to generate the 1kHz. This way you are perfectly synchronous.


so the hardware is like this:
* uC --> DAC --> reconstruction filter --> shunt --> DUT
* DUT_voltage --> (maybe filter) --> ADC1 --> uC
* shunt voltage (DUT current) --> amplifier --> (identical filter as above) --> ADC2 --> uC

Using interenal ADCs maybe even internal DACs the hardware is rather simple.
Using internal DMA data transfer to/from the ADC and DACs the timing is perfect, while the processing time is relaxed
You will find software (parts) doing the math for you

Klaus
 
Inexpensive multimeters give readings up to 1 Meg. You might find a deluxe model going up to 10M or 20M. The ranges are generally in steps of 10X. Do you want a plain meter type or a digital readout? A customary method is to send a low voltage through the Device under test while you measure Amperes through it somehow.

Raw math tells us to send 30V in order to obtain 1uA at 30 Meg. However 30V is unreasonable. So you may need to apply gain via op amp or transistor.
 
Oh,

when I hear about impedance measurement I think about a complex result, so with real and imaginary components.

But when I read Brians post, then I guess he talks about a single value.

@OP: you need to define what result you are after.

Klaus
 
Attached (Agilent Handbook) might help.

Single chip design (PSOC is a mixed signal SOC, System on Chip) :

1723287268514.png


1723287410648.png


This is a 10+ year old project, SOC is Cypress (now Infineon), was done by Kees. Originally done on
8051 core version of PSOC, I recompiled into PSOC 5LP (ARM Core) and it still builds. Kees no longer
around as far as I know . In project files a pdf describing approach/method. You could try it out on
CY8CKIT-059 (~ $15) kit.
 

Attachments

  • Impedance Measurement Handbook.pdf
    5.3 MB · Views: 48
  • Impedance Calculator_Creator22_P35.Bundle.cywrk.Archive01.zip
    2.9 MB · Views: 36
Last edited:
Normally dielectric sensors that conduct with variable bandgaps have increasing C (pF) with conductance or inverse resistance and tend to have a constant RC=Tau for a given bulk size. The same is true of diodes for Rs C(0V) but here Rp||Cp is required not Rs.

The tester probe must not load the sensor.

coax 10 mm/pF = 100pF/m
300 Ohm flat wire 5cm /pF or 20 pF/m (est.)


If you can specify more accurately input C, Tau variables and accuracy, with desired frequency, f range then a suitable design is possible.
 
Last edited:
Previously discussed measurement method https://www.edaboard.com/threads/fr...ith-ad-5933-for-impedance-measurement.411660/ is useful if you want to measure frequency dependant complex impedance, similar to function of LCR meter. The impedance characteristic of your sensor wasn't yet mentioned. Is it resistive, capacitive or complex? How is it frequency dependant? Is applicable voltage level restricted, e.g. minimal level due to sensor noise? There may be simpler or better solutions depending on sensor properties.
Dear Sir,

Thank you very much for your reply.

Regarding the AD 5933: The AD 5933 has some limitations. First, it doesn't measure impedance automatically. We need to calibrate the AD 5933 each time we measure impedance, which makes it unsuitable for measuring unknown impedance. For calibration, we must use a known resistor with an impedance very close to the unknown impedance value of DUT. This limitation is why I stopped working with the AD 5933.

My circuit's impedance is complex; it consists of a resistor in parallel with a capacitor. When we increase the frequency to measure the sensor's impedance, there is a decrease in impedance with an increase in frequency. that's why i said resistor in parallel with the capacitor

In my case, I don't need to measure the phase angle of the impedance; I just need to measure the sensor's impedance automatically, similar to an impedance analyzer, with a range of 1MΩ to 30MΩ.

The equivalent circuit of my sensor is attached below. Your suggestions on this matter would be highly appreciated.
 

Attachments

  • equivalent circuit.png
    equivalent circuit.png
    48.5 KB · Views: 36
Hi,

I have used the AD5933 a couple of times. In my opinion it's implemented is quite straightforward. If it comes to the calibration, I include an analoge switch with a comparable low Ron resistance an capacitance (check ADI's website) to realize a selectable on-board calibration impedance. In combination with an MCU, the calibration and the change of the switch can be realized quite simple. The application note of the AD5933 explains how to implement the calculation quite good.

If you are not that experienced with writing code and making a circuit design, you could use a breakout board hosting the analog switch and the calibration impedance and control its state by an Arduino. If I remember correctly, the GUI provided by ADI to read out the evaluation board is quite user friendly (~10 years ago).

There are even quite some scientific papers available explain the usage and implementation.

BR
 
Hi,

* a capacitor in parallel with a resistor.
* 1MOhms ... 30MOhms
* 1kHz, 500mV

What
* accuracy
* precision
* resolution
do you expect? (In numbers please)

I guess my approach would be to use a "dual, simultaneous sampling ADC" to measure V and I.
Maybe with let´s say 32x oversampling. This means you need a sampling frequency of 32 x 1kHz.
Best if it is synchronous to your 1kHz. Not only frequency synchronous, but also phase synchronous. Maybe you could use a PLL to generate the 32x sampling clock from the 1kHz clock. Often the DDS outputs a digital signal that can help you with this.

A microcontroler needs to read the digital signal and mathematically perform the quadrature encoding.
So you get amplitude and phase angle of both signals ...

Indeed, since 1kHz is a rather low frequency ...
.. instead of using a DDS I´d rather use an STM32 microcontroller that is able to feed a DAC to generate the 1kHz. This way you are perfectly synchronous.


so the hardware is like this:
* uC --> DAC --> reconstruction filter --> shunt --> DUT
* DUT_voltage --> (maybe filter) --> ADC1 --> uC
* shunt voltage (DUT current) --> amplifier --> (identical filter as above) --> ADC2 --> uC

Using interenal ADCs maybe even internal DACs the hardware is rather simple.
Using internal DMA data transfer to/from the ADC and DACs the timing is perfect, while the processing time is relaxed
You will find software (parts) doing the math for you

Klaus
Dear Sir
Thanks a lot for the reply and extensive explanation, highly appreciated Sir
Resolution: I need the resolution of 0.1% , so for that that i will select more than 15 Bit ADC. I don't know this is achievable or not.
Precision: I also need the precision of 0.1%, if not possible it should be less than to 0.5%.
Accuracy: i need 0.1% as well
  • Minimum Impedance: 1 MΩ
  • Maximum Impedance: 30 MΩ
Change Detection Requirement:

  • 0.1% of Minimum Impedance:0.1%×1 MΩ=0.001×1 MΩ=1 kΩ
  • 0.1% of Maximum Impedance:0.1%×30 MΩ=0.001×30 MΩ=30 kΩ
I already generated the signal with DDS i will shift toward STM32 now
I will search about DMS because i don't and also on the software for calculation purpose.

I have a question
Can you draw the diagram of the circuit on the page with the pen, having components name only for my convenience.
In case of further questions, kindly let me know
--- Updated ---

Inexpensive multimeters give readings up to 1 Meg. You might find a deluxe model going up to 10M or 20M. The ranges are generally in steps of 10X. Do you want a plain meter type or a digital readout? A customary method is to send a low voltage through the Device under test while you measure Amperes through it somehow.

Raw math tells us to send 30V in order to obtain 1uA at 30 Meg. However 30V is unreasonable. So you may need to apply gain via op amp or transistor.
Dear Sir.
Thanks for the reply. If i follow this method of measurement,as you explain
My signal amplitude is 500mV and the impedance is 28 M ohm, so the current should be 17.9 nA.

but in my case i have to only measure the impedance, which is unknown in my case, i will then measure the current flow through the device and by ohm law measure the impedance , am i right ?
--- Updated ---

Oh,

when I hear about impedance measurement I think about a complex result, so with real and imaginary components.

But when I read Brians post, then I guess he talks about a single value.

@OP: you need to define what result you are after.

Klaus

Here's the revised version of your text with improved grammar:

Dear Sir,
I have a sensor made from a microfluidic device with a channel inside it. At the bottom of the channel, there are electrodes to which I will send the signal.
Initially, when I flow the antibody through the channel, the antibody attaches to the electrodes surface on the bottom of the channel, resulting in an impedance value of 8 MΩ. After some time, I flow the sample into the channel. The sample again attaches to the electrode surface, causing the impedance value to rise to 28 MΩ.
I need to provide a signal with an amplitude of 500 mV. However, frequency-wise, I will use two different values:
  1. 100 Hz
  2. 1 kHz
I will take measurements at these two frequency points at different time intervals. I will not sweep the frequency from 100 Hz to 1 kHz, and I do not need to measure the phase angle or other parameters.
I hope this clarifies the situation. If you have any further questions, please feel free to ask. Your comments are very valuable to me.
--- Updated ---

Attached (Agilent Handbook) might help.

Single chip design (PSOC is a mixed signal SOC, System on Chip) :

View attachment 192967


View attachment 192969


This is a 10+ year old project, SOC is Cypress (now Infineon), was done by Kees. Originally done on
8051 core version of PSOC, I recompiled into PSOC 5LP (ARM Core) and it still builds. Kees no longer
around as far as I know . In project files a pdf describing approach/method. You could try it out on
CY8CKIT-059 (~ $15) kit.
Thank you so much sir for provide me the material, the PDF file is very valuable, highly appreciated
--- Updated ---

Normally dielectric sensors that conduct with variable bandgaps have increasing C (pF) with conductance or inverse resistance and tend to have a constant RC=Tau for a given bulk size. The same is true of diodes for Rs C(0V) but here Rp||Cp is required not Rs.

The tester probe must not load the sensor.

coax 10 mm/pF = 100pF/m
300 Ohm flat wire 5cm /pF or 20 pF/m (est.)


If you can specify more accurately input C, Tau variables and accuracy, with desired frequency, f range then a suitable design is possible.
Below, I have attached the equivalent circuit of my sensor.

Regarding the capacitance value, I don't know the exact value because we have only measured the impedance using an impedance analyzer. We have never measured the capacitance separately. When the antibody flows inside the sensor, the impedance increases to 8 MΩ, and when the sample flows, the impedance increases to 28 MΩ.

The signal amplitude is 500 mV, and we use two different frequency values at different intervals:

  1. 100 Hz
  2. 1 kHz
I am not going to sweep the frequency from 100 Hz to 1 kHz; I will just fix the frequency and take the measurements.

In terms of accuracy, there is no predefined requirement, but the best accuracy I have achieved is 0.1%. I plan to use an ADC with a resolution of more than 15 bits.

Your suggestions and any questions you may have are highly appreciated.
--- Updated ---

Hi,

I have used the AD5933 a couple of times. In my opinion it's implemented is quite straightforward. If it comes to the calibration, I include an analoge switch with a comparable low Ron resistance an capacitance (check ADI's website) to realize a selectable on-board calibration impedance. In combination with an MCU, the calibration and the change of the switch can be realized quite simple. The application note of the AD5933 explains how to implement the calculation quite good.

If you are not that experienced with writing code and making a circuit design, you could use a breakout board hosting the analog switch and the calibration impedance and control its state by an Arduino. If I remember correctly, the GUI provided by ADI to read out the evaluation board is quite user friendly (~10 years ago).

There are even quite some scientific papers available explain the usage and implementation.

BR
Thank you very much for your reply.

I used the AD 5933 with an Arduino via I2C communication, where I shorted two jumper wires to transfer the data to the Arduino. I am attaching a picture of that setup as well.

I have also reviewed papers regarding the automatic calibration of the AD 5933, but I haven't been able to resolve the issue of automatic calibration. I will revisit this issue.

I even contacted the technical support team at Analog Devices, explaining that I wanted to measure impedance automatically from 1 MΩ to 10 MΩ. However, they informed me that it is not possible. I can provide you with the email correspondence with Analog Devices' technical support team if you share your email address.

If I could successfully measure impedance from 1 MΩ to 10 MΩ, it would significantly simplify my problem. My sensor has a maximum impedance of 28 MΩ and a minimum of 8 MΩ. I would use some parallel resistors with the sensor and create a comparison table. For example, if the sensor's impedance is 28 MΩ, I might measure 6 MΩ, and if the impedance is 8 MΩ, I might measure 1 MΩ. This comparison table would allow me to handle the complex situation much more easily. However, due to the need for repeated calibration of the AD 5933, I stopped using it, even though I was able to transfer the data to the Arduino by writing the code in C++.

If you could assist me in achieving automatic calibration of the AD 5933 for all impedance measurements between 1 MΩ and 10 MΩ without needing to repeatedly change the calibration resistor, I would greatly appreciate your help
--- Updated ---

Hi,

I have used the AD5933 a couple of times. In my opinion it's implemented is quite straightforward. If it comes to the calibration, I include an analoge switch with a comparable low Ron resistance an capacitance (check ADI's website) to realize a selectable on-board calibration impedance. In combination with an MCU, the calibration and the change of the switch can be realized quite simple. The application note of the AD5933 explains how to implement the calculation quite good.

If you are not that experienced with writing code and making a circuit design, you could use a breakout board hosting the analog switch and the calibration impedance and control its state by an Arduino. If I remember correctly, the GUI provided by ADI to read out the evaluation board is quite user friendly (~10 years ago).

There are even quite some scientific papers available explain the usage and implementation.

BR
I even ordered the MUX as well, as i saw in one paper they used the MUX for calibration, but i failed to calibrate using that.
Have you achieved the automatic calibration of AD 5933 between 1M ohm to 10M ohm automatically and AD 5933 automatically measure the unknown impedance value lies between this range anywhere ?
 

Attachments

  • equivalent circuit.png
    equivalent circuit.png
    48.5 KB · Views: 32
  • 20240810_165936.jpg
    20240810_165936.jpg
    2.1 MB · Views: 33
Last edited:
If you do not want to use the single chip approach shown in post # 6, you
can config it (again 1 chip) to give you this basic approach :

1723328964698.png


So I show 2 DDS depending on how you will do the measurements. Note they can be 24 or 32 bit, can use their
API lib to control DDS phase and freq, or use a HW buss approach to do the control. If using 32 bit resolution is
5 mili hertz.

The DelSig is 20 bits, can config to measure to 100 mV outside each rail for range. Onchip Vref is good to +/-
.1%. Analog mux on board if needed.

The CORDIC component can be used to compute trig values if needed. Or just use code. Mixer available for
any needed signal property manipulation.

Several OpAmps on chip if G needed or impedance buffering in signal path.

USB UART and / or LCD controller for interface to user.

All components (the above, a "component" in PSOC land is an onchip resource) have a rich lib of API
calls to setup/control. Design could be done as automatic, no user intervention, using DMA and onchip
LUTs to manage.

IDE (PSOC Creator) and compiler free.

Note if you need a custom onchip component you can use schematic capture of the various
logic elements and or Verilog and create your own. Also the SOC is routable both analog and digital
onchip and of course out to pins.


Regards, Dana.
 
Is this a vector resistance or scalar impedance function?


Can you apply a current source to measure impedance with variable Vac?

Is it necessary to always apply 500 mVac to measure current and compute resistance?

Is it pk, pp or RMS? or don't care. ?

How long can the resistance measurement be so as not to interfere with the process by using a current source? For averaging in case of noise.

CC Test concept. (Falstad web simulator)
--- Updated ---

Alternate Megaohmeter using CC using Voltage driver
 
Last edited:
These all use the AD59xx for DFT and other functions which ought to be good.

I didn't read the reason why the tolerance specs demand such recalibration for each measurement vs stored short-open-load calibration constants.

Of course, with an appropriate test jig, automated recalibration can be done quickly. I have done this before (with help) on eddy current probes in steel tubing with XY vector reference defects.
 
Hi,

for me it is still unclear why you are limited to an amplitude of 500 mV, as well as why have you selected 100 Hz and 1 kHz as excitation frequency.

Which kind of nature is your DUT, e.g. tissue? Does it have caracteristic properties at 100 Hz and 1 kHz, is that the reason you have chosen this two ferquencies?

The sketch provided by you looks like an capacitively coupled sensor system to me. Is it a PCB based planar meander/interdigitate sensor? If so, it has a capacitve nature and increasing the excitation frequency will lower the impedance.

Br
 
If you do not want to use the single chip approach shown in post # 6, you
can config it (again 1 chip) to give you this basic approach :

View attachment 192981


So I show 2 DDS depending on how you will do the measurements. Note they can be 24 or 32 bit, can use their
API lib to control DDS phase and freq, or use a HW buss approach to do the control. If using 32 bit resolution is
5 mili hertz.

The DelSig is 20 bits, can config to measure to 100 mV outside each rail for range. Onchip Vref is good to +/-
.1%. Analog mux on board if needed.

The CORDIC component can be used to compute trig values if needed. Or just use code. Mixer available for
any needed signal property manipulation.

Several OpAmps on chip if G needed or impedance buffering in signal path.

USB UART and / or LCD controller for interface to user.

All components (the above, a "component" in PSOC land is an onchip resource) have a rich lib of API
calls to setup/control. Design could be done as automatic, no user intervention, using DMA and onchip
LUTs to manage.

IDE (PSOC Creator) and compiler free.

Note if you need a custom onchip component you can use schematic capture of the various
logic elements and or Verilog and create your own. Also the SOC is routable both analog and digital
onchip and of course out to pins.


Regards, Dana.
Dear Sir for the reply, highly appreciated.
1) I used the AD 9851 DDS to generate the signals, the signals frequency is control by Arduino board. It is 32 bit .I already generated the signal using that.
2) i will buy the seigma delta ADC having 20 bits.
3) i will use the library like FastTrigonometry and Arduino_CORDIC to perform the trigonometric calculation.
4) I already have AD 8001 operational amplifier ,but it high speed, i will use the small range opm like OPA 134, 2134,1612 etc..
5) do you recommend me to use PSoC Creator software for building the circuit. Previously i have planned to use LTSpice, the reason it has strong community and many you tube tutorial, so if i will struck somewhere, i it have possibility to move out
--- Updated ---

Is this a vector resistance or scalar impedance function?


Can you apply a current source to measure impedance with variable Vac?

Is it necessary to always apply 500 mVac to measure current and compute resistance?

Is it pk, pp or RMS? or don't care. ?

How long can the resistance measurement be so as not to interfere with the process by using a current source? For averaging in case of noise.

CC Test concept. (Falstad web simulator)
--- Updated ---

Alternate Megaohmeter using CC using Voltage driver
Dear Sir,

Thank you very much for your reply.

  1. I am looking for vector resistance because the sensor impedance is complex (R + jX), and I also need the phase angle information.
  2. Regarding applying the current source and measuring the voltage, I haven't worked on it yet. I have already integrated the DDS with Arduino to generate the required 500mV RMS signal.
  3. Yes, it is necessary to apply this amplitude of signal and keep it constant. The reason is that applying a higher amplitude might lead to electrode erosion.
  4. The signal is RMS; I apologize for not mentioning this earlier.
  5. Process-wise, I plan to wait for 1-2 minutes to obtain the best readings and minimize noise as much as possible.
  6. I will check out the simulator you mentioned. I plan to use LTspice because it has a wide range of tutorials and a large expert community. If I encounter any issues, I am confident someone will be able to help me. Can you recommend me some best circuit designing software having capability to do simulation as well and it should be free of cost :)
--- Updated ---

These all use the AD59xx for DFT and other functions which ought to be good.

I didn't read the reason why the tolerance specs demand such recalibration for each measurement vs stored short-open-load calibration constants.

Of course, with an appropriate test jig, automated recalibration can be done quickly. I have done this before (with help) on eddy current probes in steel tubing with XY vector reference defects.
These are very valuable articles. I must study about it. Thanks for the share
--- Updated ---

These are very valuable articles. I must study about it. Thanks for the share
--- Updated ---

Thanks a lot Sir, I will look for this article, Thanks a lot
--- Updated ---

Hi,

for me it is still unclear why you are limited to an amplitude of 500 mV, as well as why have you selected 100 Hz and 1 kHz as excitation frequency.

Which kind of nature is your DUT, e.g. tissue? Does it have caracteristic properties at 100 Hz and 1 kHz, is that the reason you have chosen this two ferquencies?

The sketch provided by you looks like an capacitively coupled sensor system to me. Is it a PCB based planar meander/interdigitate sensor? If so, it has a capacitve nature and increasing the excitation frequency will lower the impedance.

Br
Dear Sir,

Thank you very much for your reply. I will try to address your points one by one:

I am new in the lab, and the parameters used for the experiment were set by other students. These parameters are fixed, and I cannot change them. The reason is that applying higher voltage could create a Joule heating effect inside the channel due to over-voltage, and it may also cause corrosion of the electrodes. I have observed this during previous experiments. This is an order from my professor, so I cannot alter this parameter.

My DUT (Device Under Test) is a microfluidic device with interdigitated electrodes made of gold at the bottom. The sample containing the pathogen flows inside the channel and over the electrodes. We apply the signal to the electrodes at the bottom of the channel. I am attaching the impedance analyzer results of my sensor when we applied a wide range of frequencies. For my case, I only need to apply 100Hz and 1kHz. The phase angle is -70°, and the impedance is 11MΩ when the antibody flows, and 25MΩ when the sample flows. After calculations, the resistance (R) I obtained is around 11MΩ, and the capacitance is 8pF. If there is any problem with my calculations, please let me know. I am attaching the link of calculation that i did

You are correct that increasing the frequency decreases the impedance significantly. For example, the impedance that is 25MΩ at 1kHz drops to less than 1MΩ at a frequency of 1MHz.
https://chatgpt.com/c/ccf306d1-b554-4859-b96c-9b78f55f97ab
 

Attachments

  • impedance data 2.jpg
    impedance data 2.jpg
    199.4 KB · Views: 19
  • impedance data.jpg
    impedance data.jpg
    183.1 KB · Views: 23
Last edited:
Hi,

For my case, I only need to apply 100Hz and 1kHz. The phase angle is -70°, and the impedance is 11MΩ when the antibody flows, and 25MΩ when the sample flows. After calculations, the resistance (R) I obtained is around 11MΩ, and the capacitance is 8pF. If there is any problem with my calculations, please let me know. I am attaching the link of calculation that i did

please share your calculation. An impedance with a magnitute of 11 Meg (or 25 Meg) and a phase of -70° will for sure not result in a in a reistance (real part {Re}) of 11 Meg.

BTW, the measurment results are nor really useful, as it seems you used the complete frequency span instead of the range of interest. A result up to ~100 kHz would be more helpful to interpret.

BR
 

LaTeX Commands Quick-Menu:

Part and Inventory Search

Welcome to EDABoard.com

Sponsor

Back
Top