Continue to Site

Welcome to EDAboard.com

Welcome to our site! EDAboard.com is an international Electronics Discussion Forum focused on EDA software, circuits, schematics, books, theory, papers, asic, pld, 8051, DSP, Network, RF, Analog Design, PCB, Service Manuals... and a whole lot more! To participate you need to register. Registration is free. Click here to register now.

Please help power supply dead 110V to 24vdc 5vdc

Status
Not open for further replies.

imcool1

Newbie level 4
Newbie level 4
Joined
Feb 19, 2020
Messages
6
Helped
0
Reputation
0
Reaction score
0
Trophy points
1
Activity points
48
hello,
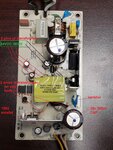
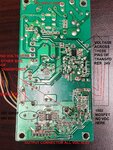
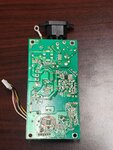
this printer power supply is dead,I cant figure out with my limited knowledge that why the lower output part of circuit is not getting any DCV. I have measured voltages across transformer and I found 24v but nothing on the other side of transformer, please have a look at pictures, any help is kindly appreciated. thanks.

Please, right click on image and open in new tab, for some reasons it will show up too big in this post

LpAl6TS.jpg


vCLRwLA.jpg


xTKZhzF.jpg


wFAUw7t.jpg


Thank you
 

Attachments

  • c2.jpg
    c2.jpg
    596.2 KB · Views: 274
  • c1.jpg
    c1.jpg
    622.7 KB · Views: 232
  • c3.jpg
    c3.jpg
    449.5 KB · Views: 207
  • c4.jpg
    c4.jpg
    599 KB · Views: 242

U1 IC
C4w1D72.jpg


Updated readings and measurements.
WZsIZ22.jpg
 

Hi,

Seems to be something basic.
Maybe FS1 is a fuse and is blown ...
Unpower your circuit and check continuity of FS1.

Klaus
 

Two points to make here:

1. You show DC voltages across the transformer primary and secondary, you can't measure these voltages with a normal test meter and they are not DC anyway.

2. There will be very high voltages on the primary side, easily enough to kill you. Be extremely careful connecting anything to them, including testmeter probes and under no circumstances try to measure voltages from one side of the transformer to the other. There is a lines, roughly side to side through the 'varistor' (more likely a high voltage capacitor), through the transformer and then through the 4 and 8 pin optocouplers (PC1, PC2?) that divides the primary high voltage side from the safer secondary and isolated low voltage side.

The first test to do is connect the AC power and measure the DC voltage across the 150uF/400V capacitor. It should have around 210V DC across it, if that is missing, either the input fuse is blown or the bridge rectifier has failed. If they are OK and the voltage is much lower, most likely the capacitor itself has failed.

Brian.

i tested the cap 150uf/400v and there is only 24VDC across it when the ac power is connected. so i will see the bridge rectifier and then cap.
thanks
 

ntc could have gone open ckt - but more likely the low power ckt supplying the IC has died - hence the IC dead & main mosfet

check o/p diode just in case this has gone short ...
 

The big capacitor is fed directly from the bridge rectifier which in turn is fed through the filter and fuse from the AC input. It could be the NTC if that's what is hidden under the white silicone but to get 24VDC implies there is a high impedance path very close to the AC input connection.

Imcool1, with the AC unplugged and the board left to discharge for a minute or so, use your testmeter on the resistance range to measure across the pins of FS1, then the green disc near the AC connections and tell us what you get.
You could also measure from each of the middle two pins of BD1 to each of the AC input wires and tell us the resistance there too.

*UNDER NO CIRCUMSTANCES DO THIS WITH THE POWER TURNED ON*

Brian.

hello, i measured more voltages, please have a look..

YVgaQsT.jpg
 

I would say it is highly unlikely to be that IC. More likely the other one as the fault appears to be on the AC side of the supply.

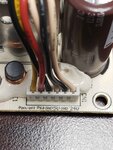
It is difficult to trace the connections from the photograph but it appears the yellow wire "Pon/off" is connected to the optocoupler PC2 then on to the triac. I would guess it turns the AC off to the bridge rectifier. Maybe the optocoupler has no supply or maybe it just isn't controlling the triac. Check R3 is reading the correct value. If it isn't my next guess would be PC2 itself. It is a zero crossing triac driver and a suitable replacement is type MOC3083.

Brian.
 

FS1 is a fuse - check that, check the green ntc . ... check the bridge rectifier ...

- - - Updated - - -

check your mains lead and mains supply too ...
 

The big capacitor is fed directly from the bridge rectifier which in turn is fed through the filter and fuse from the AC input. It could be the NTC if that's what is hidden under the white silicone but to get 24VDC implies there is a high impedance path very close to the AC input connection.

Imcool1, with the AC unplugged and the board left to discharge for a minute or so, use your testmeter on the resistance range to measure across the pins of FS1, then the green disc near the AC connections and tell us what you get.
You could also measure from each of the middle two pins of BD1 to each of the AC input wires and tell us the resistance there too.

*UNDER NO CIRCUMSTANCES DO THIS WITH THE POWER TURNED ON*

Brian.

7R3QphS.png
 

That is good. I would guess R1 is either 300 Ohms or 330 Ohms.

The snag with this PSU is how it starts up when the AC is applied. It is difficult to reverse engineer the design from the photographs but it seems the incoming AC goes to one side of the bridge and a triac is in series with the other side. The triac is turned on by the MOC3083 and that is turned on by the Pon/off voltage on the yellow wire. In essence the voltage on the yellow wire controls the triac as though it was the mains switch.

Therein lies the problem, where does the voltage come from in the first place? The LED side of the MOC3083 needs power from somewhere and it appears at first glance to be from the output side of the PSU. It is quite reasonable to expect that a low voltage on the yellow wire means 'on' and it is the ground return side of the LED but the other side needs some voltage to be able to provide the LED current. If the triac isn't turned on, how can the PSU provide that voltage?

There has to be some start-up circuit that makes the triac conduct for a moment when the AC is applied. I will attempt to trace the schematic but it will take a while.

Brian.
 

I managed to trace some of the circuit but it is quite difficult with some parts obscured by others in the photos.
It looks like the optocoupler drives the triac and the AC side of it is kept in partial conduction by a phase shift circuit comprising R7, R6, R5, R4 and what I would guess is a capacitor, probably the brown one just visible to the top left of the 150uF one. I'm guessing, because I can't see any values, that it is responsible for the 24V you see and that in turn is just enough to start the switcher oscillator and produce a low voltage output.

The '1002' MOSFET looks more like a double diode to me so I wouldn't expect a normal meter to see any DC across it. The 'Varistors' are also high voltage capacitors I think.

I'm still puzzled about the power source to the optocoupler LED, intuition says it gets power from somewhere else but I assume this is the only power supply in the device.

Brian.

hi, thanks so much replying,
can you please tell me what values you need to see and what measurements or part number you would like to see so i can measure/read them and share.

REgards
 

Check the values of R4 through R7, they are probably all the same value.
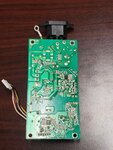
A photograph taken from above the AC socket might help as many of the components are obscured by the big capacitor. As you can probably tell, tracing a schematic from photographs is quite hard especially when you can't see what is on the other side of some of the solder joints. If you can do a close-up picture of the middle of the track side it would be useful as following the tracks is difficult at low magnification.

Brian.
 

Status
Not open for further replies.

Part and Inventory Search

Welcome to EDABoard.com

Sponsor

Back
Top