Continue to Site

Welcome to EDAboard.com

Welcome to our site! EDAboard.com is an international Electronics Discussion Forum focused on EDA software, circuits, schematics, books, theory, papers, asic, pld, 8051, DSP, Network, RF, Analog Design, PCB, Service Manuals... and a whole lot more! To participate you need to register. Registration is free. Click here to register now.

pic18f4550 demo board

Status
Not open for further replies.

angadaria

Junior Member level 2
Joined
Mar 23, 2011
Messages
21
Helped
0
Reputation
0
Reaction score
0
Trophy points
1,281
Activity points
1,434
hi guys i have build my own demo board(programmer not included) for pic18f4550. i mounted the component on and then checked for the supply levels on vss and vdd pins they seems to be good. but when i tried to do LCD code it is not displaying anything on LCD as if the demo board is not working..i have power ON LED and it works fine too....i m uploading the image of my design. it is made using express pcb...
plz suggest as what is wrong and what should i do to make it work?


thanks and regards
akshay gadaria
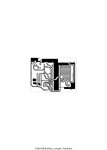
 

Attachments

  • pcb_test.jpg
    pcb_test.jpg
    45.5 KB · Views: 85

First, you don't seen to have any decoupling capacitors at the power pins of the 18F4550. These are essential (although the chip might work without them, you'll more likely have problems).

I take it you are pulling the chip off the board to program it, since you have used the PGC/PGD lines for the LCD databus.

Other than that, without seeing the code, no way to know. Do you get the line of blank/black squares on the LCD if you turn the contrast all the way up? That means that the LCD is correctly powered, but has not been initialised (properly).

A hint though: personally, with any 'test' type of build, I always try to include an LED powered up by the PIC's first lines of code. It gives a definite go/no-go on the PIC running.
 

yes i m taking the chip off the board to program it, and i can also see the black square on LCD ..just for your info i m using 20*4 LCD. if you can also let me know how to initialize it properly that would be good...now the code that i m using for LCD works good on another board so code seems to be good..
and what about decoupling caps on power pins? i mean which value shall i use and where exactly to connect it?

thanks for the help

thanks and regards
akshay gadaria
 

yes i m taking the chip off the board to program it, and i can also see the black square on LCD ..just for your info i m using 20*4 LCD. if you can also let me know how to initialize it properly that would be good...now the code that i m using for LCD works good on another board so code seems to be good..

Can you post the schematic of your dev board? Also post the LCD code to which you are referring.

Is the code Assembly or C language? If C language, what compiler are you utilizing?

What is the system clock frequency?

and what about decoupling caps on power pins? i mean which value shall i use and where exactly to connect it?

A typical value of 0.1uF between Vdd and Vss as close to the PIC as possible.


BigDog
 

hi BigDog,
this is the code for my LCD

Code:
#include<p18f4550.h>
//-------vector relocation-----------
extern void _startup (void);
#pragma code _RESET_INTERRUPT_VECTOR = 0x1000

void _reset (void)
{
	_asm goto _startup _endasm
}

#pragma code
#pragma code _HIGH_INTERRUPT_VECTOR = 0x1008
void high_ISR (void)
{
}

#pragma code
#pragma code _LOW_INTERRUPT_VECTOR = 0x1018
void low_ISR (void)
{
}
#pragma code

//------------------------------------
//-------------------------------------
void delay(unsigned char x)
{
int i,j;
for(i=0;i<=x;i++)
for(j=0;j<=1275;j++);
}
void lcd(unsigned char x, unsigned char y)
{
PORTB=x;
PORTDbits.RD5=y; // select command register
PORTDbits.RD6=0;  // ,make rw low
PORTDbits.RD7=1; // make en high
delay(1);
PORTDbits.RD7=0;  // make en low
}

void main()
{
int i,j,k,l,m;
unsigned char a[]={0x38,0x01,0x06,0x0e};
unsigned char b[]={"Welcome "};
unsigned char c[]={"good"};
unsigned char d[]={"morning"};
unsigned char e[]={"to all"};

TRISB=0x00;
TRISD=0x00;

for(i=0;i<=3;i++)
{
lcd(a[i],0);
}
lcd(0x80,0);
for(j=0;j<=6;j++)
{
lcd(b[j],1);
delay(3);
}
lcd(0xc0,0);
for(k=0;k<=3;k++)
{
lcd(c[k],1);
delay(3);
}
lcd(0x94,0);
for(l=0;l<=6;l++)
{
lcd(d[l],1);
delay(3);
}
lcd(0xd4,0);
for(m=0;m<=5;m++)
{
lcd(e[m],1);
delay(3);
}

lcd(0x0c,0);
while(1);
}

i m using MpLab IDE and C18 compiler...
the crystal on board is 20MHz...
i will try with caps between vdd and vss..
and dev board image is already there on the 1st post of these thread..plz see...

thanks and regards
akshay gadaria
 
Last edited by a moderator:

i m using MpLab IDE and C18 compiler...
the crystal on board is 20MHz...

One of the common issues with the PIC18F series are the Phase Lock Loops which generate a higher clock frequency from the attached crystal.

Often the PIC18F4550 is operating a much higher system clock frequency than expected, usually 48MHz instead of the 20MHz attached crystal.

The PLL is configured via Configuration Register Settings, try disabling the PLL and see if the LCD routines function as expected.

Routines with software delays, like the code you have posted, are very dependent on the system clock frequency.

If the delays in the routines are too short, due to the higher system clock, the LCD may not initialize correctly.


BigDog
 

Status
Not open for further replies.

Part and Inventory Search

Welcome to EDABoard.com

Sponsor

Back
Top