Continue to Site

Welcome to EDAboard.com

Welcome to our site! EDAboard.com is an international Electronics Discussion Forum focused on EDA software, circuits, schematics, books, theory, papers, asic, pld, 8051, DSP, Network, RF, Analog Design, PCB, Service Manuals... and a whole lot more! To participate you need to register. Registration is free. Click here to register now.

PIC18F452

Newbie level 3
Joined
May 22, 2024
Messages
3
Helped
0
Reputation
0
Reaction score
0
Trophy points
1
Activity points
27
I HAVE PROGRAMMED PIC18F452 SUCCESSFULLY USING PIC KIT 3 but the issue i am facing is that the program isnt getting executed by the IC. The lcd gets the power and is getting on but it isnt displaying the required sentence. i am making a door unlock system which drives a DC motor when the password entered is correct. any idea why PIC isnt executing the code
 
If the code is good (we can't see it) and the hardware is good (we can't see it) your problem is probably the configuration bits. Simulators often ignore the bits but real life won't so that could be the difference.

Brian.
 
Without seeing the code or setup it is quite impossible to speculate anything. However, if you are confident that your code is OK, and so are your connections, I suggest you adjust the variable POT connected to the V0 pin of your LCD.
 
Without seeing the code or setup it is quite impossible to speculate anything. However, if you are confident that your code is OK, and so are your connections, I suggest you adjust the variable POT connected to the V0 pin of your LCD.
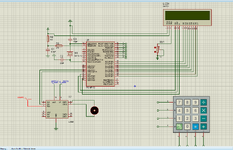
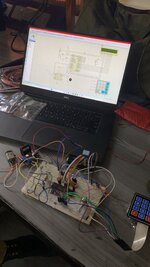
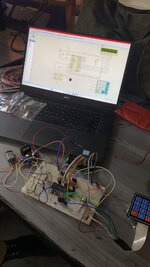
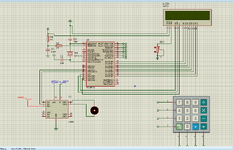
here is the code ,harware and proteus simulation
 

Attachments

  • FInal Code(Working).txt
    8.4 KB · Views: 80
  • proj prot.png
    proj prot.png
    86.9 KB · Views: 95
  • proj hardware.jpg
    proj hardware.jpg
    176.9 KB · Views: 97
If the code is good (we can't see it) and the hardware is good (we can't see it) your problem is probably the configuration bits. Simulators often ignore the bits but real life won't so that could be the difference.

Brian.
 

Attachments

  • FInal Code(Working).txt
    8.4 KB · Views: 77
  • proj hardware.jpg
    proj hardware.jpg
    176.9 KB · Views: 82
  • proj prot.png
    proj prot.png
    86.9 KB · Views: 92
Three points I notice straight away:

1. no decoupling capacitors across VSS & VDD on the breadboard. This WILL stop it working!
2. you have "RW=0" in your code twice but no "RW= 1", it may be that your LCD does not need RW but please check.
3. RV1 probably wants connecting across VSS and VDD with the wiper going to VEE, not as you have it wired.

Brian.
 
Have you thought about using a parallel to serial I2C chip for the LCD? it makes things alot simpler.
 
Code:
lcdcmd(0x38); //8-bit mode 2 lines
    delay();
    lcdcmd(0x01); //clear screen
    delay();
    lcdcmd(0x06);
    delay();
    lcdcmd(0x0E);
    delay();
    lcdcmd(0x0C); //cursor right shift
    delay();


Are these commands OK? kindly attach the datasheet of LCD as well where these are mentioned.

Also you don't need to initialize mode again and again in program. just initialize it at start up
 
There is a very good chance that your home-written 'delay' functions (i.e. using basically empty 'for' loops) will not be delaying at all. Even at 'no optimisation' your compiler could well be seeing that the inner loop is empty and so removing it and then seeing the outer loop is now empty and so removing that as well.
Use the compiler provided delay macros (read the documentation on how to use this properly)
Also make sure that the delays are of the correct length for the LCD. It has the HD44780 chip in it and this required minimum delays after (especially) some of the initialisation commands which must be given in the correct order. (Look up any LCD with the HD44780 chip and it should give you the initialisation sequences and delays - I found https://www.sparkfun.com/datasheets/LCD/HD44780.pdf with a quick Google search but there are many other documents out there.)
Susan
 

LaTeX Commands Quick-Menu:

Similar threads

Part and Inventory Search

Welcome to EDABoard.com

Sponsor

Back
Top