Continue to Site

Welcome to EDAboard.com

Welcome to our site! EDAboard.com is an international Electronics Discussion Forum focused on EDA software, circuits, schematics, books, theory, papers, asic, pld, 8051, DSP, Network, RF, Analog Design, PCB, Service Manuals... and a whole lot more! To participate you need to register. Registration is free. Click here to register now.

PEMF and RIFE dual circuit schema questions

Status
Not open for further replies.

drhiii

Newbie level 5
Newbie level 5
Joined
Mar 26, 2019
Messages
10
Helped
0
Reputation
0
Reaction score
0
Trophy points
1
Activity points
148
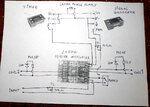
I have a very amateur level of competence when it comes to electronics, circuits, etc. Am looking at a Youtube project that combines a PEMF device (Pulsed Electromagnetic Field Therapy) and a RIFE device (Royal Rife, Tesla, etc).. dual circuitry. There are two or three elements in the hand drawn schematic that I do not understand and was hoping someone could put eyes on it and identify those pieces. I have sourced almost all of the parts, but a parts list would really have helped. I’ve tried to ask the originator of this schema but have yet to receive any replies. The engineer who drew this up posted barebones schema and vid, and I can almost get through it. Almost. So looking to this learned group for any help to interpret this schema and video.
Am attaching an image with 2 balloons w/text and pointers asking “what is this?”, etc. Plus an additional question is… on the front panel there appear to be two, or three different kinds of lights. Are they all the same(for pulse, pulse, out, out and power), as in LEDs?, Or might they different kind of lights for the three different types/labels. Cannot discern from the schema and vid.
Am also attaching some images that snapshot the project, taken from the video.
Any advice would be most helpful. At the least
Fwiw, the end game of this is the PEMF aspect assist my wife who lives in chronic pain (6 total joint replacements for instance). Additionally, she is a liver transplant recipient.. so lots going on here. The magnetic pulse fields do provide a measure of relief. Hence why am pursuing this.

Youtube link: https://www.youtube.com/watch?v=-KJtAUd_Yec&t=5s

Schematic: https://snag.gy/ZGwE8N.jpg
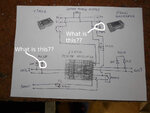

Frex+PEMF-SchematicwithPots-withQuestions.jpgFrex+PENF-internal.jpgFrex+PEMF-FrontPanel.jpg
 

One symbol is ground (possibly earth, to drain away static charge).

The other symbol looks like either a diode or resistor, inline with an led. Probably a resistor same value as the one inline with the led at right.
 

One symbol is ground (possibly earth, to drain away static charge).

The other symbol looks like either a diode or resistor, inline with an led. Probably a resistor same value as the one inline with the led at right.

Thank you for your reply. Yes, I thought the left side was also the same resistor. So thank you for verifying.

The second question was the symbol for "ground". Can you recommend what that second symbol connects to? It just shows ground. But I am not sure what that ground is supposed to connect to.

If you can interpret that, I would be in your debt. Tx
 

It looks as though ground is the same as V-. Most construction also has ground for chassis ground. So a metal enclosure serves as ground for signals, power supplies, etc.

However there is the case of a bipolar supply. This is often used in a power amplifier. It's not entirely clear looking at your schematic, whether you need a single supply or a split bipolar supply?

If it's a single supply then V- is ground.

If it's a bipolar supply then ground is 0v, and some sections run on positive polarity, and other sections run on negative polarity.
 

Sir, again, thank you for the reply. Hopefully fortunately, I finally was able to get a reply from the person who built this device. Asked him the question and awaiting his response.

And yes, according to the schematic, it does appear to be connected to V-. It is a no brainer I know... but was not 100% confident given the sparseness of the schema.

Will letcha know what I learn from the originator. Building a working PEMF device can be the diff between $20-$30 and many more $$$...


It looks as though ground is the same as V-. Most construction also has ground for chassis ground. So a metal enclosure serves as ground for signals, power supplies, etc.

However there is the case of a bipolar supply. This is often used in a power amplifier. It's not entirely clear looking at your schematic, whether you need a single supply or a split bipolar supply?

If it's a single supply then V- is ground.

If it's a bipolar supply then ground is 0v, and some sections run on positive polarity, and other sections run on negative polarity.
 

And shortly after replying to you, the originator responded. Verified what you said. I just wanted to make certain this was a valid circuit and connection.

My last acquisition is to acquire a 100v/36v power supply. I want to see what the diff is between a 19v and 36v system... if there is much diff at all.

Again, much appreciated... your continued replies. For educating. Will post a pic of the finished build...
 

chronic pain

Have you tried the muscle stimulation units which send electrical pulses through small pads that stick to the skin? The sensation is pleasant (and not shocking). Easy to use, runs on batteries. Prices are inexpensive at the pharmacy. Known as: TENS (Transcutaneous Electrical Nerve Stimulation) and EMS (Electrical Muscle Stimulation).

As to their effect on bone joints or liver, it's uncertain.

These are not the same as radionics and radioclast devices, which were promoted a hundred years ago as 'cure-alls' and are still made in various forms.

Yes, have had a TENs unit for several years. Have utilized a slew of devices throughout the years. 6 total joint replacements has been, well.. you learn a great deal about causes, surgery, healing. And their relationships to the liver and transplantation.

Appreciate your additional ideas. Am pressing forward with this PEMF unit tho. My wife does respond to a lower powered one. Have to try EVERYTHING…

Speaking of 100 years ago, we live on the same street that Tesla had a lab on in Colorado Springs. Has nothing to do with anything... just not lost on me. Fun coincidence.
 

Hello, thought I would try and come back for a follow up question given that I received responses from here, to the prior plea for help on this circuit. Note that I was able to raise the engineer who crafted this original circuit and he gave an answer that I somewhat understand… but hoping someone could clarify the addition of two resistors that are NOT part of the original schematic.

I have attached a visual snapshot of the entire circuit with these additional resistors, a second snapshot zoomed in to point in question, and also the overall schematic that does NOT include these additional resistors and what I believe is a fuse that am looking for help on answering. So…..

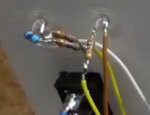
Question is… on the LED that displays as the Power on/off indicator, I saw in the video (and extracted a snapshot) that there were two resistors and what I believe is a fuse. This was not in the original schematic. I asked what these were and his reply was “These are serial resistors that serve to reduce the current through the LED diode and have a value of about 1 Kohm. In addition, these LEDs only serve as a visual indication and have no impact on the work of the device.”

I understand the LED for power indicator is optional sure. I would like however to add this LED to the circuit. What I am looking for help on is… are these resistors simply a 1K ohm, ½ watt resistor? And by serial, how are they wired? Note that this is for a 19v power supply which is used in the original design. But this circuit can go up to 36v.

So for a 19v power source, what are these resistors, how would this be wired in a 19v power source? Serial as in 1K ohm + 1K ohm soldered to the pot? Or how would this be wired? I cannot quite make this out in the snapshot.

And secondly, what would be required if one were utilizing a 36v power source? A different resistor? How would that be wired?

And, I assume the blue object in the snapshot is a fuse??? Is one really needed and if yes, can someone also clue me in on its description so I can order it, and how is it wired within the mix of the 19v and 36v circuit?

Any advice will yet again be much appreciated. I can follow directions, am decent at soldering and constructing things… but am not trained in electrical engineering hence as the saying goes.. “a little knowledge is... etc etc etc.”**broken link removed**
PEMF-RIFE-PPowerSupplyLed.jpg
Frex+PEMF+Pots-original.jpg
 

Attachments

  • SerialResistors.jpg
    SerialResistors.jpg
    88.1 KB · Views: 150

* It's not common to put a fuse next to an led. It's sensible to put a fuse where it's easy to change and not have to unsolder it from components.

* A single 19v laptop power supply should be adequate to send a few micro-Amperes through human tissue. Merely a fraction of a mA is enough to cause alarm. One milli-A is able to stop the heart. Just because the designer uses a 50W amplifier doesn't mean it all goes through a human being.

* As for what amount of led's... Your schematic has an led for each coil that lights with each pulse. It's wise in addition to add a Power-On led. One benefit is that it acts as a bleeder load, draining charge from capacitors when you turn off the device. It's a safeguard since the device is connected to someone.
 

Hi,

* A single 19v laptop power supply should be adequate to send a few micro-Amperes through human tissue.
With many laptop PSUs you don't need extra circuitry to to cause some microamperes to flow through your body.
Just touch the connector and there may be a lot of leakage current to Earth-ground.

I recommend to use a battery or a PSU specified for "medical" use. They have low leakage current via Earth-ground.

Klaus
 

* It's not common to put a fuse next to an led. It's sensible to put a fuse where it's easy to change and not have to unsolder it from components.

* A single 19v laptop power supply should be adequate to send a few micro-Amperes through human tissue. Merely a fraction of a mA is enough to cause alarm. One milli-A is able to stop the heart. Just because the designer uses a 50W amplifier doesn't mean it all goes through a human being.

* As for what amount of led's... Your schematic has an led for each coil that lights with each pulse. It's wise in addition to add a Power-On led. One benefit is that it acts as a bleeder load, draining charge from capacitors when you turn off the device. It's a safeguard since the device is connected to someone.


Thank you for your reply. I understand all that you are saying yes.

Question on the resistors tho. In the schematic, there are no resistors listed next to the LED connected to the power supply, showing on/off. What I was trying to determine is what resistors were added to the video/snapshot and how they were wired. This in a 19v power source. If anyone could shed light on what resistors would be used in this circuit, at that juncture, would be much appreciated. The originator responded by saying these were 1K ohm in serial. They didn't look to be in serial, but parallel. Just trying to sort that out. Am not an electrical engineer hence my sophomoric questions. tx

Hi,


With many laptop PSUs you don't need extra circuitry to to cause some microamperes to flow through your body.
Just touch the connector and there may be a lot of leakage current to Earth-ground.

I recommend to use a battery or a PSU specified for "medical" use. They have low leakage current via Earth-ground.

Klaus

Tx for your reply. I will review which is more suited... battery v. PSU. tx
 

LED's usually need a safety resistor in series to limit current. 20mA is a conventional spec but I would stay below 10mA because quality is unpredictable these days.

So for a 19VDC supply, 1700 ohms should be okay. Even 10k should make it light dimly.
 

FWIW, updating on this circuit progress. I finally put it all together last eve. Connected it to a 19v power source. The Timer and Signal components came alive as they should. Unfortunately the PEMF coil did not... as represented by the LEDs that are part of the coil loop and indicate being on and intensity.

Am quite certain that it is either the direction of the LED wiring, or I have the POTs wired incorrectly. If I were an electrical engineer, for sure would have been able to know which posts were correct for the POTs. And same fo LEDs.

LEDs are simple to resolve. Anyone have an opinion on how to wire the POTs in this schematic?

Am getting sporadic responses from the originator of this circuit (he uses Google translation which slows everything way down, of course) so between that and my pedestrian knowledge of electronics.. I grind it out. Am almost there. End game of this is for pain management. My wife, 26 years post liver transplant, 6 total joint replacements.. lives in pain. A real drag. So I do anything to help.
 

Here's a pitch... anyone reading this thread... consider building this circuit. For a fee of course.

Am crawling thru this process, but am interested in the end result, to see if this dual purposed circuit can help my wife. Anyone willing to look at it and talk turkey about assembling the bones of this? Not the case, just working circuitry?

Just askin'. I have parts enough to make probably 4 of these.
 

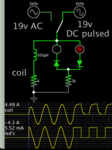
It's wise to have two led's, one to indicate positive polarity and one for negative. (The schematic has one led across a coil, but the author no doubt has instruments to tell him the coils are energized.)

It becomes a question as to what waveform, at what frequency, is most effective (assuming this device can be effective). You probably want to experiment with various frequencies of AC and pulsed DC. The purpose (as you say) is to try everything. So try to build the most versatility you can into this project, after all the work you're doing. The more adjustments you can make, as to intensity and frequency of flux field, the greater the chance of finding something that helps ease the pain.

300uH coil 19V switchable AC or pulsed DC (2 led's indicate polarity).png

The scope trace shows a few cycles of bipolar AC, then pulsed DC.

Anyway it's possible your one led is pointing in one polarity but your coil is receiving the opposite polarity. That is the reason for two led's. (A single resistor is sufficient). If the led's light equally bright it means the coil is getting true bipolar AC. If one led lights then it is pulsed DC. (Is your signal generator able to produce pulsed DC? Can the amplifier also do so?)

19v and a 50W amplifier suggests a couple Amperes flowing in the coil. Substantial Watts are needed in order to generate a strong enough magnetic field, so it can influence something an inch or two distant. It's a good bet the necessary amount of energy will heat up the coil.

There is no way to predict what frequency, AC or pulsed DC, is best projected from the coil. It depends on the gauge of wire, number of turns, overall size, Henry value, coil's ohmic resistance, etc.

I think I understand why you want to consider a 36v power supply. You're sending electricity through coils, not a human being, correct? Then it might pay to boost voltage to 36v. But you still need to watch the power output.
19V 2.6A might be as good or better than 36v 1.4A. Both are 50W but what matters is the amount of Amperes through the coil. It's just one more factor to consider when trying different things.

You may even consider whether it can put out 5A 10V? That is 50W. But to do that the coil shall not be more than 2 ohms effective impedance (10v / 5A).

You might want to wind a range of coils, with different Henry values, to try with various frequencies.
 

Hello. And thank you for the extensive lesson. I have reread it several times. Understanding almost all of it. Yes, I have wound 3 coils for starters. Studied several sites discussing Doug Coils and the craft of winding coils for this. And you are correct… won’t really know how this may work at all towards pain relief. Am going primarily based on prior experience with a simple DIY with a camera flash and a speaker coil, both out of a schema from several years ago. It did provide efficacy yes.

“19V 2.6A might be as good or better than 36v 1.4A.” Yes, I agree. It is what is previewed in the video and those power supplies are quite standard. So the model is built off of this. I have received sporadic communiques from the originator.. language gap. Makes Q & A sluggish. Anyway…

“(Is your signal generator able to produce pulsed DC? Can the amplifier also do so?)” I don’t know the answer. And asking this question would be a real challenge. My pursuit is to replicate the circuit, then branch from there.

Which leads me to two questions. Well, actually three. The two simple questions (and again, this is driven by my utter basic skills) are… based on the schematic, on the LEDs… which is + and which is -? Easiest way to answer is which one touches the resistor? + or - ?

On the POTs, again based on facing the schema.. which way does the POT face? Pole down (away) or pole up (facing) as one looks at the schema.

Finally, you’ve exerted a LOT of time. Grateful goes without saying. Time is $$. Would you, or anyone reading this thread, consider building one? For a fee? My first attempt at this did not work. The Timer and Signal generator came alive. But the LEDs and coil did not. I will redo everything. Comb over the connections. And place a 19v power supply in place so it replicates the model in the video. But… I am obviously not sophisticated enough to know which way LEDs are connected to the schema, and which way the POTs are to be soldered. Would rather move to the coils experimentation which you pointed out.

I appreciate the time and energy you have put into this. It is not just a pursuit for me, but an education. Btu as said, time is $$.. I acknowledge that.
 

* LED's have a reverse breakdown voltage which might be merely a few volts. The diodes in my simulation are safety diodes, recommended to be installed inline with an led.

* A potentiometer doesn't have a polarity. Normally we connect one end to ground, apply an incoming signal at the other end. Take output from the wiper (center) terminal. The schematic has a slightly different arrangement. It's a good idea to test all arrangements to see what works best.
 

Status
Not open for further replies.

Similar threads

Part and Inventory Search

Welcome to EDABoard.com

Sponsor

Back
Top