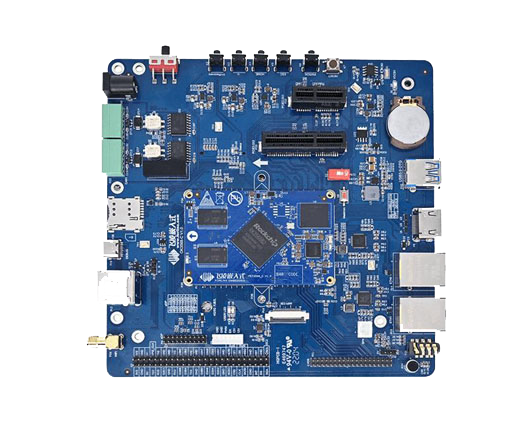
OTA is a way to upgrade the system without loss. The OTA upgrade package can be downloaded automatically through the network, or the device can be upgraded after downloading the OTA upgrade package to the SD card or U disk. This article will use the FORLINX embedded OK3568-C development board to introduce the OTA upgrade process, the local upgrade program recovery to perform the upgrade process and technical details.
buildroot/output/OK3568-recovery/build/recovery-develop
If there are source code files that have modified the above directory, you need to perform the following operations:
1. forlinx@ubuntu:~/OK3568-linux-source$ source envsetup.sh
2. Select the recovery configuration of a certain platform, enter 96
3. forlinx@ubuntu:~/OK3568-linux-source$ make recovery-dirclean && make recovery # Clear compilation artifacts and recompile
4. forlinx@ubuntu:~/OK3568-linux-source$ make rkupdate-dirclean && make rkupdate # Clear compilation artifacts and recompile
If you have not modified the source code files in the above directory, perform the following operations directly:
1. forlinx@ubuntu:~/OK3568-linux-source$ ./build.sh recovery #Compile and generaterecovery.img
2. forlinx@ubuntu:~/OK3568-linux-source$ ./mkfirmware.sh
# Copy the generated firmware to rockdev/ Under contents
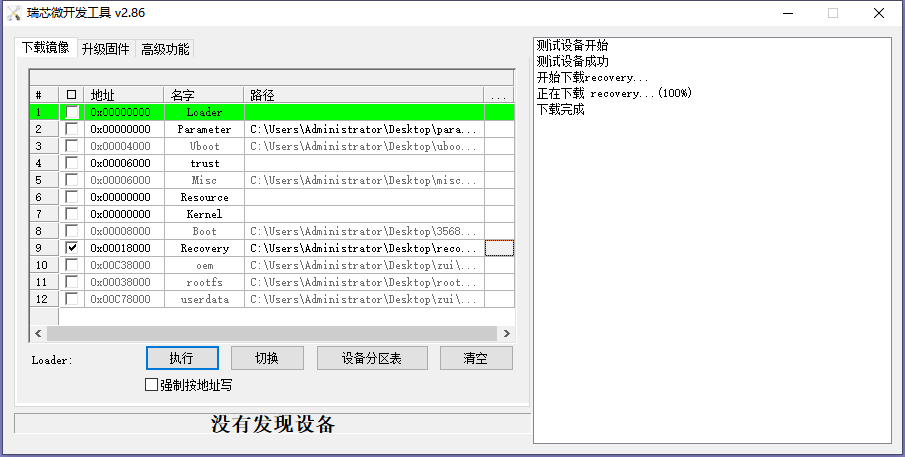
Flash/OK3568-linux-source/buildroot/output/OK3568-recovery/images/recovery.img file.
Click the device partition table, check 9, select the recovery path, and click Execute.
Revise /OK3568-linux-source/kernel/arch/arm64/boot/dts/rockchip/OK3568-C-common.dtsi Device tree file, modify the forlinx_control node as follows. By default, only the HDMI output is turned on, and the MIPI and LVDS outputs are turned off.

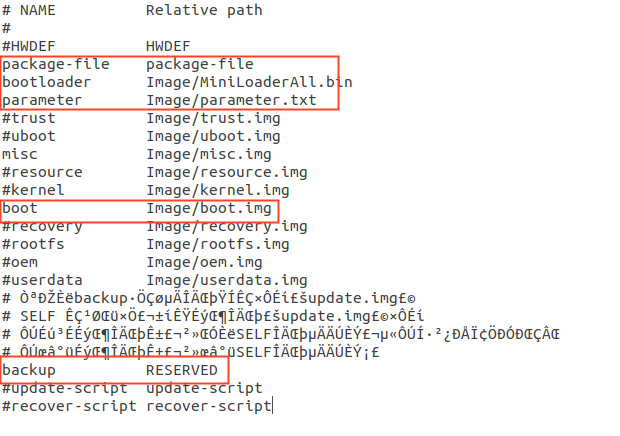
Revise/OK3568-linux-source/tools/linux/Linux_Pack_Firmware/rockdev/package-file file,Modify the file according to the requirements. This routine takes updating boot.img as an example, so comment out other .img files. Users can adjust this file according to product update requirements.
This routine takes modifying the display of the device tree as an example. After modifying the device tree, recompile the kernel.
Mount the SD card or U disk to the /run/media directory of the OK3568-C development board by default. Copy the update.img image file to the /userdata directory of the OK3568-C development board. After restarting the development board, the system will detect the upgrade package in this directory and automatically upgrade.
ftp server upgrade
Execute the following command on the development board side to copy the upgrade package file of the server to the development board for upgrade.
After the download is complete, use the following command to upgrade:
update ota /userdata/update.img
During the upgrade process, the device will enter the recovery mode and automatically upgrade. After the upgrade is successful, it will enter the normal system.
Burning the default factory image file phenomenon: the default is to enable the three outputs of HDMI, MIPI and LVDS.
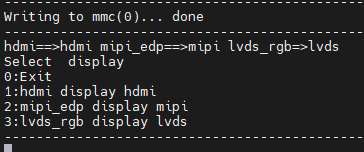
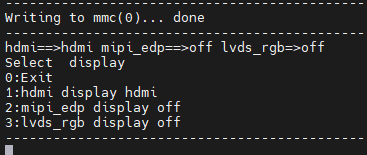
Phenomenon after programming the image file of the upgrade package: only the HDMI display is turned on, and the other two outputs are turned off.
If the recovery.img in the package-file is packaged, it will not be upgraded in Recovery mode. In order to prevent the problem that other partitions cannot be upgraded due to power failure during the upgrade of recovery.img, this partition is upgraded under the normal system. When executing the update command, it will first check whether there is recovery.img in the update.img upgrade package, and if so, upgrade the recovery partition, and then enter the recovery mode to upgrade the firmware of other partitions.
It is not recommended to package the misc partition into update.img. Even if it is packaged, it will be ignored after loading and judging in the upgrade program. Even if the misc partition is upgraded, the recovery program will still clear all the commands in the misc partition after the upgrade is successful. and parameters, resulting in unexpected results.
If you place the update.img upgrade package in the userdata partition in the flash, you need to ensure that the package-file does not include userdata.img to be packaged, because it may cause damage to the file system, and the oem or userdata partition may be damaged after the upgrade is successful. mount failed. If you upgrade from SD card or U disk, you can pack userdata.img to upgrade the userdata partition. After the upgrade is complete, the userdata partition will be resized.
PS: OK3568-C What should I do if the development board does not connect to the screen and the upgrade fails?
(1)If there is a screen, please connect the screen first and then perform OTA upgrade;
(2)If the device does not have a screen, use the
/OK3568-linux-source/buildroot/configs/OK3568-recovery_defconfig BR2_PACKAGE_RECOVERY_NO_UI=y Configure, compile and flash, and then perform OTA upgrade.
The above is the entire process of the OTA upgrade. Users can first follow the operation of this article for experimentation. After being familiar with the operation of this article, they can modify the uboot, kernel or file system, and remotely upgrade the user’s product through OTA to repair the BUG in the product, It is more convenient to optimize products and update iterations.
For additional information, visit the OK3568-C Single Board Computer
Originally published at www.forlinx.net.

Make recovery.img
Recovery relevant source path:buildroot/output/OK3568-recovery/build/recovery-develop
If there are source code files that have modified the above directory, you need to perform the following operations:
1. forlinx@ubuntu:~/OK3568-linux-source$ source envsetup.sh
2. Select the recovery configuration of a certain platform, enter 96
3. forlinx@ubuntu:~/OK3568-linux-source$ make recovery-dirclean && make recovery # Clear compilation artifacts and recompile
4. forlinx@ubuntu:~/OK3568-linux-source$ make rkupdate-dirclean && make rkupdate # Clear compilation artifacts and recompile
If you have not modified the source code files in the above directory, perform the following operations directly:
1. forlinx@ubuntu:~/OK3568-linux-source$ ./build.sh recovery #Compile and generaterecovery.img
2. forlinx@ubuntu:~/OK3568-linux-source$ ./mkfirmware.sh
# Copy the generated firmware to rockdev/ Under contents
Flash/OK3568-linux-source/buildroot/output/OK3568-recovery/images/recovery.img file.
Click the device partition table, check 9, select the recovery path, and click Execute.
Make an upgrade image
How to verify whether the upgrade is successful? We need to have a preliminary understanding of the boot.img file. The boot.img file stores the device tree and the kernel. We only need to make appropriate modifications to the device tree or the kernel. This routine takes updating the boot.img file as an example, and modifies the device tree appropriately.Revise /OK3568-linux-source/kernel/arch/arm64/boot/dts/rockchip/OK3568-C-common.dtsi Device tree file, modify the forlinx_control node as follows. By default, only the HDMI output is turned on, and the MIPI and LVDS outputs are turned off.
Revise/OK3568-linux-source/tools/linux/Linux_Pack_Firmware/rockdev/package-file file,Modify the file according to the requirements. This routine takes updating boot.img as an example, so comment out other .img files. Users can adjust this file according to product update requirements.
This routine takes modifying the display of the device tree as an example. After modifying the device tree, recompile the kernel.
Upgrade Operation
SD card or U disk upgradeMount the SD card or U disk to the /run/media directory of the OK3568-C development board by default. Copy the update.img image file to the /userdata directory of the OK3568-C development board. After restarting the development board, the system will detect the upgrade package in this directory and automatically upgrade.
ftp server upgrade
Execute the following command on the development board side to copy the upgrade package file of the server to the development board for upgrade.
After the download is complete, use the following command to upgrade:
update ota /userdata/update.img
During the upgrade process, the device will enter the recovery mode and automatically upgrade. After the upgrade is successful, it will enter the normal system.
Verify test results
Power up the OK3568-C development board, press and hold the space bar on the serial port terminal, and enter the uboot selection screen interface.Burning the default factory image file phenomenon: the default is to enable the three outputs of HDMI, MIPI and LVDS.
Phenomenon after programming the image file of the upgrade package: only the HDMI display is turned on, and the other two outputs are turned off.
Notice
When packaging the update.img firmware, you need to pay attention to it. The upgrade firmware can be packaged in all partitions or partially upgraded. You can modify the package-file file and remove the partitions that do not need to be upgraded, which can reduce the size of the upgrade package (update.img).If the recovery.img in the package-file is packaged, it will not be upgraded in Recovery mode. In order to prevent the problem that other partitions cannot be upgraded due to power failure during the upgrade of recovery.img, this partition is upgraded under the normal system. When executing the update command, it will first check whether there is recovery.img in the update.img upgrade package, and if so, upgrade the recovery partition, and then enter the recovery mode to upgrade the firmware of other partitions.
It is not recommended to package the misc partition into update.img. Even if it is packaged, it will be ignored after loading and judging in the upgrade program. Even if the misc partition is upgraded, the recovery program will still clear all the commands in the misc partition after the upgrade is successful. and parameters, resulting in unexpected results.
If you place the update.img upgrade package in the userdata partition in the flash, you need to ensure that the package-file does not include userdata.img to be packaged, because it may cause damage to the file system, and the oem or userdata partition may be damaged after the upgrade is successful. mount failed. If you upgrade from SD card or U disk, you can pack userdata.img to upgrade the userdata partition. After the upgrade is complete, the userdata partition will be resized.
PS: OK3568-C What should I do if the development board does not connect to the screen and the upgrade fails?
(1)If there is a screen, please connect the screen first and then perform OTA upgrade;
(2)If the device does not have a screen, use the
/OK3568-linux-source/buildroot/configs/OK3568-recovery_defconfig BR2_PACKAGE_RECOVERY_NO_UI=y Configure, compile and flash, and then perform OTA upgrade.
The above is the entire process of the OTA upgrade. Users can first follow the operation of this article for experimentation. After being familiar with the operation of this article, they can modify the uboot, kernel or file system, and remotely upgrade the user’s product through OTA to repair the BUG in the product, It is more convenient to optimize products and update iterations.
For additional information, visit the OK3568-C Single Board Computer
Originally published at www.forlinx.net.