Continue to Site

Welcome to EDAboard.com

Welcome to our site! EDAboard.com is an international Electronics Discussion Forum focused on EDA software, circuits, schematics, books, theory, papers, asic, pld, 8051, DSP, Network, RF, Analog Design, PCB, Service Manuals... and a whole lot more! To participate you need to register. Registration is free. Click here to register now.

How does one learn to read a schematic? (Marshall tube guitar amp)

Status
Not open for further replies.

riffwraith

Junior Member level 2
Joined
Aug 24, 2019
Messages
21
Helped
0
Reputation
0
Reaction score
0
Trophy points
1
Activity points
201
Hi all :)

First post here, and hopefully this will not be frowned upon as being too rudimentary. :)

How does one go about learning to read a schematic?

I have a schematic for my guitar amplifier, which can be found here:
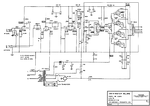
Marshall_2203_jmp_master_volume_lead_100watt.gif
https://el34world.com/charts/Schema...shall_2203_jmp_master_volume_lead_100watt.gif

I am trying to gain the ability to look at the schematic, find something there, and then find the correlating item in the circuit. But I can't seem to. Looking at the schematic, I am trying to follow the signal from the inputs ("Lo sens" and "hi sens"), and I am doing ok there, but when I look at the circuit (my amp), I am not seeing what I see on the page, and I get lost.

I can post a pic of the amp if need be.

Can someone fill me in here? I am not looking for a detailed explanation on what everything is, just a good way to start understanding how to look at the schematic and the actual circuit, and see how they correlate.

Thanks in advance.
 

It's an old-fashioned tube (valve) amplifier. Marshall is a well-reputed brand from that era. Many experts believe tubes are more listenable than solid-state.

The tubes are within circles and semi-circles. They contain grids and plates and a heater filament. Sometimes two tubes are paralleled so they yield greater current output.

From left to right:
1) source selector (guitar pickup or line-level)
2) pre-amp stage (increases low amplitude signal, potentiometer adjusts volume)
3) effects controls (bass, treble, midrange)
4) power amplifier stage (increases current, schematic shows 4 tubes)
5) transformer performs impedance matching (for maximum efficiency),
steps down voltage, steps up current to the speakers.
 
Chassis top and bottom photos would ease an explanation.

Tracing the signal path can start identifying the tubes, three dual preamp/driver and four powerstage tubes. They are usually mounted in signal direction.
 
Reading a schematic of any type involves recognizing what the component configuration is. In analog circuits, tube or transistor, there are only three basic configurations, rectifier, amplifier and oscillator but many variations of each of those exist.
In the Marshall schematic:
1. V1 is a dual triode tube, it has two identical but unjoined halves. V1a is an amplifier stage, the amplification makes small signals bigger, hence it having the "HI-SENS" (high sensitivity) socket at its input.
2. V1b is also configured as an amplifier but fed from the "LO-SENS" (low sensitivity) socket. Note that that socket has an internal switch, if something is plugged in, it goes only to V1b, if the socket is empty, the output of V1a is connected to it so the already amplified "HI-SENS" signal is used instead.
3. V2 is a further amplifier stage, configured so it can best drive the tone control circuit. The bass and treble control are like volume controls but bass is fed with the lower notes and treble with the higher ones.
4. V3 is a kind of amplifier called a phase splitter. If you imagine a sine shaped wave goes in with the positive excursion followed by the negative one, the output of each side of V2 are a) the same as goes in and b) the signal 'upside down' so the sine starts negative the goes positive. A mirror image of the input appears on one output.
5. V4, V5,V6 andV7 are the power output tubes. V4 and V5 are fed one of the outputs of V3, V5 and V6 are fed the other output. In power amplifiers we call this a "push pull" configuration because the stage always work in opposition to to each other.
6. The output transformer "OT-100M" has a center tapped primary winding, this means the end of the primary appear to be wound in opposite directions if you look from the middle. It re-combines the push-pull signals so they act as one and the magnetic field it generates is picked up on the secondary (right side) to feed the loudspeaker.

The lower part of the schematic is the power supply. It converts the AC line voltage into 6.3V to feed the tube heaters, -63V 'grid bias' to hold V4 - V7 in a non-conducting state in the absence of signal and some unspecified (a guess +300V) to power the tube anodes.

Brian.
 
Thanks so much for the responses. This helps :)

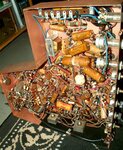
Here is the amp.

Inside-01.jpg

So, I guess my issue here - and this would apply to the next piece of gear/schem I look at - is following the circuit.

After the "HI-SENS" input jack, there is a 1Ω resistor (you cant see it in the pic, but it's there). That's the "1M" we see in the schem. So, I got that.

But how does what I see on the page correlate to the actual circuit?

bet, you say V1 is a dual triode tube (see, that really helps), I see the "HI-SENS" input jack going to V1. So, I looked at the circuit, and I see a wire going from the jack to pin7 of that tube, which, in the pic, is the first (top left) tube - a 12AX7. Pin8 of that tube is wired to the second (from the left) resistor, a 68k, but I don't see that in the schem. I see a 68k resistor hanging out there on the page, but it seems to be before V1, and I don't follow that when looking at the circuit.

Then (and I may be jumping around a bit here), we have the first (leftmost) resistor, a 10k, that seems to me to not be tied to anything when I look at the circuit (is "tied" the proper word?). The first time a 10k resistor appears on the schem, it seems tied to V1B. If that resistor is the first on the board, why is it so far down in the schem?

Thanks! :)
 

Actually, your are quite lucky, because the physical construction of this amp is really *very tidy*.

You should see some of the point to point wiring that was the custom on those days. I include some random images picked up from Google.
 

Attachments

  • 2402+point+to+point+wiring.jpg
    2402+point+to+point+wiring.jpg
    176.7 KB · Views: 506
  • p2p2.jpg
    p2p2.jpg
    311.9 KB · Views: 342

"tied" in electronics language is "connected"

It is important to understand the concept that the schematic and actual layout are quite different things. The schematic only shows what is connected to what, it demonstrates the linkage between electrical points. The actual layout may be similar to the schematic but that is only because of the convention that the input of a schematic is on the left and output on the right and for physical reasons the input and output ends of the hardware are usually kept at opposite ends.

The missing link in your understanding is not visible in the photographs, it is the copper traces on the back side of the circuit board. The copper tracks serve the same purpose as connecting wires but allow for neat and repeatable construction. If you can flip the board over you will see the copper traces linking the components together in the same way as the schematic does.

Brian.
 

Regarding post #5, you are apparently reading some component values incorrect. 1 ohm resistor makes no sense in this place. I also don't see 68k cathode resistor. Although I can't check the connection of all wires on the photo, I'm under the impression that everything is according to the schematic.

Sometimes resistor color codes can't be clearly identified, I'm using a multimeter in this case. Also continuity check to trace connections.
 

Hi and thank you again for the responses.

Sorry, but the data sheet does not help me here :(

1 ohm resistor makes no sense in this place.

I don't understand that, sorry.

I also don't see 68k cathode resistor.

I missed a '0'; I meant 680k.

"tied" in electronics language is "connected"

Thanks.

The missing link in your understanding is not visible in the photographs, it is the copper traces on the back side of the circuit board. The copper tracks serve the same purpose as connecting wires but allow for neat and repeatable construction. If you can flip the board over you will see the copper traces linking the components together in the same way as the schematic does.

Ok, that helps a bit, thanks.

I can actually see the copper traces from the top of the board, which makes thing a bit easier. So, if I am trying to find the V2A cathode resistor, how do I look at the schem and find it on the board/in the circuit? I see "V2" on the schem, but how do I approach tracing the circuit while looking at the amp, to find it? I see pins 3 & 8 of pre-amp tube #2 connected to two resistors on the board, an 800, and a 100k. Does this mean that it's one of them?
 

The 'gotcha' is knowing which is V2a and which is V2b as they are identical and electrically interchangeable. The schematic doesn't say which is which and sometimes the one on the left may be the 'a' side and sometimes the 'b' side if it makes the unit easier to wire up. However, it looks like the 'a' is the left side in the schematic in the post.

V2a cathode (sometimes spelt with k instead of c) is on pin 8 and V2 is the second from the left in the photograph. The pins are numbered clockwise starting from the gap so pin 8 has a yellow wire soldered to it. Unfortunately, there are two yellow wires but the one for V2a cathode goes to the resistor above the first 'l' in Marshall which has the colors gray, red, brown meaning 820 Ohms. The one to its right is the cathode resistor for V2b with the colors brown, black, yellow meaning 100K Ohms.

Brian.
 

Thanks!

So, maybe I am misunderstanding what you are saying, but....

First you said the V2a cathode is on pin 8, and then that the V2a cathode goes to the resistor on the left. Looking at the board and using the copper traces, the yellow wire soldered to pin 3 goes to the resistor on the left, and the yellow wire soldered to pin 8 goes to the resistor on the right.

Did I misunderstand? :)
 

I think I'm right (as in correct, not the direction!).

Marshall seem to have used the wire colors to correspond with the electrodes in the tubes. Yellow in this case being for the cathodes although there is no convention for this in general.
There are two yellow wires from V2, corresponding to the cathodes on pin 8 and pin 3, they might cross over under the board, it is impossible to tell from the photograph.

Obviously I can only go from what I can see but It looks to me like the group of components above the text "Marshall" are from left to right:
470 K resistor from V2a grid to ground
470 k resistor in parallel with the 0.00047uF capacitor between V1b and V2a
The 0.00047uF capacitor
820 Ohm resistor in the cathode of V2a
100 K resistor in the cathode of V2b.

The schematic isn't marked but I'm presuming the 'a' half of V2 is on the left.

Brian.
 

Ok, got it - thanks!

Quick Q - I want to insert a small capacitor into a slot where there is currently nothing. I don't think that you would typically do this, but a very well-known and highly respected amp modder/builder did this in a video, so I would like to give it a shot. Besides, I am in experimenting mode. The issue is, I can find only one cap with legs (are they called 'legs'?) long enough to reach both holes. Can I use "extender legs"? ie - I would snip off the two legs of a resistor (rendering that resistor useless, but who cares?), solder each leg to the board, and then solder the cap legs to the protruding res legs. I don't see why this would be a problem, but as I am new to this, thought it best to ask.

Cheers.
 

Yes, you certainly can. But beware that the physical size of some components is decided by the electrical requirements made of it. For example, higher voltage rated parts tend to be larger than low voltage parts and larger values tend to be bigger for a given capacitor type. You haven't said where the capacitor is in the circuit but assuming you have one with adequate ratings it should be safe to extend it's legs (aka 'pins')

Brian.
 
To understand such schemes, I advise you to study a book on the theoretical foundations of electrical engineering. To deepen the knowledge of a beginner, a useful thing. I recommend as a professional who creates schemes!
 

You wrongly said that the 1M input resistor is 1 ohm which is almost a dead short. No it is not since M is million so it is 1 Million ohms. 1K is 1 thousand.
 

Status
Not open for further replies.

Similar threads

Part and Inventory Search

Welcome to EDABoard.com

Sponsor

Back
Top