Continue to Site

Welcome to EDAboard.com

Welcome to our site! EDAboard.com is an international Electronics Discussion Forum focused on EDA software, circuits, schematics, books, theory, papers, asic, pld, 8051, DSP, Network, RF, Analog Design, PCB, Service Manuals... and a whole lot more! To participate you need to register. Registration is free. Click here to register now.

4017 decade counter failure

Status
Not open for further replies.

Alistair Ballantyne

Junior Member level 2
Joined
Jan 9, 2021
Messages
20
Helped
0
Reputation
0
Reaction score
0
Trophy points
1
Activity points
229
Hi – I can’t get this circuit to work and don’t see why.

The circuit calls for a 47k resistor from negative terminal to the connection of LED’s but I get nothing to work at all with this arrangement. If I take out the resistor then:

  • If the pot is turned up then all LED’s remain lit (no chasing).
  • If turned down then one LED lights.
The circuit also calls for a 330R resistor in the parts list but disappointingly doesn’t show where this would go.

Attached is scan of circuit diagram and pictures of breadboard.

Am I doing something stupid here or is the circuit suspect?

Appreciate your help.

Thank you

Alistair
1621532175778.png


1621532294504.png


1621532356247.png
 

47K is way high R, way low current to get a LED lit.

Have to get to a bigger screen to look any closer, but you can recheck polarities while you wait.
 
Use the 330 ohms for R2. The book wrongly says R3 (does not exist) is 330 ohms.
The 555 and pot might be burned out without having a resistor (47k?) in series with the top end of the pot.
I am sorry to say your breadboard wiring is a mess.
 
Hi - I've put the 47k into the pot input as you suggest and used the 330R in series with the negative rail of the 10 LED's
I've changed the pot, the 555 and the 4017.
Unfortunately doesn't make any difference - when connected all 10 LED's illuminate but do not "chase".
Adjusting the pot makes no difference.
I'm sure someone more experienced would make a better job of the breadboard wiring.
I tried to achieve clarity, however, to show clearly where each wire was connected to see if someone might find a fault.
I ultimately want to solder a project but it seems I'm a long way off!
I just cant see what I'm doing wrong.
Updated pic attached.
Thanks
1621613972648.png
 

All LEDs are turned on probably because it is oscillating way too fast.
The pot must be 1M and set to near halfway. Your photo does not show how it is connected.
The capacitor at pin2 , pin 6 and the pot appears to be too tiny, its should be 0.47uF which is sometimes marked 474. It will not oscillate slow enough if this capacitor is 4.7nF or 472.
 
It would be advisable to add an addition capacitor across the positive and negative supply as well. Its unlikely but not impossible that the circuit is unstable if the supply is fluctuating as the oscillator and counter draw current pulses. I would suggest 10uF wired at the board rather than the PSU/Battery end of the supply wires.

Brian.
 
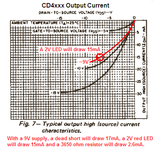
Texas Instruments datasheets for CD4xxx Cmos logic ICs show graphs of typical and minimum output current with various supply voltages.
I think the output current into a 2V red LED in series with 330 ohms with a 9V supply is 9mA. Minimum output current will be 4.5mA.
The CD4017 has only one output active at a time.
 

Attachments

  • CD4xxx output Current.PNG
    CD4xxx output Current.PNG
    32.1 KB · Views: 189
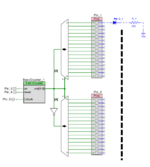
In case you needed to do a bigger decode here is a single chip solution, 32 decodes,
I think it will route to 64 if needed.

1621640571214.png


Its also possible to have a capability all outputs off as well. Led currents 20 mA
achievable, by paralleling pins could get 40 mA.


Regards, Dana.
 

Attachments

  • 1621640096724.png
    1621640096724.png
    35.3 KB · Views: 199
Last edited:
All LEDs are turned on probably because it is oscillating way too fast.
The pot must be 1M and set to near halfway. Your photo does not show how it is connected.
The capacitor at pin2 , pin 6 and the pot appears to be too tiny, its should be 0.47uF which is sometimes marked 474. It will not oscillate slow enough if this capacitor is 4.7nF or 472.
Hi – this was the last piece of the jigsaw which resulted in success!!

I changed the 0.47uf cap for a 1.0uf electrolytic cap and it worked as it should.

Bit disappointed that a circuit from a beginner’s book is so flawed – wrong resistors, wrong placement and wrong capacitor.

All added to the learning experience however, so a useful exercise in the end.

Thanks a lot for your patience and help, appreciated.

Alistair
In case you needed to do a bigger decode here is a single chip solution, 32 decodes,
I think it will route to 64 if needed.

View attachment 169655

Its also possible to have a capability all outputs off as well. Led currents 20 mA
achievable, by paralleling pins could get 40 mA.


Regards, Dana.
Thanks Dana - but not sure what this is - 3 IC's?
But what types?
Apologies if I should know!
Regards,
Alistair
 

Hi – this was the last piece of the jigsaw which resulted in success!!

I changed the 0.47uf cap for a 1.0uf electrolytic cap and it worked as it should.

Bit disappointed that a circuit from a beginner’s book is so flawed – wrong resistors, wrong placement and wrong capacitor.

All added to the learning experience however, so a useful exercise in the end.

Thanks a lot for your patience and help, appreciated.

Alistair

Thanks Dana - but not sure what this is - 3 IC's?
But what types?
Apologies if I should know!
Regards,
Alistair
That is a one chip solution called PSOC.

You drag and drop resources from its chip catalog (the chip has many resources),
drop them onto design canvas, and wire up with a tool internally and out to pins.
Then config them, like how big is counter, how many bits to use for A/D....etc.. The chip
has an ARM core which you can program for more advanced work, or just do codeless
designs like the one I did here. Lots of analog and digital resources. Gates to counters to
random logic to DSP, Wave generation, DDS, 74HC some MSI parts implemented in a
library. Custom components can be made for internal use thru schematic capture or
Verilog. A "component" in PSOC land is an onchip resource.

IDE (tool you design in called PSOC Creator) and Compiler free, boards vary in cost
but most designs I use the $ 10 to $ 15 range board.


1621692770953.png


Attached is a catalog of onboard resources for PSOC 5LP family. Many videos on Cypress/
Infineon web site from start to more complex.


Regards, Dana.


A
--- Updated ---

Missed attachment, here it is.

Regards, Dana.
--- Updated ---

Some other examples of what you can do -

https://www.edaboard.com/threads/lo...der-and-decoder-projects.396817/#post-1705573 CW Decoder

https://www.edaboard.com/threads/3-phase-sine-generation.397115/ 3 Phase generator

https://www.edaboard.com/threads/fir-filter-for-dac-in-stm32.397046/#post-1707337 FIR Filter

https://www.edaboard.com/threads/thermocouple-reading.397734/#post-1710393 Thermocouple/RTD

https://www.edaboard.com/threads/delayed-single-pulse-circuit-after-power-on.394551/#post-1692983 Delayed Pulse control

Huge number of projects -


Regards, Dana.
 

Attachments

  • Component List (2).pdf
    278.5 KB · Views: 152
Last edited:
Hi – this was the last piece of the jigsaw which resulted in success!!

I changed the 0.47uf cap for a 1.0uf electrolytic cap and it worked as it should.

Bit disappointed that a circuit from a beginner’s book is so flawed – wrong resistors, wrong placement and wrong capacitor.

All added to the learning experience however, so a useful exercise in the end.

Thanks a lot for your patience and help, appreciated.

Alistair

Thanks Dana - but not sure what this is - 3 IC's?
But what types?
Apologies if I should know!
Regards,
Alistair
Dana likes SOC's :)
Anyway, download datasheet for NE555 and ICM7555. The second one is CMOS version of N555.
There you will find a lot of useful info.
How to calculate frequency of astable mode, times for monostable mode, ...
 
Status
Not open for further replies.

Part and Inventory Search

Welcome to EDABoard.com

Sponsor

Back
Top