Continue to Site

Welcome to EDAboard.com

Welcome to our site! EDAboard.com is an international Electronics Discussion Forum focused on EDA software, circuits, schematics, books, theory, papers, asic, pld, 8051, DSP, Network, RF, Analog Design, PCB, Service Manuals... and a whole lot more! To participate you need to register. Registration is free. Click here to register now.

How to reduce inductor heating in buck converter?

Status
Not open for further replies.

vishweshgm

Member level 4
Member level 4
Joined
Dec 17, 2021
Messages
74
Helped
5
Reputation
10
Reaction score
7
Trophy points
8
Activity points
952
I am designing a simple buck converter to drive 9 V, 3 A LED. Supply can vary between 20 and 30 V. I used the TI Power Designer Tool to calculate the inductance value and other parameters. Here is the schematic:
1641644770895.png

1641644736041.png

After driving the load, everything is fine except that the inductor is getting heated to almost 85°C.

My PCB has to go into an enclosed box so this is not OK.

Strange thing is, the MOSFET is not getting hot at all, so the gate driving is fine, I guess. I have no clue why only the inductor gets heated in a buck converter.

Please suggest what factors concerning the inductor I should look into.

Vin : 20-30V switching frequency : 350kHz , Note that I am driving exactly 3A load (using shunt resistor (0.1ohm,2W) sensing to limit current)

Inductor HCM1A1307V2-330-R : Datasheet

Mosfet SI_4288DY : Datsheet

Diode SS54 : Datasheet

Driver IR2110 : Datasheet
Here is the calculation screenshot of TI tool:
1641645896309.png
 

Hi,

* increased head spreading
* less RMS current
* less coil resistance
* less core loss (HF)

Klaus
 

Hi,

* increased head spreading
* less RMS current
* less coil resistance
* less core loss (HF)

Klaus
I have covered last 3 points already I think. Becasue,
RMS Current : 3A
Coil resistance - 40.8mOhm
--> Power dissipated = 3*3*40.8mOhm = 0.36W
Frequency : I have tried upto 500kHz
Can you please explain what is head spreading?
 

Yes, your inudctor current is going from 2.87A to 3.13A at 350kHz....so the core loss shoudlnt be that high.....the thing is, the coil res is stated as 0.04R....but is that at DC?....why dont they give coil loss for 350kHz?

You should use an inductor from vishay , or v good is coilcraft, as they allow you to input your exact inductor current waveshape and see the proper coil and core loss.

I think wurth also give this facility.

Also, how are you measuring the temperature of your inductor?...do you measure it with thermal cam?...and accidentally you are measuring the reflected heat from the LED?

Did you put some good thickness and area of PCB copper at the non switchign end of the inductor pad?....(emc unfortunately disallows you from making the switching node pad big)

Attached is your converter in LTspice is you wish
 

Attachments

  • buck 30v to 3v at 3A.zip
    1.5 KB · Views: 215
  • buck 30v to 3v at 3a.zip
    7.3 KB · Views: 205

    vishweshgm

    Points: 2
    Helpful Answer Positive Rating
Hi,

RMS Current : 3A
Some pedantic note:
3A is the output current. Thus it´s the "average coil current". The RMS current is higher due to the ripple current.
Since in your case the ripple current is rather low the difference is marginal (3.00A vs 3.01A).
But when the ripple current is higher and especially at DCM mode the RMS current can be much higher than the average current.
Example: square current 0A/1A with 25% duty cycle.
* The average current is 0.25A,
* the RMS current is 0.5A.
Since power dissipation and heat rise is squared to the current you may wrongly calculate 20°C temperature rise, where the true temperature rise is 80°C (4 times).
*******

Coil resistance:
Resistance is usually is the DC resistance. Thus the calculated 0.36W (0.37W) is the DC loss.
As cupftea mentiones .. you need to add the core loss.

Heat spreading:
a heat sink (sheet of aluminum or copper), a fan, increased copper area as cupoftea mentions ... everything that decreases the hot spot temperature at identical power dissipation.

--> I´d look for a low loss coil.

BTW: the diode is calculated to dissipate 1W. This is three times the loss of the coil. Thus the overall "in_case_temperature" will be dominated by the diode loss. If there is a temperature problem, then I´d surely reduce the diode loss. Either by using a diode with less voltage drop, or using a "sync" buck (with synchronous rectifier).

Klaus
--- Updated ---

added:
Paralleling diodes isn´t a very good idea.
* it does not reduce overall power dissipation significantly
* there is a thermal runaway, thus the diode current will not divide 50%/50%

1000uF capacitors usually are electroytic capacitors. They have no good ESR at high frequency. Thus they may get warm. Use parallel ceramics capacitors, or choose electrolytics that are specified for 350kHz/500kHz (if you find some)

Simple method to find overall power loss: (this is what causes the rise in heat)
power_loss = input_power * output_power
Since input and output are DC:
P_Loss = V_in * I_in - V_out * I_out
--> simple DVM will do

Klaus
 
Last edited:

    vishweshgm

    Points: 2
    Helpful Answer Positive Rating
the overall "in_case_temperature" will be dominated by the diode loss
Good point KluasST, in fact, thermal cams have an "aiming offset"... and i couldnt be sure if OP has accidentally been aiming at the diode and thinking he was aiming at the inductor?....its very easy to do with these thermal cams....often, what you see in the thermal cam display, is not what the temperature sensor is "seeing"...

How are you measuring inductor temperature?
 

Yes...show schem....how can we be sure that you really are pushing 3A into that LED...you may be giving it 10A by mistake?

Can you please explain what is head spreading?
...think a typo...."heat spreading"
 

Off the shelf inductors are generally poor quality, if we design a 1A buck - we generally use at least a 3A rated choke, or 2 x 2A in parallel

the ferrite they use is poor - the wdgs are often near the gap - the wire is generally too small

you have been advised ...
 
the ferrite they use is poor - the wdgs are often near the gap - the wire is generally too small
I would tend to agree....at one place they did 8 paralleled Bucks for 100A at 0.9V...they used Vishay inductors and went through all the vishay online calculator to get "true" core and winding loss...but the inductors were cracking left right and centre.....i'm pretty sure all (or most) offtheshelf inductors dont use litz
 
You should use an inductor from vishay , or v good is coilcraft, as they allow you to input your exact inductor current waveshape and see the proper coil and core loss.
[Vishwesh] : Ok, I was unaware of this. I just searched though digikey and filtered the part. Will keep this in-mind next time.
Also, how are you measuring the temperature of your inductor?.
[Vishwesh] : I have IR Thermometer. My goal is to achieve a warm temperature where one can at-least touch and able to bear the heat. If I touch the inductor now, its too hot. My pcb gointo an enclosed box and this is not ok.
Yes...show schem....how can we be sure that you really are pushing 3A into that LED...you may be giving it 10A by mistake?
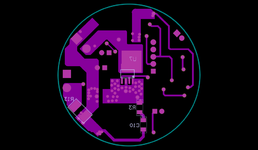
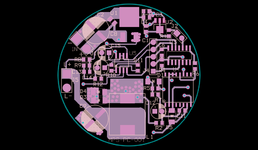
I am attaching my complete schmatic and also layout schematic. The application is challenging as all needs to be fit into circular PCB of 50mm diameter.
 

Attachments

  • led_vishwesh.pdf
    76.8 KB · Views: 230
  • led-greb_bottom.png
    led-greb_bottom.png
    44.9 KB · Views: 188
  • led-greb_top.png
    led-greb_top.png
    82.8 KB · Views: 192

I think it's difficult to determine if the inductor heating is caused exclusively by inductor losses or e.g. from nearby diodes. According to my estimation, diode losses are > 1W, core losses according to the datasheet < 100 mW. The only open point are additional skin losses, unfortunately not specified. We can expect a flat wire winding, usually not so bad.
 

    vishweshgm

    Points: 2
    Helpful Answer Positive Rating
Since power dissipation and heat rise is squared to the current you may wrongly calculate 20°C temperature rise, where the true temperature rise is 80°C (4 times).
Thanks a lot for these detailed information. I donot afford a current probe yet. I cannot measure the exact pk-pk ripple. I am using Current Clamp meter to see the DC current value at output and I have Variable Digital supply to exactly measure voltage and current at input side. (and powerfactor Pout/Pin is fund to be just 80% (no surprise, of-course)).

As per inductor datasheet, for 3A DC Current temperature rise would be just above 10°C. Now you are saying that even though DC is 3A, Due to ripple, rms can go high, which cause temperature increase.Right?

With this theory, my rms must be reaching almost 6A as the inductor temperature rise is +50°C above ambient. So there is no solution to this except changing the inductor part?
1641716558006.png

Resistance is usually is the DC resistance. Thus the calculated 0.36W (0.37W) is the DC loss.
As cupftea mentiones .. you need to add the core loss.
[Vishwesh] : Can you please explain a bit more. From datasheet I could find this graph but unable to understand it. What is Bp-p value?
1641717291319.png

Paralleling diodes isn´t a very good idea.
[Vishwesh] : Completely agree. This is the reason I used Higher rated diode SS54. It can handle 5A current. On the PCB I am using only one SS54 diode.
1000uF capacitors usually are electroytic capacitors. They have no good ESR at high frequency. Thus they may get warm.
[Vishwesh] : But capacitor is not getting much hot. Its only the the inductor.

Is there a possibility that the inductor is saturating, leading to high peak currents?
[Vishwesh] : Can you explain a bit more please? As per datasheet, 7.5A is said to be saturation current. Is it possible that the inductor can saturate earlier? Is there anyway I can check it using oscilloscope. I donot afford a current probe though.

the diode is calculated to dissipate 1W. This is three times the loss of the coil. Thus the overall "in_case_temperature" will be dominated by the diode loss.
[Vishwesh] : Well actually I looked into it while designing schematic. Thermal resistance from junction to ambient of this diode is 15°C/W, cosidering max 1.5W loss, it is +23°C above ambient which is ok I guess (around 50°C).
 

What is Bp-p value?
See datasheet page 2, note 5.
Thermal resistance from junction to ambient of this diode is 15°C/W, cosidering max 1.5W loss, it is +23°C above ambient which is ok I guess (around 50°C).
The diodes have no magic heatsink guaranteeing 15 °C/W. The value is based on certain PCB conditions, e.g. a large copper plane which is unfortunately not further specified in the datasheet. In your PCB, MOSFET, diodes and inductor are essentially sharing a common PCB heatsink. Your post #1 suggests that only the inductor heats up to about 85 °C while diodes and MOSFET are cool. Very unrealistic.
--- Updated ---

In addition, I'm quite sure that 15 °C/W "junction to ambient" is a typo. Other SMC diodes are specifying 15 °C/W junction to terminals and e.g. 75 °C/W junction to ambient.
 
Last edited:
You are using 1uF directly at the output of opamp LM358...this is a bad idea...will cause instability.

Only certain opamps can have capacitor connected directly at output.

You show a current sense resistor of 0.2R and 2W?.....1206 doesnt usually go up to 2W.....even 2512 shoudlnt really be used at 2W unless loads and loads of cooling pcb copper around it.

Also, what then is the voltage you are getting across your 0.2R sense resistor.?..is it a steady 0.6V?......or has this resistor burned short by now?...or has it burned to a different ohmic value than 0.2R?
--- Updated ---

On your layout, it does look like the inductor copper pour is being used as the "heatsink" for your buck diodes D3 and D4....really, the diodes should have a big ground copper pour area where they can get rid of their heat......Its a shame your switching node has to be so big in copper pour area...this is bad for EMC and general noisiness.

As FvM says... i am not convinced that your inductor is not just being heated up by your diodes.

I dont think your inductor should be getting as hot as you believe, but if so, then there is a bare area beneath it where you could have added thermal copper pour and got to it by vias.
--- Updated ---

Also, the 1.8W (or more, if your current is more than 3A) is probably producing a lot of heat in your smd sense resistor, which is finding its way to the inductor.
 
Last edited:

As per the above posts - you must work out the dissipation in each part - and heatsink accordingly - most newbies do not allow enough heatsinking for diodes especially, mosfets, and pcb pads on the chokes for cooling - we see this a lot in designs we are asked to fix. You can solder thin sheet copper stand ups to help and put a fan on for testing ( only ) - but in the end you'll need to re-lay the pcb

Also if you calc the pk-pk current ripple properly - this is what you will get in reality, as long as the choke can handle the peak current - but as everything heats up the eff goes down and the average DC drawn from the source goes up to compensate ( for a constant power load ).

If you greatly oversize the chokes ( for current ) and the ckt is still hot - guess what - your diode and mosfet are contributing to the heat and temp rise ...

more time spent in realistic calculations is the main point here, and realistic pcb heatsinking

if you had sent us a photo of the board all these comments would have been made earlier ...

10A in the diodes, x 0.6V say for good schottkies = 6 watts - you need A LOT of heatsinking for this condition ....

0.01 ohm in the choke x 10A ^2 = 1 watt in the choke, you get the idea .... try and hold on to a 5W white ceramic resistor with 1 watt being dissipated in it - then try it again with 5W ...
 

You are using 1uF directly at the output of opamp LM358...this is a bad idea...will cause instability.
[Vishwesh] : Oh! I was not aware. I found this method useful when there is a lot of transient noise at opamp output. Adding capacitor helps me read reliable voltage in the code. As you mentioned it may not be good idea to use circuit like this in analog design, but for microcontroller design, I found it very useful actually. This way I am able to maintain constant voltage and 3A current limit required. Please let me know if any interesting scenario where this method goes down..
You show a current sense resistor of 0.2R and 2W?
[Vishwesh] : Actually I have changed this to 0.05, 1W 2512 package and it is limiting current at a desired 3A perfectly. No instability or over heating issue
if you had sent us a photo of the board all these comments would have been made earlier ...
[Vishwesh] : Yes. Indeed. I am finding you guys so helpful. Will discuss here in my next projects.
--- Updated ---

Your post #1 suggests that only the inductor heats up to about 85 °C while diodes and MOSFET are cool. Very unrealistic.
Actually Mosfet is just warm (about 35-40degC maybe). But as everyone pointed out, I have ignored the power dissipation on the diodes completely. They were also 60-70degC hot, but I just assumed that was due to inductor. Today I spent hours by trying different combinations. I had a wirewound inductor of 70uH and I soldered it for testing. I ran it for 1hour (same 9V, 3A load) and No inductor heating observed, but doide was still hot. So I guess the diode drop is majorly contributing for the heating. At-least at this stage if I am able to solve diode heating problem, then I can worry about inductor.

To solve diode heating only solution is to replace with a finer low-drop diode which I am yet to search digikey.
more time spent in realistic calculations is the main point here, and realistic pcb heatsinking
Its funny though, I had spent so much hours in looking through the datasheets to find the cheap and best parts for the power transfer topology (loooking through heat disspation values etc.) and still in the end component heats up and solution filters down to use heatsink which I don't have much freedom todo in application :).
 
Last edited:

Hi,
I found this method useful when there is a lot of transient noise at opamp output. Adding capacitor helps me read reliable voltage in the code. As you mentioned it may not be good idea to use circuit like this in analog design, but for microcontroller design, I found it very useful actually. This way I am able to maintain constant voltage and 3A current limit required. Please let me know if any interesting scenario where this method goes down..

what you need is a filter.
A capacitor alone is no "defined" filter. For a filter you nned to consider a somehow defined current.
Often this is done with a resistor. --> resulting in a defined RC filter. It has a defined cutoff frequency.

For sure you may say the OPAMP may act as a current limiting device. I see two problems with this:
* the current limit is not really defined to act as a filter
* when the current limiting is active, then OPAMP get out of regulation and it may lead to ringing and oscillation.

Thus:
A series resistor at the OPAMP output --> to a capacitor results in a well defined low pass filter.
Tau = R x C
fc = 1 / (2 x Pi x R x C)

Some conditions need to be considered:
* is your "transient noise" cause at the output or at the input of the OPAMP
* do you have DC load at the output while you need DC accuracy at the output?

If the noise comes from the OPAMP input side, then it´s the better way to put the filter in front of the OPAMP

If the noise is caused at the output, then you should put the RC at the output. But this may cause DC error due to voltage drop at the resistor. To avoid this you may do some kind of DC feedback from the capacitor (not directly from OPAMP_output)

As so often .. it may look simple, but in detail it depends on the requirements of the application.
.. there is no "one and only perfect solution"

Klaus
 

Cload limitations at output LM358 -

1641819598264.png


Look at the phase margin unity G not exactly huge, for just 20 pF.

1641820038507.png


Also the slew rate of LM358 horrible for trying to make accurate measurements in 350 Khz signal path
for monitoring -

1641820191300.png


And I see no caps on supply pins ....? The PSRR of an OpAmp degrades with frequency, in LM358 -

1641820393774.png


When you use caps not all caps, for same C, have equivalent ESR performance -

Imp_vs_f.gif


Regards, Dana.
 
Last edited:

    vishweshgm

    Points: 2
    Helpful Answer Positive Rating
Nothing has been said about the implemented current control alorithm. Presuming that it's based on average rather than peak current, LM358 might be fast enough, even with about 10 - 20 k effective bandwidth set by the 1 uF capacitor. With an electrolytic capacitor, the loop is most likely marginally stable due to ESR.

Of course we would prefer a proper designed amplifier, if intended with defined low-pass.
--- Updated ---

To solve diode heating only solution is to replace with a finer low-drop diode which I am yet to search digikey.
I guess you can't save more than 20 - 30 % of diode power disspation by using lowest available forward voltage. A synchronous rectifier build with a second MOSFET would be the preferred solution.
 
Last edited:

Status
Not open for further replies.

Similar threads

Part and Inventory Search

Welcome to EDABoard.com

Sponsor

Back
Top