Continue to Site

Welcome to EDAboard.com

Welcome to our site! EDAboard.com is an international Electronics Discussion Forum focused on EDA software, circuits, schematics, books, theory, papers, asic, pld, 8051, DSP, Network, RF, Analog Design, PCB, Service Manuals... and a whole lot more! To participate you need to register. Registration is free. Click here to register now.

Proteus resistor size!

Status
Not open for further replies.

epilot

Member level 2
Member level 2
Joined
May 2, 2006
Messages
46
Helped
0
Reputation
0
Reaction score
0
Trophy points
1,286
Visit site
Activity points
1,642
Hello guys,

I have several 0.4in resistors in Proteus software which want to movie them to PCB section. I just want to use the said resistors in Standup state so that reduce the size of my PCB layout. a size between 0.2 inch and 0.15 inch would be ok. Can you guys tell me please how to change the size of a resistor or how to do what I need? I made a search but I was not able to find any suitable resistor with the sizes Which I need.

Thanks for any help
 

I have made a few custom sizes, download the attachment and copy the files to C:\Program Files\Labcenter Electronics\Proteus 7l\LIBRARY (this is the default location if you have a different one change accordingly)

The file includes the following (all in mil)
RES10
RES15
RES20
RES30
RES70
RES80

You can change the package in ISIS or ARES.

ISIS:
Double click in ISIS schematic the resistor you want and you will see in the dialog a property named PCB Package (a drop down list), by default it included the RES40, RES50 etc, in order to use the new sizes you have to type the new value (for example RES15) because it will not be available in the list.

If you want the new packages to be available in the list then you have to create a new component and assign the above packages to it.

ARES:
Double click the resistor and change the package property by typing any of the above names (RES10, RES15 etc)

Alex
 

Attachments

  • resistors.zip
    1.2 KB · Views: 883
Last edited:
I have made a few custom sizes, download the attachment and copy the files to C:\Program Files\Labcenter Electronics\Proteus 7l\LIBRARY (this is the default location if you have a different one change accordingly)

The file includes the following (all in mil)
RES10
RES15
RES20
RES30
RES70
RES80

you select the package if you double click in the ISIS schematic resistor and select in PCB Package one of the above names (it will not show in the drop down list if you don't add it in the component library but you can write it anyway) or you can change the package in ARES too by double clicking the resistor and changing package property

Alex

Thank you very much Alex for all your help.
I added it in my library but I am not able to use it because I am not able to see what You meant in your 3 last sentences. Can you let me know exactly what to do so that I could use it in the schematic and PCB sections?

By the way are you meaning that I can just change the name of my current resistor (i.e the 0.4 inch ones) to the new ones you gave me without needing to replace them?

Thanks again

---------- Post added at 15:51 ---------- Previous post was at 15:45 ----------

By the way As you seem to be an expert in the Proteus software can you please tell me how I change the size of the traces and holes is the PCB?
I want to change the size of all trances simultaneity.

Thanks
 

Double click the resistor and change (using the keyboard) the package from RES40 to RES15 or RES20 etc

There is no option to change all traces at the same time, you have to right click on them and change the size one by one but there is a shortcut that you may want to use if you intend to change all the traces of a specific size, you can select the track mode (fourth icon from the top) and double click the track that you want to change (for example if you click the T20 you can edit all the T20 traces) and change the width property to a different width, also leave the selection to local settings so that it doesn't make a global change.
Note that this will change all the T20 in the project to the new size

Alex
 
  • Like
Reactions: epilot

    epilot

    Points: 2
    Helpful Answer Positive Rating
Thanks Alex,
It seems that I am not able to change the resistors to say RES15 directly in PCB section, right?

By the way I was not able to find the "track mode"?! I am using Proteus 7.6....
 

Why can't you do it in ARES?
Double click the resistor and change the package property by typing any of the above names (RES10, RES15 etc)

The track mode is the fourth icon in the icon list on the left, first is arrow then opamp then IC and the next icon is the track icon
 
Why can't you do it in ARES?
Double click the resistor and change the package property by typing any of the above names (RES10, RES15 etc)

Really I don't know the reason. to solve the problem I just changed the pachage of in the schematics mode, and then created the PCB. It works just fine and I could replace the RES40 by RES10.

The track mode is the fourth icon in the icon list on the left, first is arrow then opamp then IC and the next icon is the track icon

Yea I found it . thanks for it.

Alex do you know how can I write my name on the coper section of the PCB please?

Thanks a bunch
 

To write text select the 2D text mode (letter A icon in the low section of the icons) then select the red or blue layer (instead of silk layer which is the default) and write your text.

I'm trying to understand why can't you make it work in Ares.
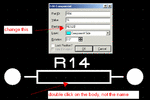
Maybe you are clicking in the wrong place, you have to click on the body of the resistor (lines) not the name, see the image

ARES.GIF

Also I prefer to edit the schematic because if you reopen the PCB from the schematic editor (ISIS) any change you have made in ARES will be lost.
If you change the resistors in ARES then you should always open the PCB (LYT) file directly or you will loose changes if you call ARES from the ISIS menu.

Alex
 
To write text select the 2D text mode (letter A icon in the low section of the icons) then select the red or blue layer (instead of silk layer which is the default) and write your text.

Yea, It worket thanks a lot Alex.

I'm trying to understand why can't you make it work in Ares.
Maybe you are clicking in the wrong place, you have to click on the body of the resistor (lines) not the name, see the image
View attachment 61612

Thats excately what I did, But I could not perform the property!

Alex, So sorry for a lot of questions but can you let me know how can I incrase the width of the coper circles around the holes too? I want to add a wire on my PCB but the circle trace seems to have no enough copper around and so I am worried maybe the circle trace cutts off by shacking the wire...

---------- Post added at 20:39 ---------- Previous post was at 19:55 ----------

I forgot to ask, Don't you think that I can chose the width of the trances by auto router or something so? I do not like the default width of the trances, though I do not know how can I change the property before auto routing??
 

Thats exactly what I did, But I could not perform the property!
I don't understand what you mean by that, what does "perform the property mean", please describe what you change, to what value and what is the result.
Do you see the property, are you able to write a new value?

The circle pads
you can easily change any one of them by selecting any pad from the list on the left (round or square pad icon) click once in the empty space to see the pad and then move it over the one you want to replace, when it is exactly centered you will see a dotted circle around the pad, click and the pad will be replaced.
The alternative is the same trick we did before, set the cursor over any of the pads you want to change in order to see in the pad style in the status bar (unless you already know it), for example the resistors use round pad C-70-30, click on the round pad icon on the left and double click the C-70-30 in the list and edit any property you like (hole size, diameter etc), all the pads of that type will be updated.

Auto routing trace style
Click the design rule manager icon from the tools menu (or from the icon next to the connectivity check), go to the second tab (net classes) and change the trace style from default to any width you like (for example T20).
Note that there are two net classes (NET and signal) and each one is set individually to the number of layers you want to be used and the trace width.
The power is used for the power supply lines so you may want to keep it thicket and the signal for the rest.
If you want to make a single layer routing then set both horizontal and vertical layers of pair 1 to the same layer instead of the default red-blue (two layer)

Alex
 
  • Like
Reactions: epilot

    epilot

    Points: 2
    Helpful Answer Positive Rating
First thank a bunch for your helps Alex, You are very kind:smile:

I don't understand what you mean by that, what does "perform the property mean", please describe what you change, to what value and what is the result.
Do you see the property, are you able to write a new value?

Well, Actually I can not change any component's package value directly through ARES, When I change any component by right click on the component then want to edit the value of the components package I receive an error saying that the package was not found. anyway I have no problem by that, Because I change the components through ISIS

Alex,
In Design rule manager I can not see any POWER, The net class has just the SIGNAL option.

Now I am trying to design a PCB for a regulated power supply using 78xx and 79xx, Now I have to problem for doing so.
First, I do not know how to change the signal to the power as I told in above and if needed.
second, I do not know how to design a PCB having very very width traces for the ground, Something like this I mean:
**broken link removed**

Is there any trick doing so?

Thanks like always....
 

Actually to change the property of the resistor in ARES I double click the left button but the right click works as well and in either case I don't understand how can it find the package when it is opened from ISIS and not when you enter it directly in ARES?

I think the power group is there if you use power in your design but even if it isn't it doesn't matter, these are just groups if you want to have different sets for the traces of each group.

The wide pad can be created with the zone mode (6th icon from top), to create it you either left click and drag the cursor (square shape) or use multiple left clicks to make a polygon but you have to close the shape (where it started).
Then you will see a dialog, select the net where this pad will be connected (usually gnd) the layer and how it will be shown, default is dimmed but I prefer normal, after it is created you can edit it using the cursor and double clicking in the border of the shape.
Play with the settings to get the feeling for it.

Alex
 
  • Like
Reactions: epilot

    epilot

    Points: 2
    Helpful Answer Positive Rating
Alex, I know where the zone mode is, But actually I did not get how to create a VERY wide trace (Please take a look at the ground trace of the link of my above post ) for ground and how to find POWER option?
I thought maybe there is a trick to wide the ground and VCC traces if needed by a button or something so...?
 

What you have asked is a wide ground area so I think that the zone achieves better what you want but you can also right click on a trace and replace it with a different width is this is what you want.
If the available widths are not wide enough then add your own and use that.
You can also add shares to cover an are if you think it suits you.

About the power class, it is added if you add any power or ground in your schematic, I don't know of a way to add in inside ARES.
You can probably create more classes in ISIS but I haven't done anything like that.

Alex
 
  • Like
Reactions: epilot

    epilot

    Points: 2
    Helpful Answer Positive Rating
Thanks a bunch Alex for all your inputs and for all your helps.

Is there ANY final difference if choice the POWER or the SIGNAL class?

Sorry but I've got 2 other question. I Think that the Proteus has a float scope or something so in addition to its common scope, Can you tell me Where is it? If my brain helps I guess it had a widow like Fourier window or so... The common Scope of the Proteus is not so good I think. It was great if the software had an digital scope showing the parameters of a wave like frequency, RM, P-P values and so on.

The other question is: how can I see the frequency response diagram of an amplifier based on op-amps in the Proteus???

Thanks again
 

The POWER and SIGNAL class just represent two groups with individual settings, I personally use the same settings and then I make manual changes in the routed tracks directly where I need to.

I don't know of a float scope but you can use the analog graph instead, add one probe in each of the two nodes and then add them in the graph (right click -> add traces) as probe P1 and probe P2 and in the expression field use P1-P2, this will show the voltage of the probe selected in P1 with reference to P2.
Double click on the graph to set the duration of the simulation and press space bar while the cursor is over the graph to simulate

For the frequency response add a frequency graph, double click on the graph to change the settings, the reference should be the input source

Alex
 

Status
Not open for further replies.

Similar threads

Part and Inventory Search

Welcome to EDABoard.com

Sponsor

Back
Top