Continue to Site

Welcome to EDAboard.com

Welcome to our site! EDAboard.com is an international Electronics Discussion Forum focused on EDA software, circuits, schematics, books, theory, papers, asic, pld, 8051, DSP, Network, RF, Analog Design, PCB, Service Manuals... and a whole lot more! To participate you need to register. Registration is free. Click here to register now.

MPLAB IDE PIC16F72 first project

Status
Not open for further replies.

atharva21

Newbie level 6
Newbie level 6
Joined
Jul 1, 2009
Messages
12
Helped
0
Reputation
0
Reaction score
0
Trophy points
1,281
Location
india
Activity points
1,384
Hi all,

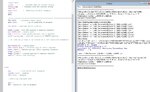
This is my first project to learn PIC and MPLAB IDE I am following the same instruction given in help file but still I am getting error.

Please correct me where I am going wrong.
PicT1.png
 

Hi,

You need to show the .asm code you are using ( enclose it in the # tags)

Also can you say / link which Tutorial you are using .
 

I think this is the code.

Have you selected MPASM as the toolsuite for the project?


Code ASM - [expand]
1
2
3
4
5
6
7
8
9
10
11
12
13
14
15
16
17
18
19
20
21
22
23
24
25
26
27
28
29
30
31
32
33
34
35
36
37
38
39
40
41
42
43
44
45
46
47
48
49
50
51
52
53
54
55
56
57
58
59
60
61
62
63
64
65
66
67
68
69
70
71
72
73
74
75
76
77
78
79
80
81
82
83
84
85
86
87
88
89
90
91
92
93
94
95
96
97
98
99
100
101
102
103
104
105
;**********************************************************************
;   This file is a basic code template for object module code         *
;   generation on the PIC16F72. This file contains the                *
;   basic code building blocks to build upon.                         *
;                                                                     *
;   Refer to the MPASM User's Guide for additional information on     *
;   features of the assembler and linker (Document DS33014).          *
;                                                                     *
;   Refer to the respective PIC data sheet for additional             *
;   information on the instruction set.                               *
;                                                                     *
;**********************************************************************
;                                                                     *
;    Filename:        xxx.asm                                         *
;    Date:                                                            *
;    File Version:                                                    *
;                                                                     *
;    Author:                                                          *
;    Company:                                                         *
;                                                                     * 
;                                                                     *
;**********************************************************************
;                                                                     *
;    Files required: P16F72.INC                                       *
;                                                                     *
;                                                                     *
;**********************************************************************
;                                                                     *
;    Notes:                                                           *
;                                                                     *
;                                                                     *
;                                                                     *
;                                                                     *
;**********************************************************************
 
 
    list        p=16f72        ; list directive to define processor
    #include    <p16f72.inc>    ; processor specific variable definitions
    
    __CONFIG   _CP_OFF & _WDTEN_OFF & _BODEN_OFF & _PWRTEN_ON & _RC_OSC
 
; '__CONFIG' directive is used to embed configuration data within .asm file.
; The labels following the directive are located in the respective .inc file.
; See respective data sheet for additional information on configuration word.
 
;***** VARIABLE DEFINITIONS (examples)
 
; example of using Uninitialized Data Section
INT_VAR        UDATA    0x20   
w_temp         RES     1        ; variable used for context saving 
status_temp    RES     1        ; variable used for context saving
 
 
; creating copies of interupt context saving variables in bank1
INT_VAR1       UDATA    0xA0
w_temp1        RES     1        ; variable used for context saving 
 
 
; example of using Uninitialized Data Section
TEMP_VAR       UDATA    0x22    ; explicit address specified is not required
temp_count     RES    1         ; temporary variable (example)
 
; example of using Overlayed Uninitialized Data Section
; in this example both variables are assigned the same GPR location by linker
G_DATA         UDATA_OVR        ; explicit address can be specified
flag           RES    2         ; temporary variable (shared locations - G_DATA)
 
G_DATA         UDATA_OVR   
count          RES    2         ; temporary variable (shared locations - G_DATA)
 
;**********************************************************************
RESET_VECTOR      CODE    0x0000      ; processor reset vector
    goto    start                     ; go to beginning of program
 
INT_VECTOR        CODE    0x0004      ; interrupt vector location
 
INTERRUPT
 
    movwf  w_temp          ; save off current W register contents
    bcf    STATUS,RP0      ; select bank0
    movf   STATUS,w        ; move status register into W register
    movwf  status_temp     ; save off contents of STATUS register
 
; isr code can go here or be located as a call subroutine elsewhere
 
 
    bcf    STATUS,RP0      ; select bank0
    movf   status_temp,w   ; retrieve copy of STATUS register
    movwf  STATUS          ; restore pre-isr STATUS register contents
    swapf  w_temp,f
    swapf  w_temp,w        ; restore pre-isr W register contents
    retfie                 ; return from interrupt
 
MAIN_PROG         CODE
 
start
 
    nop                    ; code starts here (example)
    banksel count          ; example
    clrf    count          ; example
 
; remaining code goes here
 
    goto $
    END                       ; directive 'end of program'


I am doing exactly as help file says. Yes I have selected MPASM toolsuite.

I have not modified any code so it should be good also help file also ask to build to confirm you are good upto this stage, then modify to learn.

Codes


;**********************************************************************
; This file is a basic code template for object module code *
; generation on the PIC16F72. This file contains the *
; basic code building blocks to build upon. *
; *
; Refer to the MPASM User's Guide for additional information on *
; features of the assembler and linker (Document DS33014). *
; *
; Refer to the respective PIC data sheet for additional *
; information on the instruction set. *
; *
;**********************************************************************
; *
; Filename: xxx.asm *
; Date: *
; File Version: *
; *
; Author: *
; Company: *
; *
; *
;**********************************************************************
; *
; Files required: P16F72.INC *
; *
; *
;**********************************************************************
; *
; Notes: *
; *
; *
; *
; *
;**********************************************************************


list p=16f72 ; list directive to define processor
#include <p16f72.inc> ; processor specific variable definitions

__CONFIG _CP_OFF & _WDTEN_OFF & _BODEN_OFF & _PWRTEN_ON & _RC_OSC

; '__CONFIG' directive is used to embed configuration data within .asm file.
; The labels following the directive are located in the respective .inc file.
; See respective data sheet for additional information on configuration word.

;***** VARIABLE DEFINITIONS (examples)

; example of using Uninitialized Data Section
INT_VAR UDATA 0x20
w_temp RES 1 ; variable used for context saving
status_temp RES 1 ; variable used for context saving


; creating copies of interupt context saving variables in bank1
INT_VAR1 UDATA 0xA0
w_temp1 RES 1 ; variable used for context saving


; example of using Uninitialized Data Section
TEMP_VAR UDATA 0x22 ; explicit address specified is not required
temp_count RES 1 ; temporary variable (example)

; example of using Overlayed Uninitialized Data Section
; in this example both variables are assigned the same GPR location by linker
G_DATA UDATA_OVR ; explicit address can be specified
flag RES 2 ; temporary variable (shared locations - G_DATA)

G_DATA UDATA_OVR
count RES 2 ; temporary variable (shared locations - G_DATA)

;**********************************************************************
RESET_VECTOR CODE 0x0000 ; processor reset vector
goto start ; go to beginning of program

INT_VECTOR CODE 0x0004 ; interrupt vector location

INTERRUPT

movwf w_temp ; save off current W register contents
bcf STATUS,RP0 ; select bank0
movf STATUS,w ; move status register into W register
movwf status_temp ; save off contents of STATUS register

; isr code can go here or be located as a call subroutine elsewhere


bcf STATUS,RP0 ; select bank0
movf status_temp,w ; retrieve copy of STATUS register
movwf STATUS ; restore pre-isr STATUS register contents
swapf w_temp,f
swapf w_temp,w ; restore pre-isr W register contents
retfie ; return from interrupt

MAIN_PROG CODE

start

nop ; code starts here (example)
banksel count ; example
clrf count ; example

; remaining code goes here

goto $
END ; directive 'end of program'


Thanks all for quick response
 

I have attached zip file.

Still I am confused why I am getting this error

Make: The target "C:\Program Files\Microchip\MPASM Suite\Template\Object\16F72TMPo_O" is out of date.


I think this will give you more information.
 

Attachments

  • Tutorial1.zip
    13.3 KB · Views: 94

There is no asm file in the profect so you are getting error(s). copy the contents of template file to another file and save it as asm file and include it in the project and then assemble. It will work. You are trying to use .inc file as project file instead of asm file.
 

If I look at project

Source file 16F72TMPO.ASM this file you want copy and save as ??? where to add in source file? or other location?

And I have header file 16F72.inc

Sorry it may simple I am little confused.

I do not have any file in Library files, object files, linker script .
 

16F72.ic will be in Compiler folder. Don't touch that. Create a new asm project and then select new file. copy past the asm code into it and save file. In save file dialog there is option to add file to project. Check that. Compile and tell the result. File should be saved as .asm file.
 

Jaynath thanks for giving time.

I got some solutions for my problem.

I did save asm file (copy code in notepad and then save it as asm file) and try to build new project adding two files one asm and one inc (header file) but same error.

Now I have changed the build option to generate relocateable code it was absolute. ( I need to read this )

now I am getting one error

Error - section 'INT_VAR' can not fit the absolute section. Section 'INT_VAR' start=0x00000020, length=0x00000002
Errors : 1
 

Jayanth

You can use same zip file only change the build options.
 

My project build is failed so how I can get ASM file. I have tried zip it and all other options but in vain. made new folder for project but can not see asm file there.
Need some guideline to move ahead
 

My project build is failed so how I can get ASM file. I have tried zip it and all other options but in vain. made new folder for project but can not see asm file there.
Need some guideline to move ahead


Hi,

Its interesting that a few people have started doing Assembly using Relocatable code - its really not the way to start- you should use Absolute mode.
Some of Microchips tutorials are very old or not aimed at the hobbyist.

Suggest you create a new project using the Project wizard, add this code and it should build ok.

When you build it, it may ask if you want Absolute or Relocatable code - reply Absolute.
If it fails to build , check the project , Build options. MpAsm suite is set to Absolute or Ask Me.
If anything else fails come on back with the details

For good Free tutorials in Absolute Assembler see these links.

http://www.winpicprog.co.uk/pic_tutorial.htm
**broken link removed**

Code:
	list p=16f72 ; list directive to define processor
	#include <p16f72.inc> ; processor specific variable definitions
	
	__CONFIG _CP_OFF & _WDTEN_OFF & _BODEN_OFF & _PWRTEN_ON & _RC_OSC
	
	; '__CONFIG' directive is used to embed configuration data within .asm file.
	; The labels following the directive are located in the respective .inc file.
	; See respective data sheet for additional information on configuration word.
	
	;***** VARIABLE DEFINITIONS (examples)  ABSOLUTE MODE
	
	CBLOCK 0X020
	w_temp 			 ; variable used for context saving 
	status_temp		; variable used for context saving
	TEMP_VAR  
	temp_count		 ; 	temporary variable (example)
	count 
	ENDC

	;************************************************* *********************
	ORG 0x000	 ; processor reset vector
	goto start			 ; go to beginning of program
	
	ORG 0x004 ; interrupt vector location

	movwf w_temp ; save off current W register contents
	bcf STATUS,RP0 ; select bank0
	movf STATUS,w ; move status register into W register
	movwf status_temp ; save off contents of STATUS register
	
	; isr code can go here or be located as a call subroutine elsewhere
	
	
	bcf STATUS,RP0 ; select bank0
	movf status_temp,w ; retrieve copy of STATUS register
	movwf STATUS ; restore pre-isr STATUS register contents
	swapf w_temp,f
	swapf w_temp,w ; restore pre-isr W register contents
	retfie ; return from interrupt


start
	
	nop			 ; code starts here (example)
	banksel count ; example
	clrf count ; example
	
	; remaining code goes here
	
loop	goto loop
	END ; directive 'end of program'
 

Attachments

  • 000027.jpg
    000027.jpg
    139.4 KB · Views: 135
WP100,
Thanks,

Your code works fine with absolute mode. I have copied both code in notepad and looking for difference what I can understand from it.

This will help me to start with basic programs Like LED and Push button. I have old parallel port programmer PCB4.5C. I have build circuit to read PIC using ICSP port and reading writing HEX file is working good.

Still I will need to look in clock frequency and then I will build another board to test the circuit. I have 16Mhz crystal (3pin) or may be I will buy 4 MHz or so and move ahead.

I will build HEX file from MPLAB and then I can use it with PCB4.5C software.

Where I can find the information about Relocatable and absolute code?

I will post my progress and for problem you guys are always helping.
 
Last edited:

WP100,
Thanks,

Your code works fine with absolute mode. I have copied both code in notepad and looking for difference what I can understand from it.

This will help me to start with basic programs Like LED and Push button. I have old parallel port programmer PCB4.5C. I have build circuit to read PIC using ICSP port and reading writing HEX file is working good.

Still I will need to look in clock frequency and then I will build another board to test the circuit. I have 16Mhz crystal (3pin) or may be I will buy 4 MHz or so and move ahead.

I will build HEX file from MPLAB and then I can use it with PCB4.5C software.

Where I can find the information about Relocatable and absolute code?

I will post my progress and for problem you guys are always helping.


Hi,

Yes a simple led flasher and reading a push button is the right way to start.

As you will have seen from those tutorials I linked, most web based Assembly code is in Absolute mode; simpler and easier to use.
The main difference is that user variables are given specific ram locations .


There are many varying views about relocatable or absolute code but think the general view is that for diy use absolute is all thats needed.
I do not know of a clear guide showing the differences between the two, but these links might enlighten you.

https://www.microchip.com/forums/m46653.aspx
https://forum.allaboutcircuits.com/showthread.php?t=56172


Regarding the crystals, you need to change the OSC parameter in the Config line of code, for the type of oscillator you are using.
For a 4meg Xtal you use _XT_OSC for above 4meg you use _HS_OSC.

To save having to buy and use crystals there are quiet a few pic16F chips that have very good internal oscillators, typically up to 4 or 8 mhz ( dividable).
However that depends on supply in your area and importantly if your programmer supports those chips.

- - - Updated - - -

Hi,

While Nigels tutorial is a good one to use, you might be finding it difficult to use his code on your F72 chip as you will not yet know how to modify his code to make it compatible.

Here is his flashing led routine I have changed to run on your chip - hopefully a lot clear than the relocatable code you started with.

Code:
;Tutorial 1.2 - Nigel Goodwin 2002  - Modified for Pic16f72

	LIST	p=16F72				;tell assembler what chip we are using
	include "P16F72.inc"		;include the defaults for the chip

	__CONFIG _CP_OFF & _WDTEN_OFF & _BODEN_OFF & _PWRTEN_ON & _HS_OSC
								; Configuration code using a 16mhz Crystal

	cblock 	0x20 				;start of general purpose registers / user variables
	count1 						; delay routine work files
	counta 			
	countb 						
	endc


	org	0x0000					;org sets the origin, 0x0000 for the 16F72
								;this is where the program starts running	


								; set up the chips Ports
	clrf	PORTA				; clear all PORTS
	clrf 	PORTB
	banksel	ADCON1				; select Ram Bank 1
	movlw	0x06				; set all ports from Defualt Analogue to Digital
	movwf	ADCON1
	clrf	TRISA				; set all Ports to Digital Outputs
	clrf	TRISB

   	banksel 0 					;return to Ram bank 0

Loop	
	movlw	0xff
	movwf	PORTA				;set all bits on
	movwf	PORTB

	call	Delay				;this waits for a while!

	movlw	0x00
	movwf	PORTA
	movwf	PORTB				;set all bits off

	call	Delay

	goto	Loop				;go back and do it again


; subroutine


Delay							; delay 500ms using 16mhz crystal
	movlw	0x11
	movwf	count1
	movlw	0x5D
	movwf	counta
	movlw	0x05
	movwf	countb
Delay_0
	decfsz	count1, f
	goto	dlya
	decfsz	counta, f
dlya
	goto	dlyb
	decfsz	countb, f
dlyb
	goto	Delay_0

	return

	end  						; end of program code
 
Status
Not open for further replies.

Similar threads

Part and Inventory Search

Welcome to EDABoard.com

Sponsor

Back
Top