jcjc
Newbie level 3

Hello,
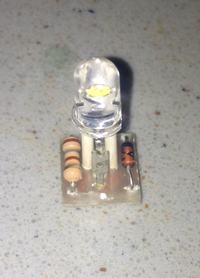
First, my knowledge and experience with electronics is very limited to say the least. So I have a vintage gaming machine made in 1975 that uses some old bayonet base lamps. Basically, the player shoots a ball into a numbered pocket and the corresponding light comes on. The light sockets are fairly corroded and so is the circuit board they're mounted to. I pulled the sockets off, cleaned the board and made a mount for an LED and it's resistor. I soldered the first one in and it worked fine. I made another and soldered it in and when the power is turned on, the LEDs come on by themselves but they are dim. So I tripped the switches controlling each one and they go from dim to their normal brightness as I expected. It seems there's some residual current in the circuit which may be normal but the LEDs are sensitive enough to "pick" it up. Also, in the past I had an engineer make some LEDs for this same type of conversion on a similar machine. His work perfectly and they have another component that I can't identify. From comparing pics online it looks like a small signal Schottky diode. I really dont't know what that is but was hoping someone here could comment both on the above problem and what the unknown (to me) component is and if is there to stop the LEDs from staying on. Here is a pic of the device that was made for me and works fine. These have a different mounting style and have different electrical specs or I would just place a few of these in the machine in question and see what happens. The component I'm trying to identify is the small cylinder on the left side of the base. Thanks for your time.

- - - Updated - - -
I meant I'm trying to identify the component on the Right side of the base. Thanks.
First, my knowledge and experience with electronics is very limited to say the least. So I have a vintage gaming machine made in 1975 that uses some old bayonet base lamps. Basically, the player shoots a ball into a numbered pocket and the corresponding light comes on. The light sockets are fairly corroded and so is the circuit board they're mounted to. I pulled the sockets off, cleaned the board and made a mount for an LED and it's resistor. I soldered the first one in and it worked fine. I made another and soldered it in and when the power is turned on, the LEDs come on by themselves but they are dim. So I tripped the switches controlling each one and they go from dim to their normal brightness as I expected. It seems there's some residual current in the circuit which may be normal but the LEDs are sensitive enough to "pick" it up. Also, in the past I had an engineer make some LEDs for this same type of conversion on a similar machine. His work perfectly and they have another component that I can't identify. From comparing pics online it looks like a small signal Schottky diode. I really dont't know what that is but was hoping someone here could comment both on the above problem and what the unknown (to me) component is and if is there to stop the LEDs from staying on. Here is a pic of the device that was made for me and works fine. These have a different mounting style and have different electrical specs or I would just place a few of these in the machine in question and see what happens. The component I'm trying to identify is the small cylinder on the left side of the base. Thanks for your time.

- - - Updated - - -
I meant I'm trying to identify the component on the Right side of the base. Thanks.


